background image

11

Remote control (RUE-4119)

a

Avoid dropping this remote control or placing it in pants pockets. Doing so may cause
damage to the case or buttons, shorten battery life or cause the system to malfunction.

a

To clean this device, wipe it with a dry cloth. (If it is extremely dirty, wipe it with a wrung
damp cloth.) Never use benzene, paint thinner or harsh chemicals which can cause
deterioration of the case or paint.

a

Do not expose this remote control to direct sunlight (i.e. on the dashboard) for extended
periods of time.

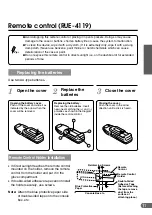
Replacing the batteries

Use two AA-type batteries.

Open the cover

1

Opening the battery cover.

Push on the cover and slide it as
indicated by the arrows then the
cover will be removed.

Replacing the battery.

Remove the old batteries. Insert
new ones matching the (+) and (–)
polarities as shown in the diagram
inside the remote control.

Closing the cover.

Push the cover in the arrow
direction until a click is heard.

2

Close the cover

3

Replace the
batteries

Tips

Remote Control Holder Installation

If direct sunlight reaches the remote control
mounted on the holder, remove the remote
control from the holder and put it in the
glove compartment.

If double-sided adhesive tape cannot install
the holder securely, use screws.

Note:

Attach the blue protective paper side
of double-sided tape onto the console
box, etc.

+

+

Blue Protective
Paper

Console Box etc.

Reinforcing Screws

Remote
Control

Remote Control
Holder

Double-Sided
Adhesive Tape
(Before attaching
the tape, remove
dust from the
surface of
attaching place.)

Summary of Contents for NVE-N871A

Page 1: ...a Tel 03 9769 0000 ALPINE ELECTRONICS GmbH Kreuzerkamp 7 11 40878 Ratingen Germany Tel 02102 45 50 ALPINE ITALIA S p A Via C Colombo 8 20090 Trezzano Sul Naviglio MI Italy Tel 02 48 47 81 ALPINE ELECT...

Page 2: ...location before attempting to access the system Do not use the navigation system to route you to emergency services Not all locations of emergency service providers such as police and fire stations ho...

Page 3: ...imes when the car is in motion This will help you avoid impact with anything in the car s interior including the system itself Be sure to reset the system before starting operation whenever the system...

Page 4: ...to alert you to potential dangers resulting from improper connections and operation Following are the meanings of these pictorial displays It is important to fully understand the meanings of these pi...

Page 5: ...ILLEGAL MANEUVER OR PLACES YOU IN AN UNSAFE SITUATION OR AREA This product is not a substitute for your personal judgment Any route suggestions by this system should never supersede any local traffic...

Page 6: ...lure to do so may cause personal injury or damage to the product Return it to your authorized Alpine dealer or the nearest Alpine Service Center for repairing DO NOT MIX NEW BATTERIES WITH OLD BATTERI...

Page 7: ...Systems Overview 8 Before Using This System Remote control RUE 4119 Names of Parts 10 Replacing the batteries 11 Remote Control Holder Installation 11 Main unit Inserting the DVD ROM 12 Removing the...

Page 8: ...signals GPS Global Positioning System This system receives signals from 3 or more GPS satellites operated by the United States Department of Defense They orbit at an altitude of 13 100 miles 21 000 ki...

Page 9: ...ots Locations surrounded by tall buildings Locations surrounded by tall trees On the bottom level of double decker express ways When a GPS satellite is low on the horizon angle below 10 obstructions s...

Page 10: ...ound is produced to execute your selection MENU button Displays the main menu screen VOICE button Press this button for voice guidance Real time voice guidance LIST button Displays list of the streets...

Page 11: ...the arrows then the cover will be removed Replacing the battery Remove the old batteries Insert new ones matching the and polarities as shown in the diagram inside the remote control Closing the cover...

Page 12: ...tment door If a DVD ROM is already in the main unit remove it by referring to Removing the DVD ROM section Insert the DVD ROM with the label side facing up When you insert the DVD ROM into a certain p...

Page 13: ...ON position The opening screen appears on the monitor display Insert your DVD ROM For instructions on inserting the DVD ROM see page 12 After completing the above steps please refer to the DVD ROM us...

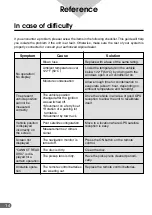
Page 14: ...tellite reception is easy Press the ON button on the remote control Clean the disc Have the pickup lens cleaned periodi cally Replace the remote control batteries Symptom No operation No display The p...

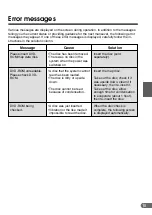
Page 15: ...tion Insert the disc sold separately Insert the map disc Take out the disc check if it was upside down clean it if necessary then re insert it Take out the disc allow enough time for condensation to e...

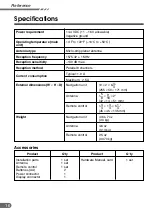
Page 16: ...set Product Installation parts Antenna Remote control Batteries AA Power connector Display connector 14 4 VDC 11 16 V allowable negative ground 14 F to 122 F 10 C to 50 C Micro strip planar antenna 1...

Page 17: ...17 Note...

Page 18: ...18 Reference Note...

Page 19: ...19 Note...

Reviews: