background image

1

Pump

Pre-Filter 

Cage

B

4

A

4

Pump

Pump 

Cover

2

A

Pump

Pump 

Cover

2

B

A

3

Pump

Impeller

B

3

Impeller

Impeller

Pump

Garden 

Hose

Garden 

Hose

Soft Bristle 

Brush

Soft Bristle 

Brush

Pump

14

If you have thoroughly cleaned the mesh bag and pre-filter cage and still 

have diminished flow rates, then you will need to remove and inspect the 

impeller and internal pump body.

IMPORTANT:

 The pump impeller includes a high quality ceramic shaft 

that provides long-lasting, reliable performance when properly maintained. 

However, extreme care should be taken when handling the shaft during 

maintenance. Avoid dropping or pressing too hard on it to avoid breakage or 

hairline fractures, which may cause the shaft to snap while in operation.

1.  Remove the pre-filter cage by pulling it off the front of the pump.

CLEANING AND REPLACING THE IMPELLER

2.  Twist the pump cover to the left until the slots at the back clear the tabs 

at the front pump body. Remove the pump cover from the pump body.

3.  Twist the impeller to the left until the tabs clear the slots on the inner 

pump body. Remove the impeller from the pump body.

Summary of Contents for VORTEX PEG1800

Page 1: ...elp with assembly Contact us and we will resolve them within 12 hours Support Hours M F 7 30 5 00 U S Pacific Time Call 877 460 4511 Text 323 201 4431 Email info alpine4u com Owner s Manual v1 0 Item s PEG1800 PEG3000 PEG4700 PEG5600 ...

Page 2: ......

Page 3: ... Installation Guidelines 9 Typical Installation Pump Placement 10 Typical Installation Tube Connections 11 Maintenance 13 Cleaning the Pre Filter Cage 13 Cleaning and Replacing the Impeller 14 Adjusting the Adapter Angle 16 Winter Pump Care 16 Troubleshooting 17 Disposal 17 Replacing and Disposing of Batteries 18 Limited 3 Year Warranty 18 ...

Page 4: ...25 up to 2 connector outlets This pump is equipped with a pre filter cage which handles solids up to a quarter inch in size Place the pump in the included mesh bag to prevent damaging debris from entering your pump and keep maintenance to a minimum Your Alpine Vortex pump is oil free magnetic driven and is epoxy protected with a ceramic shaft for long lasting dependable performance backed by a Thr...

Page 5: ...nded use i e do not use in swimming pools aquariums etc Not to be used as a sump pump Do not use this pump in swimming pools or other situations where people are immersed If an extension cord is necessary ensure connection is watertight and dust proof A cord with proper rating should be used A cord rated for less amps or watts than the appliance rating may overheat Arrange the cord so that it will...

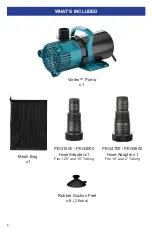
Page 6: ...6 WHAT S INCLUDED WHAT S INCLUDED PEG1800 PEG3000 Hose Adapter x1 Fits 1 25 and 1 5 Tubing PEG4700 PEG5600 Hose Adapter x1 Fits 1 5 and 2 Tubing Rubber Suction Feet x6 2 Extra Mesh Bag x1 Vortex Pump x1 ...

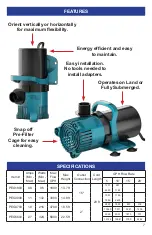
Page 7: ... 132 3000 14 8 ft 1997 1169 7559 4425 PEG4700 1 8 216 4700 18 5 ft 2 2890 1852 851 318 10940 7011 3221 1204 PEG5600 2 7 324 5600 22 5 ft 3998 2901 1873 701 15134 10981 7090 2654 Orient vertically or horizontally for maximum flexibility Operates on Land or Fully Submerged Easy installation No tools needed to install adapters Energy efficient and easy to maintain Snap off Pre Filter Cage for easy cl...

Page 8: ...0 2 25 MPT Pump Inlet Pump Body Cover Impeller O Ring Pump Body with Handle 9 9 8 Alpine Pump SKU Alpine Replacement Part Description Impeller PEG1800 PEG1800 IMP Impeller for PEG1800 PEG3000 PEG3000 IMP Impeller for PEG3000 PEG4700 PEG4700 IMP Impeller for PEG4700 PEG5600 PEG5600 IMP Impeller for PEG5600 O Ring PEG1800 PEG3000 PEG1830 OR O Ring for PEG1800 PEG3000 PEG4700 PEG5600 PEG4756 OR O Rin...

Page 9: ... without the pre filter cage on Do not wear loose clothing that may become entangled in the impeller or other moving parts during installation Keep clear of inlet and outlet openings DO NOT insert fingers in pump with power connected Do not pump hazardous materials or liquids such as oil saltwater or organic solvents Be sure no debris will block or restrict the pre filter cage from water entering ...

Page 10: ...erged Raise Pump to minimize soil intake Remove Pre Filter Cage and connect suction hose See Page 8 for inlet sizes Position pump below water level and use check valve at end of pipe NOTE Check valve prevents primer motor burnout Connect Tubing to water feature Fountain shown Use GFCI Outlet ONLY Ensure Pump is primed BEFORE connecting 10 TYPICAL INSTALLATION PUMP PLACEMENT The Vortex pump is desi...

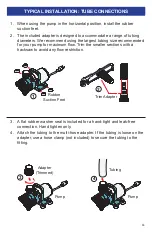
Page 11: ...ion install the rubber suction feet 2 The included adapter is designed to accommodate a range of tubing diameters We recommend using the largest tubing size recommended for your pump for maximum flow Trim the smaller sections with a hacksaw to avoid any flow restriction 3 A flat rubber washer seal is included for a hand tight and leak free connection Hand tighten only 4 Attach the tubing to the mu...

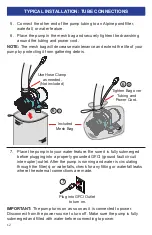
Page 12: ... and power cord NOTE The mesh bag will decrease maintenance and extend the life of your pump by protecting it from gathering debris 7 Place the pump into your water feature Be sure it is fully submerged before plugging into a properly grounded GFCI ground fault circuit interrupter outlet After the pump is running and water is circulating through the filter s or waterfalls check for any fitting or ...

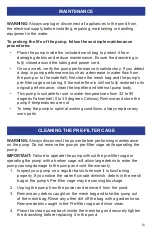
Page 13: ... degrees Celsius Remove and store the pump if temperatures are not To keep the pump in optimal working conditions always replace any worn parts MAINTENANCE CLEANING THE PRE FILTER CAGE WARNING Always disconnect the power before performing maintenance on the pump Do not remove the pump s pre filter cage while operating the pump IMPORTANT Failure to operate the pump without the pre filter cage or op...

Page 14: ...hen properly maintained However extreme care should be taken when handling the shaft during maintenance Avoid dropping or pressing too hard on it to avoid breakage or hairline fractures which may cause the shaft to snap while in operation 1 Remove the pre filter cage by pulling it off the front of the pump CLEANING AND REPLACING THE IMPELLER 2 Twist the pump cover to the left until the slots at th...

Page 15: ...p Pump Cover A 4 Impeller Clean with Soft Bristle Brush and warm water B 4 Pump Impeller Pump A 5 Pump Impeller B 5 15 CLEANING AND REPLACING THE IMPELLER 4 If your impeller and internal pump body have excessive scale build up soak with any cleaning solution that removes calcium lime and rust Rinse with warm water and a sponge or soft bristled brush that won t scratch the stainless steel Removing ...

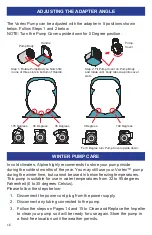
Page 16: ...t cannot be used in below freezing temperatures This pump is suitable for use in water temperatures from 32 to 95 degrees Fahrenheit 0 to 35 degrees Celsius Please follow the steps below 1 Disconnect the power cord plug from the power supply 2 Disconnect any tubing connected to the pump 3 Follow the steps on Pages 14 and 15 to Clean and Replace the Impeller to clean your pump so it will be ready f...

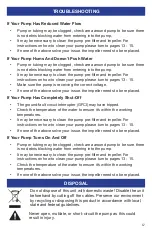
Page 17: ...p please turn to pages 13 15 Make sure the pump is receiving the correct voltage If none of the above solve your issue the impeller needs to be replaced If Your Pump Has Completely Shut Off The ground fault circuit interrupter GFCI may have tripped Check the temperature of the water to ensure it s within the working temperatures It may be necessary to clean the pump pre filter and impeller For ins...

Page 18: ...ear from date of purchase with the above exclusion Procedure Service Should a warranty claim be needed you should contact the retailer from whom you purchased the product If that is not an option you can contact Alpine Corporation at www alpine4u com When contacting Alpine Corporation you must be prepared to show proof of purchase provide photographs and any other information needed to validate yo...

Page 19: ......

Page 20: ...opyright Alpine Corporation 2021 Purchased your product online We would really appreciate it if you can share your experience with others by reviewing our product on the website from which you purchased ...

Reviews: