background image


hypercharger  - Operation Instructions and Installation Guide 

Version 1-1C


Page 48 of 57 

8


Maintenance


All rights reserved. The reproduction of this document, also partially, is allowed only with authorization by alpitronic s.r.l. 

8.  Maintenance 

Attention 


Attention 

 
Observe all hazard warnings in chapter 1.3 


8.1.  Overview of maintenance work 

For the safe operation of the charging station, regular maintenance or control of the safety 
equipment is required. All the points listed below are considered mandatory and must be 
carried out by the operator of the switchgear at the intervals described.  
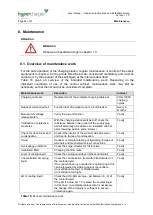
Table  16  gives  an  overview  of  the  intended  maintenance  work.  Depending  on  the 
individual  conditions  of  use  of  the  control  cabinet,  maintenance  work  may  still  be 
necessary so that the list cannot be considered complete. 
 

Maintenance work 

Execution 

Interval 

Charging cable set 

Replacement of the complete charging cable set 

After 10000 
charging 
cycles 

Residual current devices 

Function test of residual current circuit breaker 

Every 6 
months 

Main switch, voltage 
release switch 

Verify the correct function 

Yearly 

Verification of protective 
measures 

With the charging station switched off, check the 
resistance between the ground of the supply plug 
and all externally accessible, non-insulated cabinet 
parts (housing, add-on parts, screws) 

Yearly 

Check for cleanliness and 
condensation 

Check if the interior of the control cabinet is clean 
and has no traces of condensation. 

Yearly 

Screw 

Random or complete testing of tightening torques at 
terminals and mechanical screw connections. 

Yearly 

Overvoltage protection 

Check the surge arrester for full function 

Yearly 

Ventilation filters 

Changing the filter mats 

Yearly 

Level of cooling liquid 

Check the cooling liquid level (fill level indicator) 

Yearly 

Concentration of cooling 
liquid 

Check the concentration (test with refractometer) of 
the coolant liquid. 
If the concentration is outside the required range, this 
can be remedied by adding coolant concentrate 
(concentration too low) or distilled water 
(concentration too high). 

Yearly 

pH of cooling liquid 

Check the pH (optimal value - 

pH between 8…9) of 

the coolant liquid. 
If the pH is below pH 7.7, replace the coolant liquid. 
In this case, no complete replacement is necessary, 
the change of the majority is sufficient to ensure 
protection again. 

Yearly 

Table 16:

 Periodic maintenance work 

Summary of Contents for Hypercharger HYC 075

Page 1: ...hts reserved The reproduction of this document also partially is allowed only with authorization by alpitronic s r l Operation Instructions and Installation Guide hypercharger 75kW 300kW HYC_075 HYC_1...

Page 2: ...n Instructions and Installation Guide Version 1 1C Content All rights reserved The reproduction of this document also partially is allowed only with authorization by alpitronic s r l This page was int...

Page 3: ...ify us at info hypercharger it alpitronic S r l assumes no responsibility for any errors that may appear in this document This document is originally written in English Other language versions are a t...

Page 4: ...oduction of this document also partially is allowed only with authorization by alpitronic s r l Version History Version Date Author Description 1 1A March 2018 P Senoner First version 1 1B May 2018 Ch...

Page 5: ...harger configurations 22 3 6 1 HYC_075 configuration 22 3 6 2 HYC_150 configuration 23 3 6 3 HYC_225 configuration 24 3 6 4 HYC_300 configuration 24 4 Mechanical installation 26 4 1 Concrete foundatio...

Page 6: ...hypercharger 24 Figure 20 DC output power of the 300kW hypercharger whole DC power on one outlet 25 Figure 21 Naming of relevant components for the mechanical installation of the hypercharger 26 Figur...

Page 7: ...19 Table 8 DC output switchgear components for hypercharger HYC_225 and HYC_300 20 Table 9 AC input switchgear components for hypercharger HYC_225 and HYC_300 21 Table 10 Distances between base plate...

Page 8: ...n Instructions and Installation Guide Version 1 1C Content All rights reserved The reproduction of this document also partially is allowed only with authorization by alpitronic s r l This page was int...

Page 9: ...For the connection between the electric vehicle supply equipment EVSE and electric vehicle EV no additional cables are required besides from the one provided with the hypercharger A charging cord sho...

Page 10: ...replacement of components switch off the external group switch and the main switch in the hypercharger cabinet and do a voltage check to make sure that the electrical power is disconnected from the s...

Page 11: ...n by alpitronic s r l Hints Pushing the optionally installed Stop button see Fehler Verweisquelle konnte nicht gefunden werden on the front door stops charging disables charging The hypercharger power...

Page 12: ...the configuration of the charging station the following nameplate example may be located on the device Modell HYC_075 HYC_150 Manufactured 04 2018 Main voltage 3x 400 10 Frequency 50 5 Maximal input...

Page 13: ...r is delivered in a specialized wood packaging The following figure shows the packaging and size information for the two charger types Type W mm D mm H mm HYC_075 HYC_150 1200 800 2340 HYC_225 HYC_300...

Page 14: ...f this document also partially is allowed only with authorization by alpitronic s r l Figure 2 Vertical and horizontal transport with pallet truck or forklift In addition to the transport with a palle...

Page 15: ...s r l Attention The hypercharger must be stored in its original packaging in a dry environment from 40 C to 55 C The following table contains the weight indication for the single hypercharger types T...

Page 16: ...ended to transport the hypercharger to its final destination in its original packaging and unpack it there The following illustrations show the sequence to unpack the hypercharger Unpacking the hyperc...

Page 17: ...ly with authorization by alpitronic s r l 11 12 13 14 15 Open right side door Open front door Remove front acrylic glass cover Remove screws on the base plate of the hypercharger Close all doors lift...

Page 18: ...stack The HYC_150 is equipped with two hypercharger power stacks each 75kW and has a nominal power of 150kW The HYC_225 and the HYC_300 of the hypercharger product family have the same but larger hou...

Page 19: ...to give certain a minimum distance from possible objects around the hypercharger to allow adequate airflow and secondly space for possible service or maintenance operations Attention A mechanical ram...

Page 20: ...power stacks a clearance of at least 110cm must be available on the left side see D1 At least a distance of 1100mm D1 and 1000mm D3 must be maintained in front of the ventilation grilles to not impai...

Page 21: ...charger has three doors which allow access to the inside of the device The two narrow doors are equipped with a locking cylinder to lock the device The cylinder is a 10 30 mm profile half cylinder whi...

Page 22: ...and HYC_150 left front and right The following table describes the single components highlighted in the figures above Identifier Description BC1 DC fault current monitoring for AC charging optional o...

Page 23: ...harging QB7 Contactors for AC charging optional only when AC socket is present TB1 Auxiliary 24V power supply TB2 TB3 hypercharger power stacks TF1 Antenna 3G LTE or WLAN XD1 Mains input busbars XD2 P...

Page 24: ...utput switchgear of the HYC_075 and the HYC_150 The following table describes the single components highlighted in the table above Identifier Description BC1 DC fault current monitoring for AC chargin...

Page 25: ...vehicle cable connection XD6 DC outlet 2 XD4 2 DC busbar pole for vehicle cable connection XD6 DC outlet 2 Table 5 DC output switchgear components for hypercharger HYC_075 and HYC_150 The following f...

Page 26: ...the figures above Identifier Description BC1 DC fault current monitoring for AC charging optional only when AC socket is present BE3 AC meter BX1 1 BX2 1 DC outlet 1 isolation monitoring device BX2 2...

Page 27: ...cks TF1 Antenna 3G LTE or WLAN XD1 Mains input busbars XD2 Power socket 230Vac for service XD3 DC busbar for vehicle cable connection XD5 DC outlet 1 XD4 DC busbar for vehicle cable connection XD6 opt...

Page 28: ...tlet 1 isolation monitoring device BX2 2 BX1 2 DC outlet 1 isolation monitoring device optional only when DC outlet 2 is present FC1 1 FC1 2 DC outlet 1 fuses FC2 1 FC2 2 DC outlet 2 fuses KF3 CTRL_IO...

Page 29: ...HYC_225 and the HYC_300 The following table describes the single components highlighted in the figure above Identifier Description FA1 Lightning protection and EMI filter device FB1 32A circuit breake...

Page 30: ...urations of the products within each product family Figure 16 hypercharger configurations and options 3 6 1 HYC_075 configuration The hypercharger with 75kW has one built in 75kW hypercharger power st...

Page 31: ...cles at the same time with DC when equipped with two DC outlets one per stack maximum 75kW vehicle DC output power see Figure 17 If a vehicle to be charged requires a charging power greater than 75kW...

Page 32: ...utlet power In addition it is possible to have one 22kW AC socket installed The following figure shows the DC output power of the 225kW hypercharger Figure 19 DC output power of the 225kW hypercharger...

Page 33: ...with authorization by alpitronic s r l Figure 20 DC output power of the 300kW hypercharger whole DC power on one outlet Attention The total performance of the 300kW hypercharger is limited to one 500A...

Page 34: ...pacity analysis according to relevant norms The following figure defines the naming of relevant components for the mechanical installation Figure 21 Naming of relevant components for the mechanical in...

Page 35: ...mechanical impact protection as close as possible to the car park to be supplied 4 1 Concrete foundation The base plate is arranged eccentrically to the charging station The outer dimensions related t...

Page 36: ...d positions defined by the used foundation and the hypercharger base is screwed together with the adaptor see the following chapter To realize the mechanical mounting of the hypercharger on the concre...

Page 37: ...300 Figure 25 hypercharger base for the HYC_225 and HYC_300 front top view left Suitable washers are to be provide The hypercharger base is to screw together with the concrete foundation or with the a...

Page 38: ...paration of the foundation see chapter 4 1 Mounting of the adaptor to the concrete foundation see chapter 4 2 only if a universal foundation is used Mounting of the hypercharger base see chapter 4 3 P...

Page 39: ...HYC_150 The following figure shows the schematic of the hypercharger for the HYC_075 and the HYC_150 DC output switchgear AC input switchgear 400V 24VDC HYC CTRL_COM Display STACK AC DC HYC_150 only 4...

Page 40: ...play STACK AC DC HYC_300 only 4 lightning protection main switch 3 CCS or CHADEMO CCS or CHADEMO AC CCS 2 STACK AC DC FC2 2 2 2 4 STACK AC DC STACK AC DC 2 2 GRID KF1 TB1 QB1 125A 10kA 3 125A 10kA 3 1...

Page 41: ...with a clamping range of 27 39mm 34 45mm 44 55mm 1 x M20 Hole for a cable gland with a clamping range of 7 13mm 5 x M40 Hole for cable glands with a clamping range of 19 28mm 1 x M20 Hole for cable gl...

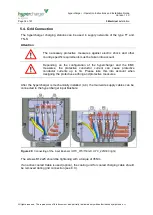
Page 42: ...n into account Depending on the configuration of the hypercharger and the EMC measures the protective conductor current can cause protective conductor currents up to 1A Please take this into account w...

Page 43: ...lied charging station regarding the upstream protective device according to ISO 61439 2 7 as well as deviating country specific standards and directives Selectivity Checking the selectivity taking int...

Page 44: ...tool The diagnostic interface can be loaded via any browser at the default IP address as shown in Table 13 Default IP address 192 168 1 100 Table 13 Default Charging Station IP address 6 1 User inter...

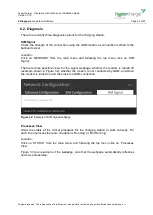
Page 45: ...re 31 Home screen of web interface Here is a list of all functionalities of the web interface and where they are found in their corresponding menus Links for Diagnosis category To check the SIM Signal...

Page 46: ...ng the top menu BOOT can be found To edit the OCPP configuration you can navigate to OCPP from the main menu To edit the GUI visibility options you can navigate to GUI from the main menu To edit the E...

Page 47: ...u and following the top menu click on SIM Signal There are three possible views for the signal webpage whether the modem is turned off example shown in Figure 32 whether the modem is not connected by...

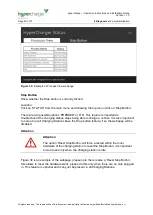
Page 48: ...feature is important to troubleshoot if the charging station stops being able to charge a vehicle It is also important to note at not all Charging Stations have the Stop button feature if so the webp...

Page 49: ...stallation Guide Version 1 1C 6 Diagnosis and parameterization Page 41 of 57 All rights reserved The reproduction of this document also partially is allowed only with authorization by alpitronic s r l...

Page 50: ...to set up the main running parameters for the charging station They are required to be inserted manually Click Save Configuration when all parameters are typed Location Click on OCPP from the main men...

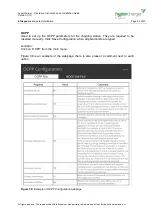
Page 51: ...lowed only with authorization by alpitronic s r l OCPP Used to set up the OCPP parameters for the charging station They are required to be inserted manually Click Save Configuration when all parameter...

Page 52: ...menu Figure 37 is an example of the webpage please note that the options for each feature is either true or false selectable from a dropdown menu Figure 37 Example of GUI Configuration webpage Etherne...

Page 53: ...ation Guide Version 1 1C 6 Diagnosis and parameterization Page 45 of 57 All rights reserved The reproduction of this document also partially is allowed only with authorization by alpitronic s r l Figu...

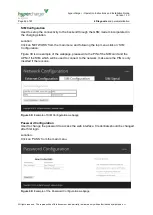
Page 54: ...Location Click on NETWORK from the main menu and following the top menu click on SIM Configuration Figure 39 is an example of the webpage please write the PIN of the SIM card and the APN of the SIM wh...

Page 55: ...ck if circuit breakers are switched on Power stack cannot be turned on The circuit breaker QB1 FB2 of the power stack is switched off Turn on the circuit breaker No communication to the backend No con...

Page 56: ...rect function Yearly Verification of protective measures With the charging station switched off check the resistance between the ground of the supply plug and all externally accessible non insulated c...

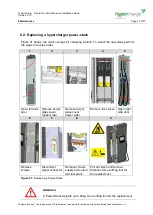
Page 57: ...nging a stack To install the new stack perform the steps in reverse order 1 2 3 4 5 Open left side door Remove acrylic glass cover upper side Remove acrylic glass cover lower side Remove the strives O...

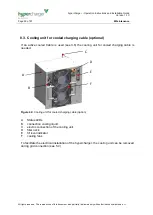
Page 58: ...d charging cable optional If an active cooled Cable is used see 3 6 the cooling unit for cooled charging cable is needed Figure 42 Cooling unit for cooled charging cable option A Status LEDs B connect...

Page 59: ...rotection the application concentration of 25 V V innovatek Protect PRO Konzentrat should not be undercut This corresponds to a frost protection of 9 C At concentrations of less than 20 V V innovatek...

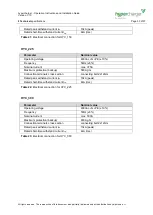
Page 60: ...ating Table 18 Technical data general Type Wide mm Large mm Height mm Weight kg HYC_075 854 420 2235 300 HYC_150 854 420 2235 400 HYC_225 854 732 2235 550 HYC_300 854 732 2235 650 Table 19 Mechanical...

Page 61: ...ge 400Vac N PE 10 Frequency 50Hz 5 Nominal current max 375A Maximum protection backup 500A gG Connection terminals cross section connecting bolt 2x12mm Rated peak withstand current Ipk 10kA peak Rated...

Page 62: ...s and Installation Guide Version 1 1C Page 54 of 57 10 Declaration of Conformity All rights reserved The reproduction of this document also partially is allowed only with authorization by alpitronic s...

Page 63: ...ion Instructions and Installation Guide Version 1 1C 10 Declaration of Conformity Page 55 of 57 All rights reserved The reproduction of this document also partially is allowed only with authorization...

Page 64: ...ion Instructions and Installation Guide Version 1 1C Page 56 of 57 10 Declaration of Conformity All rights reserved The reproduction of this document also partially is allowed only with authorization...

Reviews: