background image

Altec AIR CO2-PG80 Purge Gas Generator Operations and Maintenance Manual 


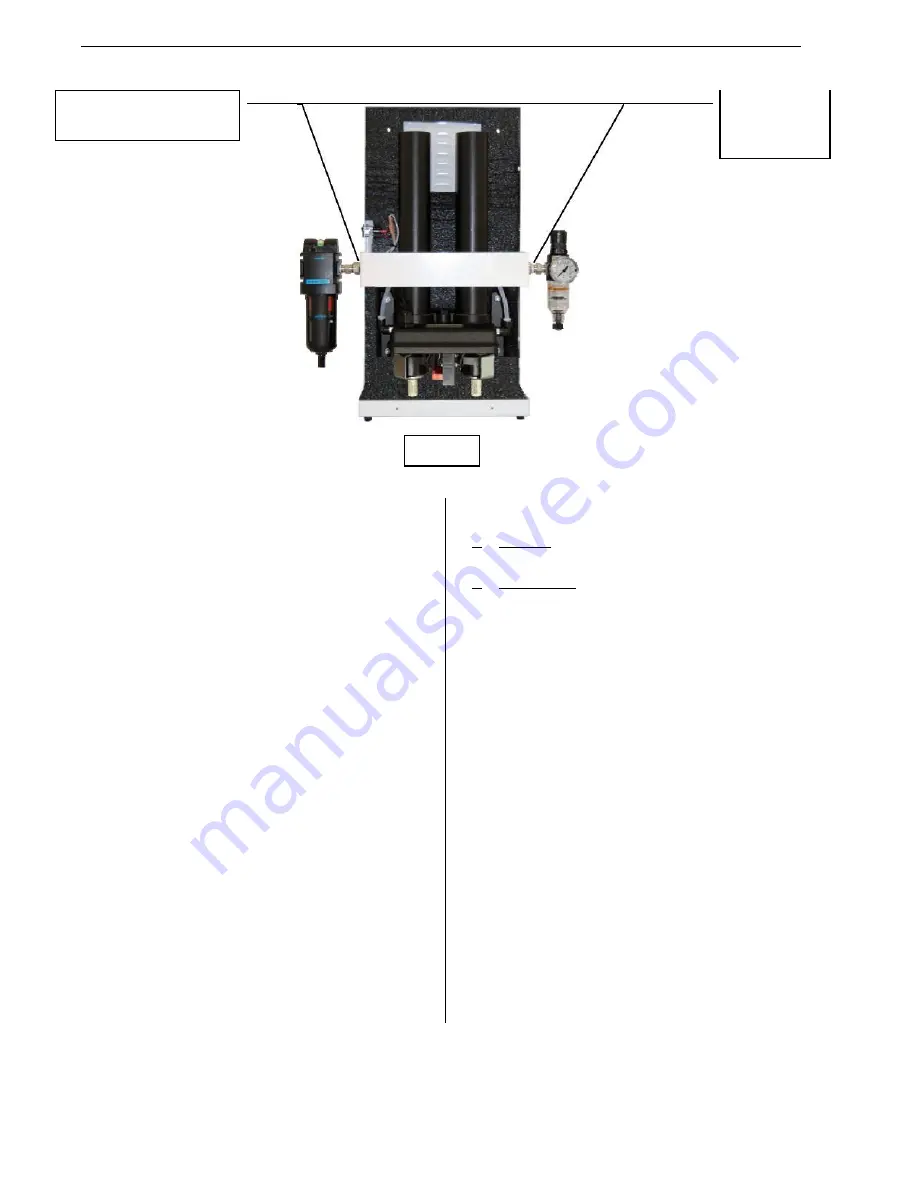
INLET BULKHEAD 
FITTING 


OUTLET 
BULKHEAD 
FITTING 


FIG 2 


SECTION 4 INSTALLATION 

4.1 

PARTS INCLUDED 

(1) CO2-PG80 Purge Gas Generator 
(1) Inlet Coalescing Filter Assy. 
(1) Outlet Filter Regulator Assy. 
(6) Cover Screws, 6-32 x 3/8, PH, SS 
(1) Operations & Maintenance Manual 

4 .2   LO C AT IO N  

DO  NOT  INSTALL  THE  UNIT  IN  AN  ENVIRONMENT  OF 
CORROSIVE  CHEMICALS,  EXPLOSIVE  GASES,  OR  AREAS 
OF HIGH OR LOW AMBIENT TEMPERATURE (ABOVE 125°F 
OR BELOW 33°F). 

Install the unit indoors. Unit may be wall mounted or placed on 
a table top. 

4.3 

INSTALL FILTERS 

A coalescing filter is provided to be installed on the inlet to the 
adsorber/dryer to remove entrained particulates, liquid moisture 
and  oil  which  can  cause  damage  to  the  desiccant  beds.  A 
particulate  afterfilter  is  provided  to  be  installed  on  the  outlet  of 
the  adsorber/dryer  to  remove  any  adsorbent  media  dust  that 
may migrate from the desiccant beds. 

Using  a  wrench  to  keep  inlet  bulkhead  fitting  from  turning, 
install  Inlet  Filter  Assy  to  left  side  of  unit  as  shown  in  FIG  2 
above.  Similarly,  install  Outlet  Filter  Regulator  Assy  to  Right 
Side of unit. 

4 . 4   M O U NT I N G  

1. 

Table top  
a. 

The  unit  comes  with  rubber  feet  installed  on  bottom 
of cabinet for use on table top. 

2. 

Wall mounting  
a. 

Remove (6) cover screws and remove cover. While a 
helper  holds  the  unit  at  the  mounting  location,  mark 
the position of the (4) mounting holes at the back of 
the cabinet. 

Mount the cabinet 

using these  

mounting holes. Be sure to use proper wall mounting 
anchors if mounting in drywall. 

b. 

Reinstall cover. 

4.5 

ELECTRICAL CONNECTIONS 

Before plugging in unit, check the unit nameplate for electrical 
characteristics.  Standard  electrical  characteristics  are  115 
volt,  1  phase,  50/60  Hz.  Models  operating  on  230  volts  are 
available. 

IMPORTANT!:  No  overload  protection  is  provided  in  the 
adsorber/dryer  and  unit  should  be  plugged/wired  into  a 
protected circuit. 

4.6 

PIPING AND CONNECTIONS 

Inlet and outlet tubing should be appropriate for pressure and 
temperature of operation. 

See specification chart for  

inlet/outlet  NPT  thread size.  Teflon  tape should be  used in the 
makeup  of  joints  to  ensure  a  good,  airtight  fit  of  piping 
components.  Check  all  connections  for  leakage  using  soap 
solution prior to putting unit into service. 


Page 4 

P/N P013253 REV B 

Summary of Contents for CO2-PG80

Page 1: ...ety Operation Safety SECTION 3 Specifications Pg 3 Flows Connections Dimensions and Weights SECTION 4 Installation Pg 4 Parts Included Location Install Filters Mounting Electrical Connections Piping and Connections SECTION 5 Start Up Pg 5 SECTION 6 Maintenance Pg 5 SECTION 7 Replacement Parts Pg 6 SECTION 8 Troubleshooting Guide Pg 7 SECTION 9 Wiring Diagram Pg 8 SECTION 10 Warranty Claims Pg 8 P ...

Page 2: ... PPM CO2 when operated at catalog conditions The dry and CO2 free air leaving the top of DESICCANT TOWER A is directed to the outlet through open CHECK VALVE A PURGE ORIFICE B and closed CHECK VALVE B allow a metered portion of the processed air to flow into DESICCANT TOWER B being regenerated The open purge port on deenergized SOLENOID VALVE B and the purge orifice reduce the pressurized dry air ...

Page 3: ...equipment with fluids or gases other than air consult Altec AIR for written approval SECTION 3 SPECIFICATIONS 3 1 FLOWS CONNECTIONS DIMENSIONS AND WEIGHT MODEL NO CO2 PG80 Max Flow Capacities at 125 PSIG L M Inlet Flow 114 Purge Flow 34 Outlet Flow 80 Connections NPT Inlet 1 4 Outlet 1 4 Dimensions Inches Height 27 7 Width 17 2 Depth 6 2 Weight Pounds 25 TABLE 1 OUTLET FLOW CAPACITIES AT VARIOUS I...

Page 4: ...s shown in FIG 2 above Similarly install Outlet Filter Regulator Assy to Right Side of unit 4 4 MOUNTING 1 Table top a The unit comes with rubber feet installed on bottom of cabinet for use on table top 2 Wall mounting a Remove 6 cover screws and remove cover While a helper holds the unit at the mounting location mark the position of the 4 mounting holes at the back of the cabinet Mount the cabine...

Page 5: ...PMENT ENSURE THAT ALL PERSONNEL HAVE READ AND UNDERSTAND THE SAFETY AND OPERATION INSTRUCTIONS IN THIS MANUAL 6 1 PREVENTIVE MAINTENANCE Below is a suggested schedule based on average operating conditions As conditions such as dirty environment humidity conditions ambient temperature etc change the frequency of the inspections may need to be increased Daily 1 Inspect the adsorber dryer for proper ...

Page 6: ...51315 27 PURGE ORIFICE 27 FOR 140 150 PSIG OPER 2 51315 29 PURGE ORIFICE 29 FOR 120 130 PSIG OPER 51315 32 PURGE ORIFICE 32 FOR 80 110 PSIG OPER 51315 40 PURGE ORIFICE 40 FOR 50 70 PSIG OPER SEE TABLE 1 ON PAGE 3 FOR ORIFICES FLOWS 5 O RING PURGE ORIFICE OUTER 2 x 6 51308 MOISTURE INDICATOR WITH O RING NOT SHOWN 1 7 O RING MOISTURE INDICATOR 1 8 51316 BALL CHECK VALVE 2 x 9 51317 SPRING CHECK VALV...

Page 7: ...ation of Verify particle coalescing inlet filtration is Towers must be replaced if contamination desiccant beds adequate and functioning properly is suspected A8 Timing cycle improper Verify correct timing cycle by listening to purge or by using voltmeter across coil connections on timer Replace timer if defective A9 Purge flow restricted Check mufflers for excessive back pressure Replace mufflers...

Page 8: ...found defective will be repaired replaced or refunded at Altec AIR s option free of charge provided that Altec AIR is notified within the above stated warranty period All returns of defective parts equipment must have prior written Returned Material Authorization RMA RMA may be obtained from our service department All defective parts equipment must be returned freight prepaid to the Altec AIR fact...

Reviews: