background image


5


HARDWARE 


5.1


Front Panel 


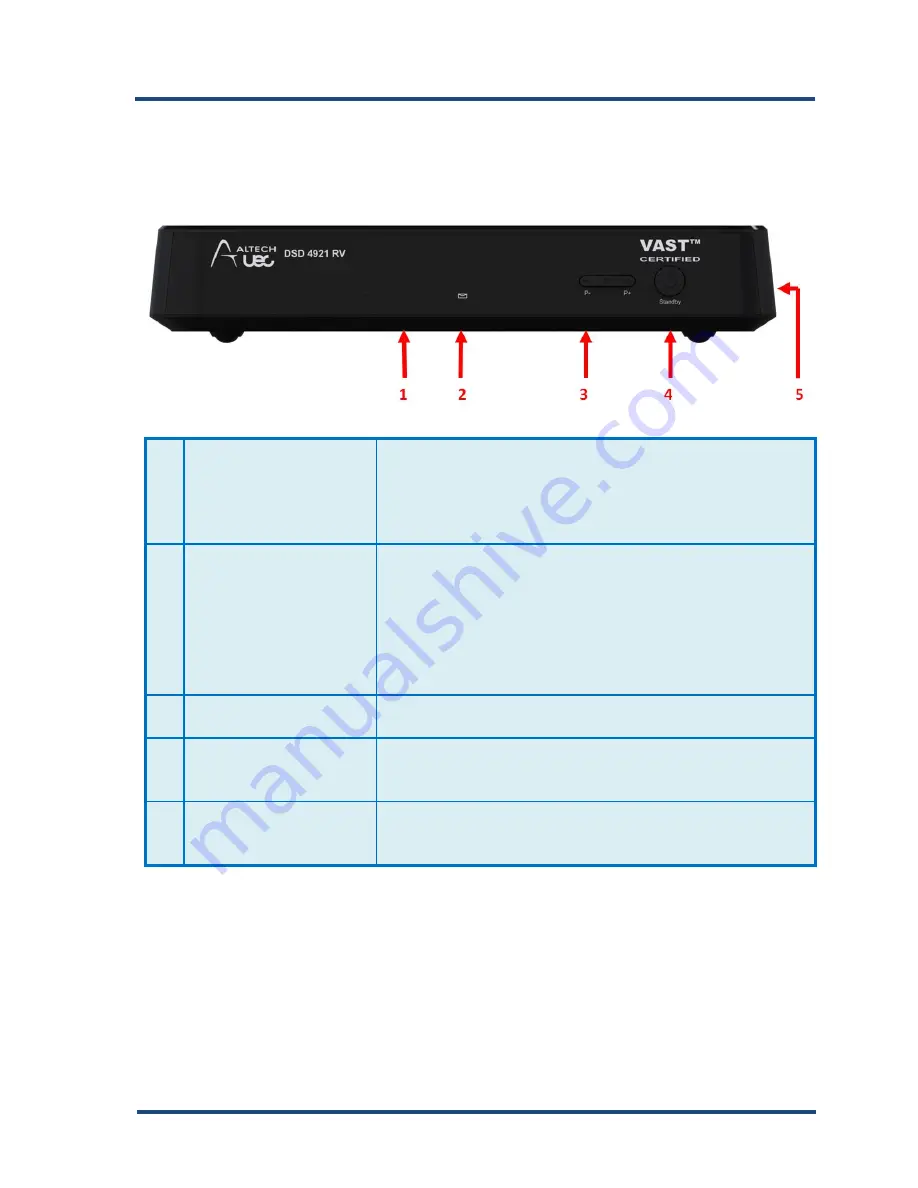
IR Receiver 

IR Receiver for the Remote control unit.  
The  Remote  Control  Unit  (RCU)  operates  the 
receiver by sending a beam, which is received by the 
infra-red  window.    Do  not  block  the  path  between 
remote control and this window. 

Front Panel LED 


The following information could be displayed: 

  Red/Green  - Flashing on start up 

  Red -   Indicates if the Set Top Box is in STANDBY 

mode 

  Green 

–  Indicates if the Set Top Box is ON 

  Orange 

–  Flashing  when  the  decoder  has 

received mail 

P+/P- Button 

Change the channels using the Program up (+) and 
down (-) buttons  

Standby Button 

Switches  the  Set  Top  Box  between  ON  and 
STANDBY  (If  held  down  for  more  than  4s  this  will 
reset the Set Top Box) 

Smart card 

The  smart  card slot  is  on the right hand  side of  the 
device. A VAST Smart card is inserted into this slot 
for encrypted VAST TV channels. 

Summary of Contents for DSD 4921 RV

Page 1: ...DSD 4921 RV User Manual ...

Page 2: ...Blank Page ...

Page 3: ...34 10 TROUBLESHOOTING 43 11 LEGAL MATTERS 44 The DSD 4921 RV User s Manual is the subject of intellectual property rights including copyright under domestic law and international conventions All rights are reserved The DSD 4921 RV User s Manual supplements the information supplied with the packaging of the Set Top Box as well as the detailed information available on our website Due to software upg...

Page 4: ...in a safe place as our guarantee service is based on the time of purchase and the warranty conditions If the product is faulty and requires repair please take the product to your nearest authorised dealer This product carries the RCM logo and is compliant with Electricity Consumer Safety Regulation 2015 Radio communications Electromagnetic Compatibility Standard 2008 Greenhouse and Energy Minimum ...

Page 5: ...HE LNB or ANTENNA Disconnect the product from the mains outlet before connecting or disconnecting the cable from the LNB or antenna Failure to do so can result in damage to the LNB or antenna CONNECTION TO THE TV Disconnect the product from the mains outlet before connecting or disconnecting the cable from the TV Failure to do so can result in damage to the TV LOCATION To avoid exposing the unit t...

Page 6: ...g in anyway Do not bend or twist the power cord Make sure to disconnect the power cord at the mains plug outlet when servicing or away for long periods Always keep heating appliances as far as possible from the mains power cord to prevent the protective plastic cover from melting To avoid electrical shock Never open the main body of the unit Do not insert metal or inflammable material inside the p...

Page 7: ...ce with statutory law Never throw batteries in your regular household waste Normal batteries may not be charged Never heat or thrown normal and rechargeable batteries into open fire danger of explosion Disposal In any case never dispose of your Set Top Box and the batteries in your regular household waste Please contact a local E Waste facility to arrange the disposal of your Set Top Box http www ...

Page 8: ...allation options provided in this manual as well as becoming familiar with the Front Panel and Remote Control Unit keys Identifying your Set Top Box To identify the Set Top Box look for a bar code sticker on the underside of your Set Top Box Keep these numbers in a safe place as your network provider requires them for troubleshooting purposes Example of label on the underside of your Set Top Box c...

Page 9: ...using external USB storage device USB2 0 Ethernet 10 100 Digital audio coaxial SPDIF Composite CVBS video output with stereo audio outputs Remote Control Unit RCU NEC protocol Remote control extender included for discreet installation and operation External PSU 110 240V AC with reverse polarity protection 12V DC car cigarette lighter adapter 4 WHAT S IN THE BOX Check that all of the following item...

Page 10: ...rol Unit RCU 2 x 1 5V AAA Batteries 1 x User Manual 1 x HDMI Cable 1 x 12V Car Adaptor with cable 1x RCA cables 1 x IR Extender Documentation included in the box VAST Registration Please note these items are not supplied with your Set Top Box S PDIF Cable Ethernet Cable External Hard Disk Drive Satellite Dish ...

Page 11: ...ed Green Flashing on start up Red Indicates if the Set Top Box is in STANDBY mode Green Indicates if the Set Top Box is ON Orange Flashing when the decoder has received mail 3 P P Button Change the channels using the Program up and down buttons 4 Standby Button Switches the Set Top Box between ON and STANDBY If held down for more than 4s this will reset the Set Top Box 5 Smart card The smart card ...

Page 12: ...pplied HDMI cable to connect the HDMI output on the Set Top Box to one of the HDMI inputs on the TV or AV Home Theatre system Provides both high definition video and Dolby Digital surround sound When available 6 SPDIF Connects to the Digital Audio Coaxial SPDIF input on your AV Home Theatre System for Dolby Digital Surround if available in the program and as configuration in Setup 7 RCA Video L R ...

Page 13: ...e to move closer to the Set Top Box before it functions Use good quality batteries and never try to recharge them short disassemble and expose to heat or place them in fire Rechargeable batteries are not recommended for use with this remote Do not use new and old batteries together Please remove the batteries if the remote control is not used for a long periods This may lead to electrolyte leaking...

Page 14: ...adio channels xx Blank Future functionality 72 PVR Short cut key to all recording options 71 GUIDE Short cut Key to launch Electronic Program Guide EPG 52 Up Arrow Menu navigation and selection Up 5D Left Arrow Menu navigation and selection Left 62 OK Menu navigation and selection OK 5E Right Arrow Menu navigation and selection Right 53 Down Arrow Menu navigation and selection Down 5C MENU Short c...

Page 15: ...ion or to select various menu options 6E BLUE Functions as required by application or to select various menu options 20 REW Rewinds a recorded program or when time shifting 21 PLAY Starts playing the recorded program or resumes playing back behind live TV program 22 FWD Fast forwards a recorded program or when time shifting 12 STOP Stops the recorded program and jumps to live TV 01 REC Records sel...

Page 16: ...o the connector marked LNB IN on the rear panel of the Set Top Box 4 Connect a HDMI cable between the HDMI port of your TV and your Set Top Box 5 Connect a RCA cable between the three RCA Ports of your TV or Red White leads to Aux input of Audio Amp AV receiver and your Set Top Box 6 If required Install the digital audio coaxial SPDIF cable between one of the digital audio ports on the Set Top Box...

Page 17: ...able can be plugged into your AC wall socket outlet 12 Once Set Top Box is powered up follow the instructions in the setup wizard Point 7 First time start up of the Set Top Box page 17 of this guide 6 2 VAST Registration The Australian Government funds a free to air satellite service Viewer Access Satellite Television VAST VAST provides digital television to viewers in remote areas of Australia wh...

Page 18: ...y Reset Restore Default Settings press OK and select YES to start the restore factory settings process Smart Card The smart card is paired to this Set Top Box which means that the smart card provided with your Set Top Box cannot be used in any other Set Top Box Similarly you will not be able to use any other card in your Set Top Box Reset Button Reset function is provided by pressing the standby b...

Page 19: ...ivation Live TV Channel 800 Setup Procedures Switch ON the TV and set it to the correct HDMI or RCA input and then switch ON the Set Top Box after a few seconds the splash screen will appear followed by the first installation screen STEP 1 RESOLUTION The next setting is the Resolution 1 Use the keys to select your relevant resolution for your TV 2 A screen will popup asking you to Keep Revert reso...

Page 20: ... options Use the keys to select your preferred USB Storage device press OK to accept and proceed to next screen File format EXT4 or FAT32 STEP 4 CHANNEL SEARCH The final setting is the Satellite Channels Search Note To continue your Satellite Dish must have been installed correctly 1 Press OK to begin searching for all the available channels this may take a few minutes to complete Note Signal info...

Page 21: ... below POINTING YOUR SATELLITE DISH 7 If no channels or radio services are found the system will display a Satellite scan failed This is either because the dish isn t aligned properly and signal is weak No services found message with the following options Check your setup again or reconfigure the settings Show help for aligning dish 8 Check your setup again or reconfigure the settings where you ca...

Page 22: ...able satellites The set top box will go to live TV Channel 800 where the following information is shared 1 1 Welcome to the viewer access satellite television VAST information channel 1 2 Welcome to VAST 1 3 What channels are available to VAST 1 4 How do I get access to VAST channels contact details 1 5 Important information 1 6 Set top box over the air updates 1 7 Need more information contact de...

Page 23: ...te mode There are two ways to regain the volume 1 If the volume is muted press the key again to regain volume 2 If the volume is muted press either the VOL or keys to regain volume Switching between TV and Radio Channels Use the TV RADIO key to change between the TV Channels and radio stations The radio screens and procedures are similar to your TV procedures in this User Manual NOTE If Red White ...

Page 24: ...another window where you enter the channel or program title 2 To select the letters numbers or symbols use the keys press OK to accept each letter until title is complete 3 To begin the search press If found the channel or program title results are shown 4 To delete the name of the channel or program title press The name will be removed from the search area or 5 Use the to backspace a single lette...

Page 25: ...ns on the remote This allows you to browse the programme information of the other channels without changing the channel you are presently viewing 3 When the I Plate is displayed press the arrow buttons on the remote This allows you to browse between the Current and Next event of the channel you are presently viewing 4 When the I Plate channel is displayed Press the button on the remote to launch t...

Page 26: ...lection of popular and highly useful applications right on your fingertips Future feature Timers Discover all of your programmed and scheduled events by creating new or editing saved reminders fast and easy Recordings Manage all of your recorded events whether manually or automatically recorded through a clean cut straight forward list EPG Use the Electronic Program Guide to be informed on current...

Page 27: ...enu provides functionality for the user to set up and manage scheduled timers either set from the EPG I plate or custom schedules recordings This is an easy and quick way to view all your scheduled content Using this application allows you to edit existing or create new schedules this screen shows you start times and program titles 1 To launch the Main Menu press the MENU key 2 Use the keys to hig...

Page 28: ...s 6 To re schedule the current program press 7 To Cancel and close this function press the EXIT key 8 Once you have programs saved into the list three coloured icons at the bottom appear where you can perform various functions use the red icon to remove a channel from the list green icon to set new timer yellow icon to lock a channel or blue to edit a timer The procedures for Channel Change Remind...

Page 29: ...ogram Guide EPG This chapter describes how to use the EPG while watching TV and how to change to and from the Radio services One of the great advantages of Digital TV transmissions is the addition of extra features to the broadcast such as information about the current and next programs and extra options such as the ability to choose between different languages for Audio and Subtitling 1 To launch...

Page 30: ... coming up and again to the present day 3 CURRENTLY SHOWING Displays basic information on the current content you are viewing 8 NAVIGATION ICONS Allows you to navigate to the EPG previous and next pages to view EPG data 4 WEEK DAY Allows you to see what day of the week you are looking at while navigating through the seven day schedule 9 HELP ICON Displays a selection of Icon descriptions 5 CHANNEL...

Page 31: ...rview of channels with information about present and forthcoming programs As you scroll through the guide information of all available events for the selected channel for the next 7 days The availability of Program information data is dependent on the individual broadcaster 1 To scroll through schedule use the and keys 2 To scroll through to the Next Day press or Previous Day press keys 3 To close...

Page 32: ...t the desired program 2 Press the Record to set the timer 3 To select Record Entire Event press OK 4 A icon is placed next the programme you want to record Record custom duration The Record custom duration allows you to set your own time duration The duration is set in minutes the allocation for this function is a maximum of 2 days If timer settings for the program overlap an error message is disp...

Page 33: ...ns from the EPG Time shift Function 1 During Live TV you can press the pause key to activate the Time Shift function The Set Top Box pause s the program until you want to continue watching 2 Use the play key to continue watching the time shifted program 3 Press the Fast Forward or Rewind keys to increase the playback speed from 2 to 256x in both directions 4 To stop playback press the stop key 5 T...

Page 34: ...for brief details about the recorded program Deleting a recorded program 1 Use the keys to highlight the program you want to delete press OK 2 A confirmation banner appears Yes to delete or No to cancel 3 To accept press OK Locking and unlocking a program Programs that are locked can t be viewed until a password has been entered 1 Use the keys to highlight the movie series you want to lock then pr...

Page 35: ...ens the renaming banner 2 To delete part of the name use the backspace key or delete the name completely press delete all key 3 To type in a new name use keys to select the letters then press OK to accept do this procedure until you have entered the name 4 Once the name is done press to submit and close ...

Page 36: ... 2 Use the keys to highlight Settings icon 3 To access the Settings content press OK 4 To close the menu and return to live TV press EXIT All settings menus can be navigated in the following way 1 To view the selected menu use the key to highlight Selected menu press OK to select 2 From this list you can choose the relevant option you want to change 3 To navigate through the options press OK scrol...

Page 37: ...arch screen 2 Select the correct Frequency Symbol Rate Polarity Modulation and Encryption 3 On completion of settings press Start scan 4 The system starts the scan Once the rescan has completed the results of all the channels will appear 5 If the scan fails the Satellite scan failed No services found message will be displayed See First time start up Step 5 6 To go to the previous menu press the BA...

Page 38: ...at a later date Network information Network mode LAN Settings Restart Network Get time from time server Factory Reset Performing a Factory Reset will erase any personal settings and or data The parental PIN code will change to the default of 1234 To reset your decoder back to the factory defaults carryout the following procedures 1 Use the keys to scroll to Factory Reset 2 To open press OK 3 A con...

Page 39: ...In the Sub menu Recording you have various options to change the settings of your connected Hard Disk Drive HDD or USB devices This Sub Menu includes the following functions Select USB storage device Recording start lead time Recording end delay Time shift length Automatic time shift Setup USB storage device Jump Forward Jump Backward Series record Format storage device Format recording device Che...

Page 40: ...Backward The Jump Back time can be set 10 20 or 30 minutes Series Record Series recording can be selected to record only the current channel or all channels Setup USB Storage device This feature allows the user to set up their storage device preference Format Recording Device In this Sub menu you can see all information about your connected Hard Disk Drive as well as an option to format the HDD In...

Page 41: ...ou may not hear the sound effects when selecting Dolby Digital as the audio output mode Selectable Audio settings include SPDIF Digital Audio Output HDMI Digital Audio Output SPDIF Audio Delay Subtitle On OFF Use the Subtitle setting to select whether you want Subtitles On or OFF by default Time Zone Settings Use the Time Zone setting to select your Australian region the system shall adjust to the...

Page 42: ...he Parental Control function you will always have to enter the Parental PIN code to gain access The PIN will allow 3 failed entries before the system is locked out this can be reset by the FACTORY RESET to reset the Set Top Box back to the default or by calling the service centre Enabling Parental Control 1 To view the Parental Control screen use the keys to highlight Parental Control press OK to ...

Page 43: ...al Control Rating press OK The Parental Control Rating window allows you to specify the age categories that are inappropriate for viewing unless you first enter your PIN code 2 To block the age category of program use the buttons to highlight it and then press OK This places a tick next to the category you have blocked 3 To change the restriction level highlight a different restriction level and t...

Page 44: ...tatus Loader Status Software Update The Software settings provide access for you to check for Software updates Software Update Over the Air OTA Note USB Software upgrades may be performed by inserting a USB device with approved software into the USB port on the rear panel Followed by rebooting the unit while holding down the left button on the front panel File format FAT32 Software License The sof...

Page 45: ...s not turned all the way down To increase the volume press the Vol button Check connection of the Audio cables to the Set Top Box and TV Home Theatre Remote control does not work Check if TV and Set Top Box are ON not in standby mode Check that your RCU Standby Key lights up when a key is pressed if not change your batteries If the RCU Standby Key lights up RED Check that there are no obstructions...

Page 46: ... downloads to your decoder to ensure that only approved services are being received and that the decoder remains compatible with the networks platform Obsolescence Disclaimer Digital Satellite Technology is rapidly evolving As a result of this it is not possible to predict what the requirements will be in a few years time The manufacturer cannot guarantee that this DSD 4921 RV Set Top Box will be ...

Page 47: ...ideo signals fed through VCRs may be affected by copyright protection systems and the picture will be distorted on the television Dolby Audio Logo Manufactured under license from Dolby Laboratories Dolby Dolby Audio and the double D symbol are trademarks of Dolby Laboratories HDMI Logo HDMI and HDMI Logo and High definition Multimedia Interface are trademarks or registered trademarks of HDMI Licen...

Page 48: ...riminal offence Some components are licensed under GPL and LGPL licenses For further information regarding the licenses and which components are licensed under these licenses please visit www altech multimedia com Manufacturer s Information Should you require further technical assistance and your authorised dealer or installer was not able to help please contact our technical support service The s...

Page 49: ...47 Blank Page ...

Page 50: ...48 Blank Page ...

Page 51: ......

Page 52: ...R095000501 Rev003 July2018 ...

Reviews: