background image

CLARKE TECHNOLOGY Image 20  Operator's Manual

Page 21

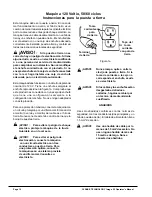
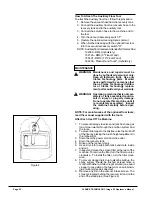
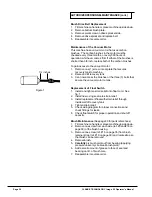
Limpieza de una superficie grande (véase fig. 3)

Para limpiar una gran superficie de moqueta, siga este
procedimiento:

1. Empiece por el ángulo del lado superior de la

alfombra.

2. Mueva la máquina a lo largo del borde derecho de la

alfombra, hasta la mitad de su longitud. Tire de la
máquina hacia atrás regularmente y con una
velocidad constante.

3. Vuelva al punto de arranque. Limpie una segunda

faja paralela a la primera.

4. Cada faja debe solapar la faja anterior por

aproximadamente 2,5 cm. Además, cada faja debe
ser más larga de 10 cm que la anterior, para evitar
que se forme una línea en medio de la alfombra.

5. Termine la limpieza de la primera mitad de la

alfombra.

6. Siga el mismo procedimiento en el ángulo superior

derecho de la segunda mitad que tiene que limpiar.

7. Tire de la máquina a lo largo del borde derecho hasta

el final de la alfombra.

8. Siga trabajando con fajas paralelas que solapan por

2,5 cm.

9. Termine la limpieza de esta segunda mitad.

CUIDADO: De ningún modo Clarke Technology

será responsable de daños o
resultados no satisfactorios de una
limpieza, que son el hecho de la
incompetencia de un trabajador
operandola máquina.

MANTENIMIENTO QUE EL OPERADOR DEBE
EFECTUAR

VACIADO DEL DEPOSITO DE RECUPERACION

Siga este procedimiento:
1.

Ponga todos los interruptores de la máquina en la
posición ‘O’.

2.

Coloque la máquina encima de la fosa de vaciado o
coloque un cubo por debajo del orificio de vaciado.

3.

Abra la válvula de vaciado.

4.

Despuès del vaciado, no olvide cerrar la válvula.

¡AVISO!:

El depósito de recuperación está
provisto de un flotador de parada
eléctrico. Cuando el depósito está
lleno, todas las funciones
eléctricas se paran
automáticamente. Ponga el
interruptor aspiración/accesorios
y el interruptor inyección/cepillo
en la posición ‘O’ antes de vaciar
el depósito de recuperación.

VACIADO DEL DEPOSITO DE SOLUCION

1.

Ponga todos los interruptores de la máquina en la
posición ‘O’.

2.

Coloque la máquina encima de una fosa de vaciado
o coloque un cubo por debajo del orificio del
vaciado.

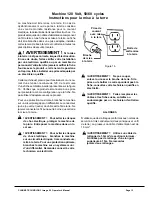
Nettoyage d’une grande surface (voir fig. 3)

Pour le nettoyage d’une grande surface recouverte de
moquette, procédez comme suit:

1. Commencez par l’angle du côté supérieur droit du

tapis.

2. Passez la machine le long du bord droit du tapis,

jusqu’à la moitié de sa longueur. Tirez la machine
vers l’arrière de façon régulière et à vitesse constante.

3. Retournez au point de départ. Nettoyez une seconde

bande parallèle à la première.

4. Chaque bande doit chevaucher la précédente

d’environ 2,5 cm. De plus, chaque bande doit être
plus longue de 10 cm que la précédente, afin d’éviter
l’apparition d’une ligne au milieu du tapis.

5. Terminer le nettoyage de la première moitié du tapis.
6. Recommencer dans le coin supérieur droit de la

moitié qui reste à nettoyer.

7. Tirer la machine le long du bord droit, jusqu’à la fin du

tapis.

8. Continuer à travailler en bandes parallèles, qui se

chevauchent de 2,5 cm.

9. Terminer le nettoyage de cette deuxième moitié.

ATTENTION : Clarke Technology ne peut en

aucun cas être tenu pour
responsable des dégâts ou des
résultats non satisfaisants d’un
nettoyage dûs à l’incompétence du
membre du personnel qui a utilisé
la machine.

ENTRETIEN POUR L'OPERATEUR

VIDANGE DU RESERVOIR DE RECUPERATION

Procédez comme suit:
1. Mettre tous les interrupteurs de la machine en

position ‘O’.

2. Placer la machine au-dessus d’une fosse de vidange

ou placer un seau en-dessous de l’orifice de vidange.

3. Ouvrir la vanne de vidange.
4. Après vidange, ne pas oublier de refermer la vanne.

! AVERTISSEMENT !:

Le réservoir de

récupération est équipé
d’un flotteur d’arrêt
électrique. Lorsque le
réservoir est plein, toutes
les fonctions électriques
s’arrêtent
automatiquement. Mettre
l’interrupteur aspiration/
accessoires et
l’interrupteur injection/
brosse sur 

O

 avant

d’effectuer la vidange du
réservoir de récupération.

VIDANGE DU RESERVOIR DE SOLUTION

1. Mettre tous les interrupteurs de la machine en

position ‘O’.

2. Placer la machine au-dessus d’une fosse de vidange

ou placer un seau en-dessous de l’orifice de vidange.

  PRODUCTO DE LIMPIEZA PARA ALFOMBRA  

(cont.)

NETTOYAGE D’UN TAPIS 

 (cont.)

Summary of Contents for IMAGE 16 120V

Page 1: ...Operator s Manuals Image 16 120V click here Image 20 120V click here E...

Page 2: ...as well You must have training in the operation of this machine before using it If your operator s cannot read this manual have it explained fully before attempting to operate this machine Si Ud o su...

Page 3: ...s Pump Motor 28 Solenoid Solution Directional Valve Removal 28 Brush Motor Repair 28 Brush Drive Belt Replacement 30 Maintenance of the Vacuum Motor 30 Replacement of the Float Switch 30 Brush Mainten...

Page 4: ...limpiza para alfombra 19 MAINTENIMIENTO Vaciado del dep sito de recuperaci n 21 Vaciado del dep sito de soluci n 21 Fijaci n de los accesorios para el suelo 23 Despu s de cada utilizaci n de la maquin...

Page 5: ...e 13 Commandes 17 Pr paration de la machine avant le mise utilisation 19 Nettoyage d un tapis 19 MAINTENANCE Vidange du r servoir de r cup ration 21 Vidange du r servoir de solution 21 Fixation des ac...

Page 6: ...by or near children 4 Use only as described in the manual Use only manufacturer s recommended attach ments 5 Do not use with damaged cord or plug If appliance is not working as it should has been dro...

Page 7: ...correctamente si ha ca do si ha sido da ada si se ha quedado fuera o si se ha quedado inmersa en el agua m ndela a uno de nuestros centros t cnicos 6 Nunca tire de la m quina usando el cable de alime...

Page 8: ...r le cordon Garder le cordon l cart des surfaces chaudes 7 Ne pas d brancher en tirant sur le cordon Tirer plut t la fiche 8 Ne pas toucher la fiche ou l appareil lorsque vos mains sont humides 9 N in...

Page 9: ...16 Weight 101 lbs Shipping Weight 140 lbs DANGER Machinescancauseanexplosionwhenoperatednearflammablematerialsandvapors Donot usethismachinewithornearfuels graindust solvents thinners orotherflammable...

Page 10: ...r continuamente o por intermitencia Esta m quina es de un uso comercial Caracterestecas Tecnicas PELIGRO Las m quinas pueden originar una explosi n cuando se operan cerca de materiales o vapores infla...

Page 11: ...uer une explosion si elles sont utilis es dans l environnement imm diat de mat riaux ou de vapeurs inflammables N utilisez jamais la machine avec ou pr s de combustibles de grains de poussi re de solv...

Page 12: ...inst electric shock use a circuit that is protected by a ground fault circuit inter rupter The green or green and yellow conductor in the cord is the ground wire Never connect this wire to any termina...

Page 13: ...No use ning n adaptador con este producto Para una protecci n m xima conecte la m quina con un circuito protegido por un diferencial El conductor amarillo o verde y amarillo del cable es el hilo de ti...

Page 14: ...isque d lectrocution En cas de doute faites v rifier votre installation par un lectricien qualifi ou par un membre du personnel d entretien Ne jamais modifier la fiche fournie avec le produit si elle...

Page 15: ...or is located in the center in the rear of the machine This connection is used to hook up optional auxiliary floor tools Recovery Tank Drain Remove hose from rear of machine Place over drain and open...

Page 16: ...con caudal y presi n medios Restoration utilizado con el cepillo restoration para una extracci n intensiva con caudal y presi n altos MANDOS Interruptor aspiraci n bomba El interruptor de tipo I O ON...

Page 17: ...rom drive mechanism To reassemble follow these instructions a Align brush drive slots with brush drive pin b Apply pulling pressure to the brush drive end pulling toward the steel brush plate apply en...

Page 18: ...de du Clarkare Defoamer anti moussant 398420 Pour la pr paration et l utilisation correctes des accessoires pour le sol veuillez consulter le manuel qui y est joint PREPARACION DE LA MAQUINA PARA TRAB...

Page 19: ...ust brush height place brush adjusting rod in the position that corresponds to your carpet type Proper adjustment is with approximatley 1 8 bristle engagement NOTE Incorrect brush height may cause cir...

Page 20: ...de r cup ration Si l eau du r servoir de r cup ration est mousseuse il faut galement le vidanger avant de remplir le r servoir de solution PRODUCTO DE LIMPIEZAPARAALFOMBRA CUIDADO El dep sito de recu...

Page 21: ...already cleaned 9 Make more passes until all of the room is cleaned CAUTION Clarke Technology will not be held li able for damage to the carpet or poor results because of the operator s lack of abilit...

Page 22: ...O 2 Coloque la m quina encima de una fosa de vaciado o coloque un cubo por debajo del orificio del vaciado Nettoyage d une grande surface voir fig 3 Pour le nettoyage d une grande surface recouverte d...

Page 23: ...Use a dry cloth to wipe both tanks and tools inside and out 7 Inspect and clean the screen filter at the rear of the machine To remove the filter turn the filter counter clockwise To install the filte...

Page 24: ...ouve l extr mit du tuyau fixe derri re le couvercle du r servoir de r cup ration Voir Fig 4 SUJECION DE LOS ACCESORIOS OPCIONALES PARA EL SUELO Para sujetar los accesorios para el suelo siga este proc...

Page 25: ...Nozzles To clean or quick change the nozzles follow this procedure 1 Grasp the nozzle cap assembly and twist counterclock wise to remove assembly from the spray bar 2 Pull the nozzle out of the cap 3...

Page 26: ...r s toute r paration lectrique la machine doit tre test e du point de vue de la s curite lectrique COMO PROTEGER LA MAQUINA DE LA HELADA Para evitar los da os causados por la helada s rvase seguir el...

Page 27: ...Page 26 CLARKE TECHNOLOGY Image 16 Operator s Manual NOTES...

Page 28: ...CLARKE TECHNOLOGY Image 16 Operator s Manual Page 27 IMAGE 16 120V Section II Parts and Service Manual 78486B...

Page 29: ...ad from solution valve 4 Disconnect solenoid from brush housing by press quick disconnect coupling on top of brush housing 5 Remove hoses by loosening hose clamps and pull hoses from solenoid valve 6...

Page 30: ...nillos 10 32 8 Saque el motor y invierta las operaciones para volver a instalarlo 9 Compruebe que las conexiones el ctricas son correctas refiri ndose al diagrama de conexiones ENTRETIENPARLETECHNICIE...

Page 31: ...s the brushes or the three 3 bolts that secure the vacuum motor to tank Replacement of float switch 1 Install and tighten strain relief onto float cord See fig 1 2 Install new o ring seal onto strain...

Page 32: ...nera que el cuerpo del cepillo y los rodamientos sean hermetizados 7 Monte de nuevo el conjunto siguiendo el orden inverso ENTRETIEN PAR LE TECHNICIEN AGREE suite Remplacement de la courroie d entra n...

Page 33: ...2 The spray tips may be dirty plugged 2 Clean or replace the tips or worn 3 The hose may be kinked 3 Inspect the hose The drain valve leaks 1 The drain valve gaskets may be worn 1 Replace the gaskets...

Page 34: ...en la posici n I distribuci n de soluci n inyecci n cepillo es defectuoso 2 Los orificios de las toberas est n 2 Limpie los orificios o cambie las toberas 3 El flexible est aplastado 3 Compruebe el es...

Page 35: ...solution peut tre d fectueux Faire appel un technicien agr pour le remplacer 2 Les orifices des buses sont 2 Nettoyer les orifices ou remplacer bouch s endommag s ou us s les buses 3 Le flexible est...

Page 36: ...TECHNOLOGY Products Item Part No Description Qty 1 59231A RM 4P Tool Assembly 1 2 59230A RM 8P Tool Assembly 1 3 59228A RM 4M Tool Assembly 1 4 59229A RM 12M Tool Assembly 1 5 398420 Defoamer 1 case...

Page 37: ...16 Operator s Manual CLARKE TECHNOLOGY Image 16i ix Drawing Final Assembly 4 99 1 49 8 7 9 38 17 41 39 40 31 24 5 25 47 28 37 38 2 29 26 27 30 43 35 32 42 6 46 45 50 45 36 33 48 34 17 4 10 44 14 12 15...

Page 38: ...erminal Clip 10 Ring 1 x x 27 47905A Terminal FIMQD 1 x x 28 45905C Pump 100 psi 120V 1 x 45928A Pump 100 psi Bypass 1 x 29 77094A Label Ground Symbol 1 x x 30 920224 Nut 10 32 2 x x 31 85383A Screw 1...

Page 39: ...x 1 8 81110A Nut 10 24 1 9 39326A Tube Vacuum 1 10 85519A Screw 20 x 3 8 1 11 59877A Washer NPT Sealing 1 12 34256A Gasket Cover 1 13 39327A Tube Recovery 1 14 56476A Strainer 1 15 832002 Clamp Plasti...

Page 40: ...rocket 28T 1 24 34273A Gasket Brush 1 25 63059A Brush Restoration 1 25a 63060A Brush Maintenance 1 26 962628 Screw Set 8 32 x 3 16 2 27 50909A Belt 1 28 47701A Terminal FIFQD 2 29 980603 Washer 10 Ext...

Page 41: ...920224 Nut 10 32 2 10 77094A Label Ground Symbol 1 11 42188A Cord Power 35 1 12 47711A Terminal FIFQD 2 13 911933 Terminal 10 Insulated Ring 1 14 58013A Strain Relief 1 15 170870 Washer 7 8 Flat 1 16...

Page 42: ...ifier 1 17 920722 Nut 10 32 Elastic Stop 1 18 68776A Panel Electrical 1 19 41435B Breaker Brush 1 25A 1 20 82100A Lock Nut Conduit 1 21 49724A Cord Harness Machine 1 22 52504A Control Speed Variable 1...

Page 43: ...696801 Plug Recess 2 x x 7 63063A Bracket Manifold Retainer 1 x x 8 962798 Screw 10 24 x 3 x x 9 54880A Housing Spray 4 x 9A 54164A Nozzles 110 x 1 5 4 x 10 81110A Nut 10 24 Nylock S S 3 x x 11 30426A...

Page 44: ...iption Qty 15 980603 Washer 10 Ext Lock 4 16 920224 Nut 10 32 Hex 4 17 962987 Screw 10 24 x 3 8 1 18 692870 Elbow Swivel 2 19 35147A Hose 14 2 20 59785A Valve Solution Flow 1 21 59016A Tee 1 22 53617A...

Page 45: ...55372A Kit Switch Viton 80 100psi 1 x 53057A Kit Switch 80 100psi 1 x 2 55374A Kit Dual Check Valves 1 x 52908A Kit Check Valves 1 x 3 54881A Housing Upper 1 x x 4 55373A Kit Valve 1 x 59783A KIt Val...

Page 46: ...g 1 11 Washer 1 12 Bracket Fan End 1 13 Spacer 1 Ref Part No Description Qty 14 Fan Rotating 2 15 Spacer 2 16 Fan Stationary 1 17 Shell Fan 1 18 638313 Spring Load 1 19 53995A Fan Air Seal 1 20 Fan St...

Page 47: ...Page 46 CLARKE TECHNOLOGY Image 16 Operator s Manual CLARKE TECHNOLOGY Image 16 i ix Electrical Schematic 4 99 Brush Circuit Breaker 2 5 amp Fuse 1 25 amp...

Page 48: ...CLARKE TECHNOLOGY Image 16 Operator s Manual Page 47 CLARKE TECHNOLOGY Image 16 i ix Connection Diagram 4 99...

Page 49: ...NOTES...

Page 50: ...rway Bjornerudveien 24 N 1266 47 2275 1770 CLARKE TECHNOLOGY AMERICAN SANDERS TECHNOLOGY A L COOK TECHNOLOGY Customer Service Headquarters and Factory 2100 Highway 265 Springdale Arkansas 72764 501 75...

Page 51: ...r location Transportation charges to and from the repair location must be prepaid by the purchaser c Clarke Technology will repair the product and or replace any defective parts without charge within...

Page 52: ...as well You must have training in the operation of this machine before using it If your operator s cannot read this manual have it explained fully before attempting to operate this machine Si Ud o su...

Page 53: ...ccess Pump Motor 28 Solenoid Solution Directional Valve Removal 28 Brush Motor Repair 28 Brush Drive Belt Replacement 30 Maintenance of the Vacuum Motor 30 Replacement of the Float Switch 30 Brush Mai...

Page 54: ...ra alfombra 19 MAINTENIMIENTO Vaciado del dep sito de recuperaci n 21 Vaciado del dep sito de soluci n 21 Fijaci n de los accesorios para el suelo 23 Despu s de cada utilizaci n de la maquina 23 C mo...

Page 55: ...e 13 Commandes 15 Pr paration de la machine avant le mise utilisation 17 Nettoyage d un tapis 19 MAINTENANCE Vidange du r servoir de r cup ration 21 Vidange du r servoir de solution 21 Fixation des ac...

Page 56: ...by or near children 4 Use only as described in the manual Use only manufacturer s recommended attach ments 5 Do not use with damaged cord or plug If appliance is not working as it should has been dro...

Page 57: ...correctamente si ha ca do si ha sido da ada si se ha quedado fuera o si se ha quedado inmersa en el agua m ndela a uno de nuestros centros t cnicos 6 Nunca tire de la m quina usando el cable de alime...

Page 58: ...r le cordon Garder le cordon l cart des surfaces chaudes 7 Ne pas d brancher en tirant sur le cordon Tirer plut t la fiche 8 Ne pas toucher la fiche ou l appareil lorsque vos mains sont humides 9 N in...

Page 59: ...20 Weight 103 lbs Shipping Weight 145 lbs DANGER Machinescancauseanexplosionwhenoperatednearflammablematerialsandvapors Donot usethismachinewithornearfuels graindust solvents thinners orotherflammable...

Page 60: ...equipo adecuado AVISO Aseg rese de que todos los adhesivos etiquetas instrucciones e indicaciones de aviso se pueden leer Si es preciso c mbielos Su distribuidor Clarke Technology puede procurarle nu...

Page 61: ...d un quipement ad quat AVERTISSEMENT V rifier que toutes les tiquettes autocollants notices d utilisation et signaux d avertissement sont lisibles Si n cessaire remplacez les Vous pouvez vous en procu...

Page 62: ...inst electric shock use a circuit that is protected by a ground fault circuit inter rupter The green or green and yellow conductor in the cord is the ground wire Never connect this wire to any termina...

Page 63: ...o use ning n adaptador con este producto Para una protecci n m xima conecte la m quina con un circuito protegido por un diferencial El conductor amarillo o verde y amarillo del cable es el hilo de tie...

Page 64: ...sque d lectrocution En cas de doute faites v rifier votre installation par un lectricien qualifi ou par un membre du personnel d entretien Ne jamais modifier la fiche fournie avec le produit si elle n...

Page 65: ...or is located in the center in the rear of the machine This connection is used to hook up optional auxiliary floor tools Recovery Tank Drain Remove hose from rear of machine Place over drain and open...

Page 66: ...con caudal y presi n medios Restoration utilizado con el cepillo restoration para una extracci n intensiva con caudal y presi n altos MANDOS Interruptor aspiraci n bomba El interruptor de tipo I O ON...

Page 67: ...rom drive mechanism To reassemble follow these instructions a Align brush drive slots with brush drive pin b Apply pulling pressure to the brush drive end pulling toward the steel brush plate apply en...

Page 68: ...nde du Clarkare Defoamer anti moussant 398420 Pour la pr paration et l utilisation correctes des accessoires pour le sol veuillez consulter le manuel qui y est joint PREPARACION DE LA MAQUINA PARA TRA...

Page 69: ...ust brush height place brush adjusting rod in the position that corresponds to your carpet type Proper adjustment is with approximatley 1 8 bristle engagement NOTE Incorrect brush height may cause cir...

Page 70: ...de r cup ration Si l eau du r servoir de r cup ration est mousseuse il faut galement le vidanger avant de remplir le r servoir de solution PRODUCTO DE LIMPIEZAPARAALFOMBRA CUIDADO El dep sito de recu...

Page 71: ...already cleaned 9 Make more passes until all of the room is cleaned CAUTION Clarke Technology will not be held li able for damage to the carpet or poor results because of the operator s lack of abilit...

Page 72: ...O 2 Coloque la m quina encima de una fosa de vaciado o coloque un cubo por debajo del orificio del vaciado Nettoyage d une grande surface voir fig 3 Pour le nettoyage d une grande surface recouverte d...

Page 73: ...Use a dry cloth to wipe both tanks and tools inside and out 7 Inspect and clean the screen filter at the rear of the machine To remove the filter turn the filter counter clockwise To install the filte...

Page 74: ...uve l extr mit du tuyau fixe derri re le couvercle du r servoir de r cup ration Voir Fig 4 SUJECION DE LOS ACCESORIOS OPCIONALES PARA EL SUELO Para sujetar los accesorios para el suelo siga este proce...

Page 75: ...Nozzles To clean or quick change the nozzles follow this procedure 1 Grasp the nozzle cap assembly and twist counterclock wise to remove assembly from the spray bar 2 Pull the nozzle out of the cap 3...

Page 76: ...r s toute r paration lectrique la machine doit tre test e du point de vue de la s curite lectrique COMO PROTEGER LA MAQUINA DE LA HELADA Para evitar los da os causados por la helada s rvase seguir el...

Page 77: ...NOTES...

Page 78: ...Image 20 120V Section II Parts and Service Manual 78594A...

Page 79: ...ad from solution valve 4 Disconnect solenoid from brush housing by press quick disconnect coupling on top of brush housing 5 Remove hoses by loosening hose clamps and pull hoses from solenoid valve 6...

Page 80: ...nillos 10 32 8 Saque el motor y invierta las operaciones para volver a instalarlo 9 Compruebe que las conexiones el ctricas son correctas refiri ndose al diagrama de conexiones ENTRETIENPARLETECHNICIE...

Page 81: ...s the brushes or the three 3 bolts that secure the vacuum motor to tank Replacement of Float Switch 1 Install and tighten strain relief onto float cord See fig 1 2 Install new o ring seal onto strain...

Page 82: ...nera que el cuerpo del cepillo y los rodamientos sean hermetizados 7 Monte de nuevo el conjunto siguiendo el orden inverso ENTRETIEN PAR LE TECHNICIEN AGREE suite Remplacement de la courroie d entra n...

Page 83: ...2 The spray tips may be dirty plugged 2 Clean or replace the tips or worn 3 The hose may be kinked 3 Inspect the hose The drain valve leaks 1 The drain valve gaskets may be worn 1 Replace the gaskets...

Page 84: ...en la posici n I distribuci n de soluci n inyecci n cepillo es defectuoso 2 Los orificios de las toberas est n 2 Limpie los orificios o cambie las toberas 3 El flexible est aplastado 3 Compruebe el es...

Page 85: ...solution peut tre d fectueux Faire appel un technicien agr pour le remplacer 2 Les orifices des buses sont 2 Nettoyer les orifices ou remplacer bouch s endommag s ou us s les buses 3 Le flexible est...

Page 86: ...TECHNOLOGY Products Item Part No Description Qty 1 59231A RM 4P Tool Assembly 1 2 59230A RM 8P Tool Assembly 1 3 59228A RM 4M Tool Assembly 1 4 59229A RM 12M Tool Assembly 1 5 398420 Defoamer 1 case...

Page 87: ...CLARKE TECHNOLOGY Image 20i ix Drawing Final Assembly 4 99 Form 04115A 04116A 3 16 15 10 4 17 48 33 36 45 50 45 34 35 32 29 31 2 35 17 13 13 30 51 35 34 14 23 22 21 12 20 19 11 35 18 1 49 37 26 27 28...

Page 88: ...erminal FIMQD 1 x x 28 45905C Pump 100 psi 120V 1 x 45928A Pump 100 psi Bypass 1 x 29 77094A Label Ground Symbol 1 x x 30 920224 Nut 10 32 2 x x 31 85383A Screw 10 32 x 3 4 1 x x 32 68784A Cover Botto...

Page 89: ...A Nut 10 24 1 9 39326A Tube Vacuum 1 10 85519A Screw 20 x 3 8 1 11 59877A Washer NPT Sealing 1 12 34256A Gasket Cover 1 Ref Part No Description Qty 13 39327A Tube Recovery 1 14 56476A Strainer 1 15 83...

Page 90: ...art No Description Qty 1 35229A Housing Brush 1 2 980202 Washer Wave 1 3 52654A Coupling Male Q D 1 4 87026A Washer Flat S S 1 5 68782A Exhaust Weldment 1 6 81104A Nut 20 1 7 36504A Manifold 1 8 58517...

Page 91: ...ound Symbol 1 11 42188A Cord Power 35 1 12 47711A Terminal FIFQD 2 13 911933 Terminal 10 Insulated Ring 1 14 58013A Strain Relief 1 15 170870 Washer 7 8 Flat 1 16 46103A Rectifier 1 17 920722 Nut 10 3...

Page 92: ...Parts List Electric Panel Assembly 8 00 Form 17436A Ref Part No Description Qty 16 46103A Rectifier 1 17 920722 Nut 10 32 Elastic Stop 1 18 68776A Panel Electrical 1 19 41427A Breaker Brush 2 5A 1 20...

Page 93: ...et Manifold Retainer 1 x x 8 962798 Screw 10 24 x 3 x x 9 54880A Housing Spray 5 x 9A 54160A Nozzles 110 x 1 Brass 5 x 10 81110A Nut 10 24 Nylock S S 3 x x 11 30426A Hose Recovery 1 x x 12 54339A Cap...

Page 94: ...CLARKE TECHNOLOGY Image 20 Drawing and Parts List Valve Assembly 4 99 Form 19411A Ref Part No Description Qty 14 85383A Screw 10 32 x 3 4 2 15 980603 Washer 10 Ext Lock 4 16 920224 Nut 10 32 Hex 4 17...

Page 95: ...1 55372A Kit Switch Viton 80 100psi 1 x 53057A Kit Switch 80 100psi 1 x 2 55374A Kit Dual Check Valves 1 x 52908A Kit Check Valves 1 x 3 54881A Housing Upper 1 x x 4 55373A Kit Valve 1 x 59783A KIt Va...

Page 96: ...rt No Description Qty 1 Nut 1 2 Housing Vent 1 3 Fan 1 4 85303A Screw 8 32 x 3 8 4 5 40812A Brush Mechanism 2 6 51914A Clamp 2 7 50618A Bracket End Com 1 8 Bearing 1 9 672714 Disc 1 10 Bearing 1 11 Wa...

Page 97: ...Page 46 CLARKE TECHNOLOGY Image 20 Operator s Manual CLARKE TECHNOLOGY Image 20i ix Electrical Schematic 4 99 Brush Circuit Breaker 2 5 AMP Fuse 1 25 AMP...

Page 98: ...CLARKE TECHNOLOGY Image 20 Operator s Manual Page 47 CLARKE TECHNOLOGY Image 20i ix Connection Diagram 4 99...

Page 99: ...NOTES...

Page 100: ...Norge A S Oslo Norway Bjornerudveien 24 N 1266 47 2275 1770 CLARKETECHNOLOGY AMERICANSANDERSTECHNOLOGY A L COOKTECHNOLOGY Customer Service Headquarters and Factory 2100 Highway 265 Springdale Arkansas...

Page 101: ...r location Transportation charges to and from the repair location must be prepaid by the purchaser c Clarke Technology will repair the product and or replace any defective parts without charge within...

Reviews: