FIXING TO CONCRETE KERBS
Fixing of cills to concrete kerbs
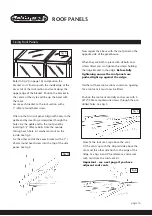
Layout the wooden cills in position making sure
the side cills bevelled edge faces
outwards
from
the building.
There is no bevel on the gable end cills. They
should be positioned with the slots closest to the
outside.
Loosely fix the cills with the M10 x 50 coach
screws (50mm long) and washers. Use the slots
for any adjustment. See fig 1. Ensure that the side
cills are butted up to and are square to the end
cills. It is worth checking again the diagonal
measurements.
When all in position and square, tighten the bolts
down with a 17mm spanner.
Back
Side
fig 1
Fixing end Gable and the first side panel
The bolts for fixing the frames are different lengths
and are for specific locations. Washers should
always be fitted before the nut is put on. Please
note that, when a low level vent is fitted adjacent
to the gable end, that the bolts have to be reversed
and plastic caps are provided to cover the exposed
nuts on the outside of the gable end.
Prior to commencing the assembly of the sides
gather together all the necessary bolts, washers,
nuts, brackets & screws that you see identified. The
quantity will vary depending on the length of the
model.
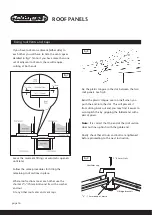
It’s best to start with the plain gable end and side
panel as shown in fig 2. Offer the end and side
section to the cill being
sure to rest both
sections on the
top edge of the
concrete and
against the
outside edge of
the cill. See fig 4
on page 8.
see
fig 4
see
fig 3
fig 2
page 7
fig 3
Summary of Contents for Amateur 8'0" x 10'6"
Page 31: ...page 31...


