background image


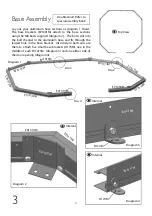
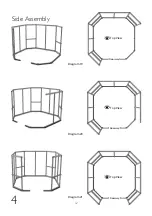
Side Assembly


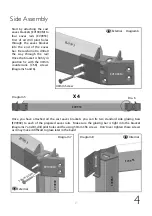
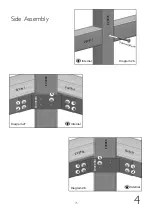
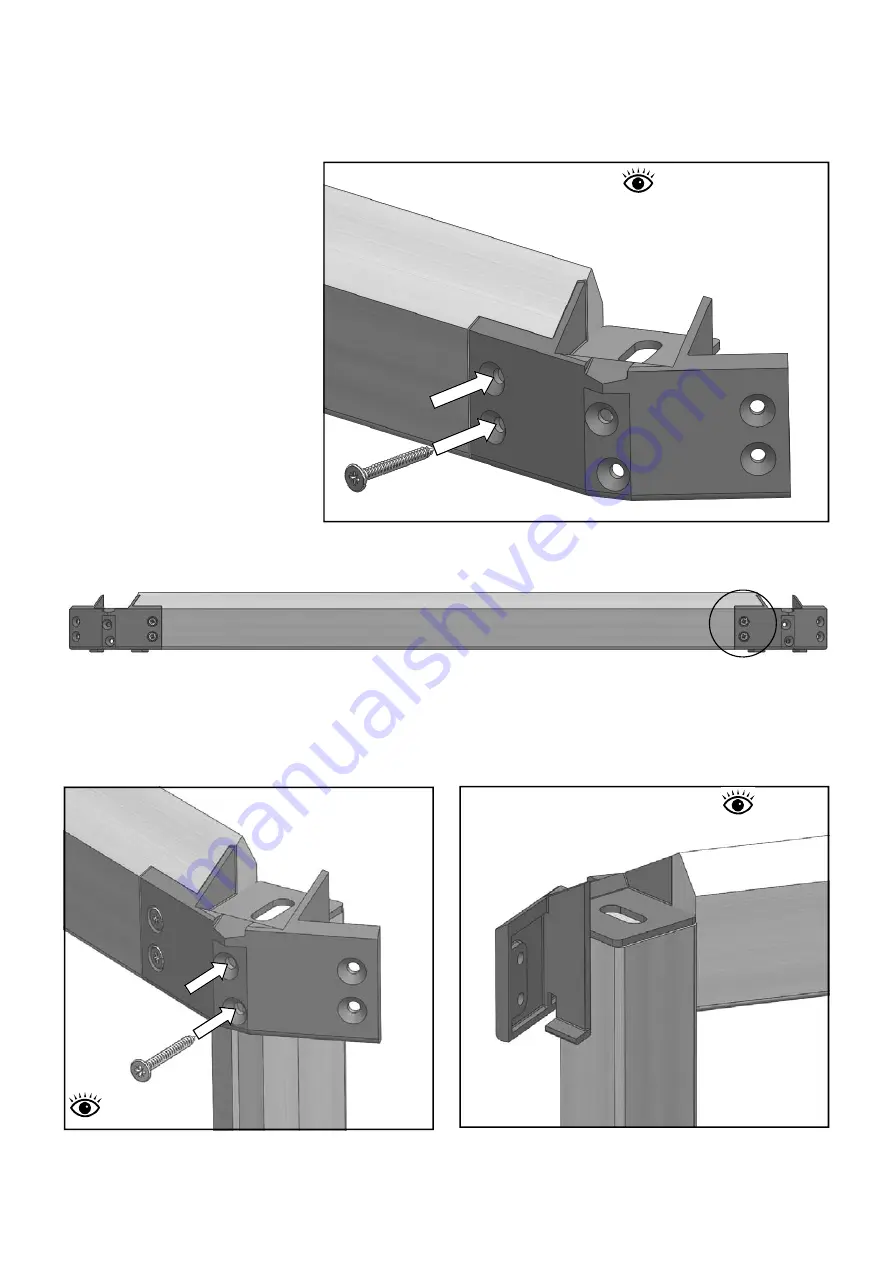
Start by attaching the cast 
eaves brackets (EV1000M) to 
four eaves rails (EV0953). 
First of all drill pilot holes 
through the eaves bracket 
into the end of the eaves 
bar.  Be careful not to drill all 
the way through the rail! 
Once the bracket is firmly in 
position fix with the 40mm 
countersunk (CSK) screws 
(diagrams 5 and 6).   
 

Diagram 6 

Diagram 7 

Diagram 8 

X 4 

Diagram 5 

Dia. 6 

40mm Screw 

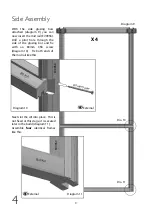
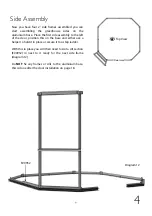
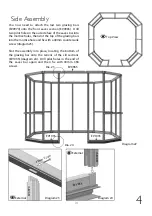
Once you have attached all the cast eaves brackets you can fix two standard side glazing bars 
(EV0969) to each of the prepared eaves rails.  Make sure the glazing bar is tight into the bracket 
(diagrams 7 and 8), drill pilot holes and fix using 50mm CSK screws.  Don’t over tighten these screws 
as it may make it difficult to glaze later in the build. 

50

mm

 Sc

rew


EV1000M 

EV095

EV0953 

EV0

953


EV1000M 

EV0969 

EV0969 

EV0953 

EV1000M 

External 

Internal 

External 

Summary of Contents for Evolution octagonal

Page 1: ...1 04 19...

Page 2: ...mbly Attachment Roof Vent Installation Louvre Assembly and Positions Glazing part 1 Gutter Installation Glazing part 2 Staging Installation High Level Shelf Installation Downpipe Installation Fixing D...

Page 3: ...other vulnerable locations To minimise the risk of wind damage try to select as sheltered a site as possible e g beside a hedgerow or garden fence Additional Considerations Please bear in mind that a...

Page 4: ...n be a particular nuisance and should be avoided Choose a site where the greenhouse is relatively easy to get to and convenient to bring water to and possibly a supply of electricity Finally and most...

Page 5: ...to tiny pieces if you catch an edge on a hard surface such as concrete You should also wear suitable gloves when handling the glass this also helps to keep it clean Option of gluing joints This is not...

Page 6: ...annel in the aluminium base and fix through the largest hole in the base bracket Also slide in bolts and use them to attach five small base brackets D174M one in the middle of each EV1015M diagram 3 a...

Page 7: ...rams 5 and 6 Diagram 6 Diagram 7 Diagram 8 X 4 Diagram 5 Dia 6 40mm Screw Once you have attached all the cast eaves brackets you can fix two standard side glazing bars EV0969 to each of the prepared e...

Page 8: ...t hole through the side of the glazing bar and fix with an 80mm CSK screw diagram 10 Fix both ends of the mid rail like this 80mm Screw Next slot the cill into place This is not fixed at this stage it...

Page 9: ...he door position this on the base and either ask a helper to hold it in place or secure it to a step ladder With this in place you will then need to slot a cill section EV0952 in next to it ready for...

Page 10: ...glazing bar into the mortice hole and fix with a 40mm countersunk screw diagram 14 Slot the assembly into place locating the bottom of the glazing bar onto the tenons of the cill sections diagram 15 D...

Page 11: ...ace you will then need to slot a cill section EV0952 in next to it ready to repeat the previous page diagrams 14 through to 16 Continue working like this in a clockwise fashion until all four of your...

Page 12: ...12 Side Assembly 4 Top View Top View Top View Doorway Doorway Doorway Diagram 19 Diagram 20 Diagram 21...

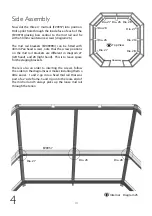
Page 13: ...ont eaves section EV0965 Drill two pilot holes in the outside face of the eaves bar into the mortice holes then slot the top of the glazing bars into the mortise hole and fix with a 40mm countersunk s...

Page 14: ...brackets are different in diagram 27 left hand and 28 right hand This is to leave space for the staging brackets There is also an order to inserting the screws follow the order on the diagrams as it m...

Page 15: ...15 Side Assembly 4 Diagram 27 Internal 1 2 3 4 5 EV0999M Internal Diagram 26 EV0957 EV0956 EV0957 EV0969 EV0970 Diagram 28 Internal 3 4 1 2 5 EV0999M EV0956 EV0957 EV0969 50mm Screw...

Page 16: ...fix with mid rail brackets EV0999M diagrams 27 28 on the previous page Then drill a pilot hole through the sides of the glazing bar to the left and right of the doorway and secure the mid rail with an...

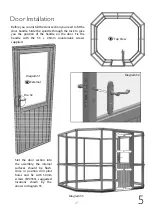
Page 17: ...on of the handle on the door Fix the handle with the 3 5 x 25mm countersunk screws supplied Diagram 31 Diagram 32 Diagram 33 Slot the door section into the assembly the internal surfaces should be flu...

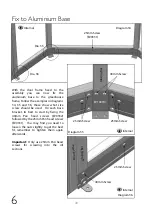
Page 18: ...ouse frame Follow the examples in diagrams 34 35 and 36 these show what size screw should be used On each base bracket its best to start by fixing the 40mm Pan head screws EV0332 followed by the 25mm...

Page 19: ...frame The board will drop slightly and the bottom baton will rest on the cill Work your way around the building until all the boards are in place Once in position you can fix them with the cedar panel...

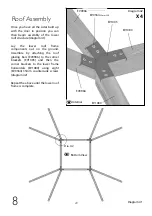
Page 20: ...s out on the ground Assemble by attaching the roof glazing bars EV0966 to the corner brackets EV1005 and then the corner brackets to the lower frame horizontals EV1080 using eight EV0364 35mm counters...

Page 21: ...grams 44 and 45 for the fixing down of the roof bars to the sides making sure they are pulled tight into the side glazing bars leaving no gap When in position drill vertically down in the location sho...

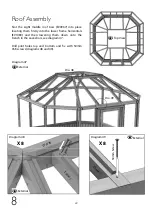
Page 22: ...080 and then lowering them down onto the trench in the eaves bars see diagram 47 Drill pilot holes top and bottom and fix with 50mm CSK screws diagrams 48 and 49 Roof Assembly 8 Diagram 47 External Di...

Page 23: ...be visible externally Use 50mm CSK screws to fix through the handed EV1094 EV1095 lantern side corner mortices to pick up the cill section EV1089 Again making sure that the pilot holts are accurately...

Page 24: ...mm CSK screws Diagrams 54 and 55 show the optimum positions for the pilot holes note these screw heads will also be visible externally The ridge is fixed to the gable bars with 50mm CSK screws diagram...

Page 25: ...the optional aluminium capping this should be fitted on the long side face If using the cedar capping then the short face should be used so the slam rail sits higher cedar orientation shown in diagra...

Page 26: ...e making sure they all meet neatly in the corners Lantern Assembly 9 EV849x397x199 EV849x166 Taking the necessary safety precautions insert the two gable and two side panes into the lantern as shown b...

Page 27: ...nes D729TG The lantern roof glass is held in place by 1 glass stop EV0313 per pane and secured with capping on each side using 40mm pan head screws diagram 62 If you have the optional aluminium bar ca...

Page 28: ...ace you can then screw the finial down onto the bolt diagram 64 This can be done once the lantern top is in place if you find it a little heavy to lift but it is easier to do this on the ground Import...

Page 29: ...persons on ladders lift the assembled lantern top above the roof and lower it down onto the greenhouse main frame diagram 67 The lantern top then fixes to this with twelve 25mm pan head screws diagram...

Page 30: ...e of glass and locate this in the vent hinge Before lowering this down completely slot the glass stops onto the open edge EV0315M EV0323 EV1106M Cedar capping part number EV1110 Diagram 70 When in pos...

Page 31: ...hinges EV0314M diagram 66 from either end diagram 72 You can now lower the vents until they rest on the lantern roof bars in a cen tral position Secure in place with the D220 vent barrels and FS6060 b...

Page 32: ...e diagram 75 The bottom arm fixes to the underside of the lantern top eaves rail EV1098 us ing EV0331 25mm pan head screws do this with the roof vent in the closed posi tion so that you get the bracke...

Page 33: ...art building your louvre you first need to assemble the sides Connect the two side section with the two inserts as shown here D166 D166 D168L D168L Pinch all glass retainers before glazing D166 D168R...

Page 34: ...lush with the ends Attach the top and bottom of the louvre with the 19mm assembly screws in each end This locates with a screw channel in the side sections diagrams 79 and 80 Makes sure you pinch the...

Page 35: ...ole Fix with 50mm screws Diagram 81 Diagram 82 Diagram 83 Dia 82 EV0 973 EV 09 73 EV0974 EV0974 EV0973 50mm Screw Slot the louvre into the louvre frame diagram 83 Important Make sure that when your in...

Page 36: ...louvre frame top you need to drill pilot holes through the bottom of the mortice holes diagram 85 Drill as close to the middle of the mortice hole as possible Then slot this onto the louvre frame side...

Page 37: ...h level diagram 87 or mid level diagram 88 The louvre can be installed at any of the locations indicated by the arrows Requires extra components request two EV1154M per louvre Telephone 01782 385409 o...

Page 38: ...of the glazing bar before fixing Drill pilot holes through the top rail of the louvre frame and secure to the eaves rail with 50mm CSK screws Diagram 90 EV795X392 Diagram 89 Next drill pilot holes th...

Page 39: ...om rail of the louvre frame and secure to the mid rail with a 50mm CSK screws Diagram 94 Next drill pilot holes through the glazing bar diagram 95 diagram 96 shows the ideal angle of the 80mm CSK scre...

Page 40: ...e building by inserting one of the narrow panes EV610x76 next to the louvre frame If you have the louvre in the mid level position as below you also need to install the glass above the louvre EV795X39...

Page 41: ...3 12 Before you install the large panes it helps to place each 1028mm long bar capping around the building ready for installation When ready insert the large side pane next to the louvre diagram 101 I...

Page 42: ...door and in the middle of the 4 sections of the building is slightly different to the standard capping If you have aluminium capping this also needs rubber inserting along the channels It is installed...

Page 43: ...the centre point of the eaves bracket diagram 106 Once you are happy with the position you can fix it in place with 25mm Pan head screws One section of the 2 guttering has large holes at each end rea...

Page 44: ...tter joint EV1070 Slide this in until the corner in the middle of the gutter joint meets the end of the gutter diagram 107 With this in place you can now prep the next section of gutter Apply another...

Page 45: ...if any adjustment needs to be made you can do this now When you re happy with the fit add a bead of silicone to both ends then fix the section in place with 25mm round head screws diagram 111 Make su...

Page 46: ...113 External Finally you can add the last two gutter joints EV1070 With the silicone beads applied to the gutter lower the joint into position first locating the front edge then push the base of the j...

Page 47: ...es bars Hang two glass stops between each glazing bar as shown in diagram 114 Space these around 100mm in from the roof glazing bars diagram 115 Important Please make sure you have installed the gutte...

Page 48: ...first piece of roof glass into place be careful to support this and try to slide it up one roof bar until it reaches the other When lowered into the glass stops the glass should fit either side of the...

Page 49: ...ars in the middle of a 4 section as before with the sides these use a slightly different capping diagram 118 119 If you haven t already done so you can now install the louvre glass 6 per louvre From t...

Page 50: ...udy diagrams 123 127 closely and attach the HE300M EV1125M brackets accordingly Run a spirit level between the brackets to check they are all level Diagram 122 Dia 123 Dia 124 Dia 126 Dia 127 30 m m 3...

Page 51: ...0M brackets with a 10mm bolt HE576 and nut HE579 as shown in diagram 129 and 130 If you struggle to line the holes up try loosening the screws fix the nut and bolt and then tighten the screws again Di...

Page 52: ...losest to the ends locate with the holes in the staging arms diagram 132 The longest slat EV1131M nearest to the middle of the greenhouse needs 6 x 10mm bolts The ends of the slats should line up with...

Page 53: ...35 once happy with the position tighten all the nuts Attach the internal mid arm EV1123 in a similar manner diagram 134 Important The extra bolt in the longest slat should be left towards the rear of...

Page 54: ...diagram 139 140 You will need to remove the 25mm round head screw to fix the brackets on the rear mid rail As before fix in place with the large head 25mm screw Next attach the staging support bracke...

Page 55: ...while you fit the first couple of slats diagram 142 Slide three 10mm bolts into each of two infill staging slats EV1116M and position them as shown in diagram 141 Loosely attach these for now as you...

Page 56: ...1124M up with the bolts on the 2nd slat in from the front and attach nuts to both E V 0 3 5 0 M E V 1 1 2 4 M Make sure all the staging slats are level before fixing the diagonal support with a large...

Page 57: ...s allows you room for small plant pots on the shelf but won t interfere with larger pots on the staging top diagrams 146 149 The left hand bracket should be fitted inline with the left edge of the gla...

Page 58: ...the middle bolt to attach the slats to the mid arm and use the two nearest the ends to attach to the outer shelving arms diagram 152 Diagram 150 Internal EV1126M EV1127M EV1129M EV0348M Use another 10...

Page 59: ...shelving slats and slot them on to the bolts already inserted Line up with the front edge and at the rear with the outer shelving arm attach nuts and fix when you re happy with the position E V 0 3 4...

Page 60: ...et D201 diagram 157 Push the outlet through the hole and attach the downpipe D211 While supporting the downpipe slide the downpipe clip EV0740M on from the bottom of the pipe Fix this to the mid rail...

Page 61: ...uilding down You need at least one fixing per base bracket supplied if the building is exposed to high winds it would be a good idea to use 2 fixings per bracket not supplied Drill through the bracket...

Page 62: ...id Rail_Single EV0956 843mm 4 EV0957 Octagonal Mid Rail_Double EV0957 1654mm 3 EV0966 Octagonal Roof Glazing Bar EV0966 1146mm 8 EV0967 Octagonal Roof Glazing Bar_Standard EV0967 1099mm 8 EV0969 Octag...

Page 63: ...EV1001M MOSS 8 EV1005M Octagonal Ridge Box Frame Bracket EV1005M MOSS 4 EV1014M Octagonal Base_Single EV1014M 824mm MOSS 4 EV1015M Octagonal Base_Double EV1015M 1634mm MOSS 3 EV1017M Octagonal Base N...

Page 64: ...HE9 Evo Octagonal Greenhouse Shelving 6x9 9x9 and 9x12 Single HE300M Base Bracket MOSS 2 EV0348M Atlas shelf tubular support 02 2211 MOSS 3 EV1125M Evo Atlas Octagonal Staging Bracket_Middle arm EV112...

Reviews: