TR-3019-230E-ICU / TR-3019-400E-ICU
36
36
SETTING THE DOOR END POSITIONS
CONNECTOR CONTACT DESCRIPTION
XP6
LO
Normally open (NO) relay contact
Relay output voltage 230 V / 50 Hz,
maximum load 100 W.
The relay operating mode is set up in the
settings (
table
4,
DIP3
).
Signal lamp connection —
Fig.
21.
Traffic light connection —
Fig.
22
LC
Normally closed (NC) relay contact
N
General relay contact
XP7
SE
Resistive safety edge connection input 8.2 kOhm (
Fig.
23, 8K2) or optical safety edge
(
Fig.
24,
OSE
). The edge (sensor) type is set in the settings (
table
4,
DIP2
). Contact of the
door leaf with an obstacle during closing (activation of the installed sensor) stops the
movement and then opens the door (if
DIP1-ON
,
table
5)
GND
General contact
+12V
Power output of additional devices. Supply voltage 12 V DC / max. 50 mA
6.
SETTING THE DOOR END POSITIONS
Y
ATTENTION!
When setting the door end positions, the door shall be in the intermediate posi-
tion (e.g. 1 m above the floor). For manual movement of the door leaf use the release (Section
4.3. ‘Drive release’).
Y
ATTENTION!
To set the door end positions, it is necessary to perform all the operations one by
one (
table
3). Incorrect settings may lead to malfunction or the end positions will not be recorded!
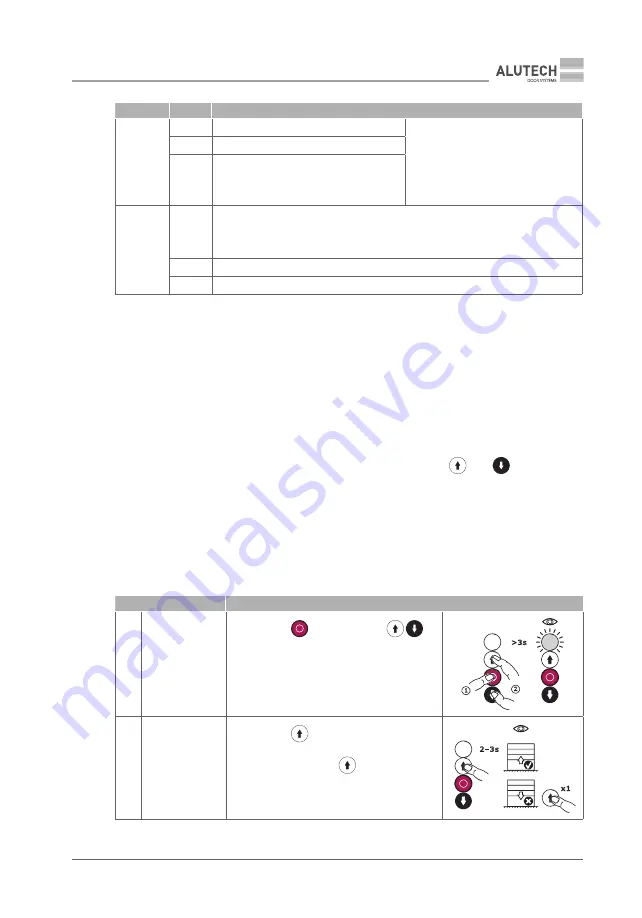
End positions are set up using the control station (
Fig.
13). During the setting of end positions,
the door leaf movement is controlled manually with the buttons
and
(pressing and
holding the button).
If you need to interrupt the setup operations and then start again, wait 30 s before automatic
exit from the setup menu or turn off and turn on the power supply of the drive using the mains
switch (
Fig.
4).
Y
ATTENTION!
All movement blocking devices (STOP) should not be in activation position un-
til they are set up. The LED of the control panel should not illuminate continuously (
table
8).
Table
3
ACTION
SETUP OPERATIONS
1
Entering setup
Press and hold
. Press two buttons
together and hold them for at least 3 s. When
the LED starts flashing with a rate of one second,
release the buttons.
ATTENTION!
Further flashing of the LED with a rate
of one second means staying in the setup menu
and waiting (no more than 30 s) for the next action
2
Checking opening
direction
Press and hold
for some seconds to see the
direction of door movement. The door must open!
If the door is closing, press
again and hold it
for some seconds. Make sure that the door opens


