TAS12-AS1 & TAS12P-AS1 Installation Instructions
Page 4
For Assistance: support@alvaradomfg.com +1 (909) 591-8431 PUD3677R1-0
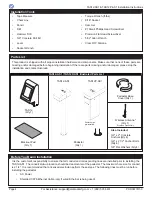
This product is shipped with all proper installation hardware and components. Make sure that none of these parts are
missing and/or damaged before beginning installation. If there are parts missing and/or damaged, please stop the
installation and contact Alvarado.
TAS12-AS1 / TAS12P-AS1 Illustrated Parts List
Parts List
TAS12
(Qty 1)
Also Included:
3/8" x 2" Concrete
Anchors (Qty 4)
3/8" x 2 1/2" Anchor Bolts
(Qty 4)
3/8" Flat Washers (Qty 4)
Before You Begin Installation
It is the customer's responsibility to ensure that all conduit and corresponding lines are installed prior to installing the
TAS12-AS1. The conduit stub-up location should be dead-center of the pedestal. The maximum hole size for conduit
is 2 1/4". It is recommended that a licensed electrician perform these steps. The following lines must be run before
installing the pedestal:
• AC Power
• Shielded CAT6 Ethernet Cable (only if wired Ethernet is being used)
Pedestal Base
Cover (Qty 1)
Pedestal
(Qty 1)
TAS12-AS1
TAS12P-AS1
Blackout Pad
(Qty 1)
• Tape Measure
• Chalk Line
• Pencil
• Drill
• Hammer Drill
• 5/8" Concrete Drill Bit
• Level
• Socket Wrench
• Torque Wrench (ft-lbs)
• 9/16" Socket
• Hammer
• #1 Small Phillips Head Screwdriver
• Precision Flat Head Screwdriver
• 5/32" Allen Wrench
• Clear RTV Silicone
Installation Tools
Printer ships
pre-installed.
Wireless Antenna*
(Qty 1)
*Wireless Option Only


