TAS12-AS1 & TAS12P-AS1 Installation Instructions
Page 6
For Assistance: support@alvaradomfg.com +1 (909) 591-8431 PUD3677R1-0
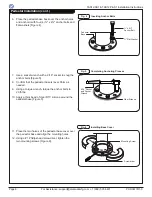
6. Place the pedestal base back over the anchor holes
and anchor it with four (4) ⅜" x 2½" anchor bolts and
flat washers [Figure 4].
7. Use a socket wrench with a 9/16" socket to snug the
anchor bolts [Figure 5].
8.
Confirm that the pedestal base is level. Shim as
needed.
9. Using a torque wrench, torque the anchor bolts to
20 ft-lbs.
10. Apply a thick bead of clear RTV silicone around the
pedestal base [Figure 5].
11. Place the two halves of the pedestal base cover over
the pedestal base and align the mounting holes.
12. Using a #1 Phillips head screwdriver, tighten the
two mounting screws [Figure 6].
Mounting Screw
Screwdriver
9/16" Socket
and Socket
Wrench
Clear Silicone
⅜" Flat Washer
⅜" x 2½"
Anchor Bolt
Pedestal
Base
Pedestal Installation (cont.)
Fig. 4
Inserting Anchor Bolts
Fig. 5
Completing Anchoring Process
Fig. 6
Installing Base Cover


