background image


Using the 

self adjusting laser


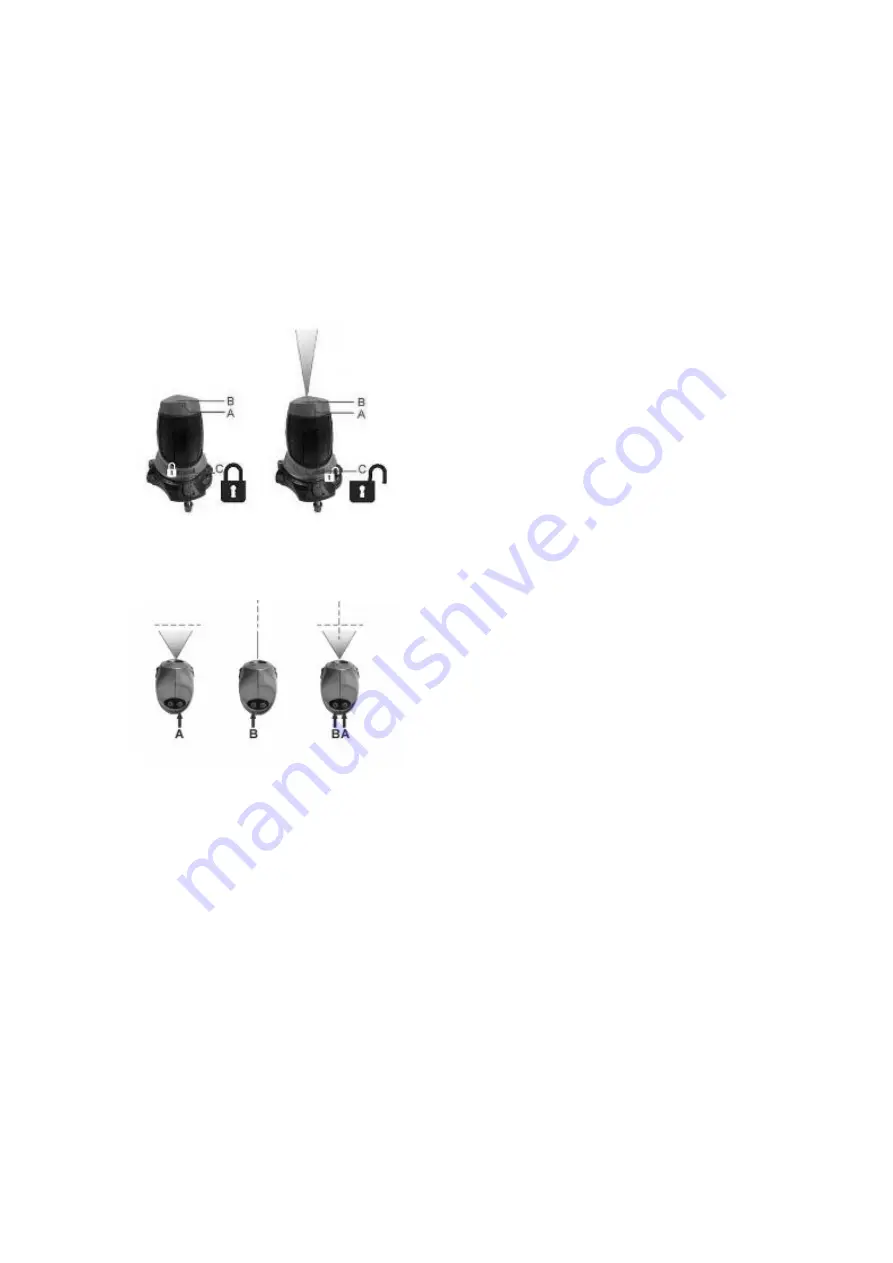
Switch on/off the tool by pressing button A or button B


·

do not look into the laser beam. 

·

do not point the laser beam at persons or animals. 

·

always switch off the tool after use. 

·

always lock the self-leveling system after use and. 

·

during transportation by sliding switch C in the lock-position.


Operating the tool


·

position the tool on a horizontal surfac

e.  

·

switch on the too

l. 

If the surface inclines more than 4°, the tool is out of its self-leveling range 

·

level the tool by turning adjustment knobs E in such a way that the bubbles in levels F are 
centered -only use the bubble levels as a first rough indication for leveling.


·

project a horizontal line by pressing button A. 

·

project a vertical line by pressing button B.


·

project a crossed line by pressing button A and B    one after the other.


·

obstructions in front of the tool will not affect the line projection. 

·

use the tool manually for quick reference of a straight-line or alignment of two points of 

reference (lock the self-leveling system)  

Summary of Contents for EPT-SA10

Page 1: ...anual de instrucciones Esta herramienta emite una l nea de referencia l ser que cuando se utiliza en interiores o bajo la luz solar indirecta genera una l nea l ser recta visible en la superficie dond...

Page 2: ...na pieza de trabajo robusta sin superficie reflectante es decir que la madera o las superficies con recubrimiento rugoso son aceptables La chapa de acero reflectante brillante o similar no es adecuada...

Page 3: ...asegur ndose de que los terminales y est n orientados correctamente cierre D y aseg rese de que est en su lugar de manera segura Retire siempre las pilas de la herramienta si no la va a utilizar dura...

Page 4: ...mienta est fuera de su rango de autonivelaci n Nivele la herramienta girando los botones de ajuste E de tal manera que las burbujas en los niveles F est n centradas s lo utilice los niveles de burbuja...

Page 5: ...encias en la ubicaci n espacial Tripode K Anillo de bloqueo L Clips de bloqueo M Barra de tr pode N Empu adura de ajuste P Perilla de bloqueo Despliegue el tr pode bloquear el anillo del tr pode K Aju...

Page 6: ...uevas No utilice pilas recargables en este producto No recargue bater as no recargables No permita que ninguna pieza entre en contacto con el calor o una llama directa No permita que el agua entre en...

Page 7: ...ng laser level 4 Instruction Manual This tool emits a laser reference line which when used indoors or indirect sunlight generates a visible straight laser line on the surface where the beam is project...

Page 8: ...beam is aimed at a sturdy work piece without reflective surface i e wood or rough coated surfaces are acceptable Bright shiny reflective sheet steel or the like is not suitable for laser use as the re...

Page 9: ...t include making sure that the and terminals are orientated correctly close D and ensure it is in place securely always remove the batteries from the tool if the tool is not used for a long period alw...

Page 10: ...e surface inclines more than 4 the tool is out of its self leveling range level the tool by turning adjustment knobs E in such a way that the bubbles in levels F are centered only use the bubble level...

Page 11: ...lace and for seeing it better in these conditions Determine the differences in the spatial location Tripod K Locking ring L Locking clips M Tripod rod N Adjustment handle P Locking knob unfold the tri...

Page 12: ...Do not mix used and new batteries Do not use rechargeable batteries in this product Do not recharge non rechargeable batteries Do not allow any part to come in contact with heat or a direct flame Do...

Reviews: