background image

27

Some individuals may experience a mild tingling sensation, gag reflex, 

irritation or minor bleeding when first using Amabrush. This should stop after 

a few days of use. If not, please consult your dental professional.

5.2 CHARGING

The handpiece is sealed and the battery is not accessible. Do not attempt 

to replace the batteries. Beware the risk of explosion when replacing an 

incorrect type of battery.

When the power level of your Amabrush noticeably decreases, you need to 

recharge the handpiece. 

To charge the Amabrush:

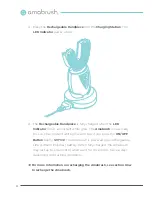
•  Place the Amabrush on the

 Charging Station

. The 

LED Indicator

 shows a 

pulsing white light and the charging starts. Once the charging is finished, the 

LED Indicator

 will glow constantly in white colour. 

If you do not want the LED to shine, you can turn off this function. 

To disable the shining of the LED:

1.  Make sure that the 

Amabrush

 is in the 

Charging Station

.

2.  Press the 

On/Off Button

. The 

LED Indicator 

will go out. 

3.  To activate the LED indicator, press the 

On/Off Button

 again. 

Summary of Contents for AM-SB01

Page 1: ...USER MANUAL Amabrush1 www amabrush com SEPTEMBER 2018 VERSION 1 0 STARTER SET BASIC ...

Page 2: ...d herein If you have any suggestions for improvements or amendments or have found errors in this publication please notify us All pertinent state regional and local safety regulations must be observed when using this product Failure to observe this information can result in injury or equipment damage Copyright 2018 by Amabrush All rights reserved No part of this publication may be reproduced distr...

Page 3: ...XPLANATION OF VISUAL SIGNALS 12 3 SAFETY INSTRUCTIONS 13 3 1 HOW TO USE THE AMABRUSH1 SAFELY 13 3 1 1 Safety information for vulnerable people 13 3 1 2 Safety information related to the intended use 13 3 1 3 Safety information related to the use of the product in residential areas 14 3 1 4 Safety information related to the risk of electrocution 14 3 1 5 Safety information related to the power plug...

Page 4: ...3 5 1 BRUSHING 23 5 1 1 Brushing Modes 25 5 1 2 Brushing your teeth further information 26 5 2 CHARGING 27 5 3 CONFIGURATION 28 6 CLEANING AND MAINTENANCE 29 6 1 HOW TO CLEAN THE AMABRUSH 29 6 2 HOW TO REPLACE A MOUTHPIECE 30 7 TROUBLESHOOTING AND REPAIR 31 7 1 HOW TO IDENTIFY AND SOLVE PROBLEMS 31 8 DISPOSAL 33 8 1 DISPOSAL OF ELECTRONIC EQUIPMENT 33 8 2 DISPOSAL OF PACKAGING WASTE 33 8 3 DISPOSA...

Page 5: ...le conventions are used in this document Bold Names of product elements commands options programs processes services and utilities Names of interface elements such as windows dialog boxes buttons fields and menus Interface elements the user selects clicks presses or types Italic Publication titles referenced in text Emphasis for example a new term ...

Page 6: ...sed by persons who have fully read and understood the contents of the User Manual Ensure that each person who uses the Amabrush has read the User Manual and follows the instructions This will avoid fire explosions electric shocks or other hazards that may result in damage to property and or severe or fatal injuries Failure to do so can result in serious injury or death Keep all instructions for fu...

Page 7: ...ns technical information and other product documentation are available at the following address support amabrush com There you can submit comments We appreciate your feedback For questions information technical assistance or ordering instructions please contact us Amabrush GmbH Weyringergasse 3 Top B3 1040 Vienna Austria https support amabrush com ...

Page 8: ...r their safety The Amabrush shall be used with original accessories and original components only If used with software the Amabrush shall only be used with the original Amabrush App All use other than described in the Safety Instructions and the User Manual is seen as unintended use 2 2 THE AMABRUSH1 STARTER SET BASIC AND ITS ACCESSORIES The Starter Set Basic consists of the following original com...

Page 9: ...Standard V 1 2 Battery 3 7V 160mAh Typical Charging Duration 2h Standby Time 6 weeks Usage Time 4 weeks when used 2 times each day Frequency band 2 4 Ghz BLE Maximum radio frequency power transmitted in the frequency band s in which the radio equipment operates Max 100mW IP Rating Handpiece IP 45 Dimensions 70x58 5x51mm Weight 75g Power Plug Model No AM PP01 Input Power 100 240V AC 50 60Hz 0 3A Ou...

Page 10: ...el No AM TP01 Maximal Storage Duration 12 months Dimensions 54x52 2x15mm Weight 26g filled Antimicrobial Mouthpiece Model No AM AM01 Dimensions in mm 65x81x34mm Weight in g 45g 2 4 SIMPLIFIED EU DECLARATION OF CONFORMITY Amabrush GmbH hereby declares that the radio equipment type Amabrush1 is in compliance with Directive 2014 53 EU The full text of the EU declaration of conformity is available at ...

Page 11: ...ELEMENTS A Rechargeable Handpiece B Magnetic Connection C Inject Toothpaste Button D On Off Button E LED Indicator F Antimicrobial Mouthpiece G Wireless Charging Station H Power Plug I Toothpaste Pod A F G H C D E B I ...

Page 12: ...a constant glow Massage brushing mode Treats gums and teeth with a gentle massage Lasts 20 seconds Violet constant glow Power brushing mode Provides faster vibrations Lasts 20 seconds Blue pulsing glow Waiting for Bluetooth connection Blue constant glow Bluetooth connection established White pulsing glow Amabrush is charging White constant glow The Amabrush is fully charged Red Error ...

Page 13: ...they have been given supervision or instruction concerning use of the Amabrush in a safe way and understand the hazards involved Children shall not play with the Amabrush Never leave children unattended with the packaging material The packaging material represents a danger of suffocation Children frequently underestimate the dangers Always keep children away from the packaging material Be vigilant...

Page 14: ...ing Do not place or store the Wireless Charging Station where it can fall or be pulled into water or other liquid Do not reach for the Wireless Charging Station if it has fallen into water or other liquid If the Wireless Charging Station or Power Plug falls into water or other liquid unplug it immediately Never use a damaged Wireless Charging Station that has a damaged Power Plug or Power Plug cor...

Page 15: ... the Power Plug and the point where the Power Plug exits from the Wireless Charging Station 3 1 7 Safety information regarding the use of the Amabrush Read and follow the instructions regarding the installation and use in the User Manual provided at support amabrush com before using the Amabrush We recommend using the Wireless Charging Station provided with your Amabrush However your Amabrush can ...

Page 16: ... of the Wireless Charging Station and the Power Plug in touch with water Do not use wipes or chemicals as these could damage the surface If your Amabrush will not be used for an extended period of time unplug the Wireless Charging Station Store the Amabrush in a cool dry place away from direct sunlight Do not put any or all parts of the Amabrush into the dishwasher 3 1 9 Service and repair safety ...

Page 17: ...on that the product complies with the essential requirements of the relevant European health safety and environmental protection legislation The symbol on the product the accessories or packaging indicates that this device must not be treated as unsorted municipal waste but must be collected separately ...

Page 18: ...on DISPOSAL 2 Make sure that the packaging contains the following content Starter Set Basic Rechargeable Handpiece Wireless Charging Station with Power Plug Antimicrobial Mouthpiece 3 x Toothpaste Pods Additionally contained in Starter Set Pro is a Ø Ø UV Sanitizing Station Additionally contained in Starter Set Ultimate are Ø Ø UV Sanitizing Station Ø Ø Wireless Charging Travel Case 3 Check the ap...

Page 19: ... the Amabrush How to assemble the Amabrush 1 Attach the Toothpaste Pod NOTICE Amabrush offers three types of Toothpaste Pods It is recommended that you replace your Toothpaste Pod every month or whenever empty to achieve optimal results ...

Page 20: ...outhpiece in place CAUTION The Mouthpiece and the Handpiece are connected via a magnet Be careful when connecting these parts as body parts might get jammed between them NOTICE Amabrush offers one type of mouthpiece It is recommended that you replace your mouthpiece every three months to achieve optimal results ...

Page 21: ... the Amabrush 1 Place the Wireless Charging Station where it cannot fall or be pulled into water or other liquid 2 Plug the Power Plug into the Charging Station and then into a suitable properly installed and easily accessible mains power socket ...

Page 22: ...Amabrush is now ready for use The constant white glow will stop if you press the ON OFF Button briefly NOTICE The Amabrush is powered by a rechargeable LiPo Lithium Polymer battery When fully charged the Amabrush may last up to one month when used for 10 seconds twice a day depending on brushing conditions è For more information on recharging the Amabrush see section How to recharge the Amabrush ...

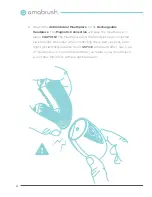
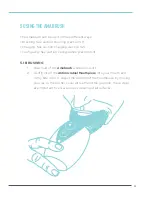
Page 23: ...iguring See section Configuration section 5 3 5 1 BRUSHING 1 Take hold of the Amabrush while turned off 2 Gently insert the Antimicrobial Mouthpiece into your mouth and softly bite on to it Adjust the position of the Mouthpiece by moving your jar so the bristles cover all teeth and the gum line These steps are important to ensure proper cleaning of all surfaces ...

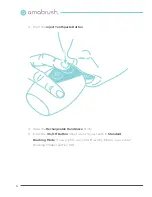
Page 24: ...ct Toothpaste Button 4 Grab the Rechargeable Handpiece firmly 5 Press the On Off Button once to brush your teeth in Standard Brushing Mode If you wish to use other Brushing Modes see section Brushing Modes section 5 1 1 ...

Page 25: ...ed Brushing Mode by displaying different colours In order to change the Brushing Mode press the On Off Button once more With every further click of the On Off Button the Amabrush will switch to the next Brushing Mode in the order indicated by the table below Once you have selected the Brushing Mode you want wait 2 seconds for the brushing to start The brushing will stop automatically after the tim...

Page 26: ...h brushing technique The U shaped form of the mouthpiece may cause it to slip off of the teeth during use particularly when first getting used to this technique and especially if the mouth is open too wide Consult your dental professional before using the Amabrush if you have braces or dental restorations With braces it is not always possible to fit the mouthpiece into your mouth correctly If this...

Page 27: ...tery When the power level of your Amabrush noticeably decreases you need to recharge the handpiece To charge the Amabrush Place the Amabrush on the Charging Station The LED Indicator shows a pulsing white light and the charging starts Once the charging is finished the LED Indicator will glow constantly in white colour If you do not want the LED to shine you can turn off this function To disable th...

Page 28: ... User Profile Create your own Brushing Modes Change the colour the strength of the vibration and its duration of a Brushing Mode Read the battery status Update the firmware Receive push notifications To configure the Amabrush via the supplied Smartphone App 1 Press the On Off Button for at least two seconds until the LED Indicator shows blue pulsing light 2 Release the On Off Button The Amabrush i...

Page 29: ...rom the Rechargeable Handpiece by pulling both parts apart from each other 2 Rinse the Antimicrobial Mouthpiece under lukewarm water 3 Put the Antimicrobial Mouthpiece at a place where it can dry preferably onto the Mouthpiece Holder Use the UV Sanitizing Station for optimal cleaning results 4 Use a damp cloth to wipe the entire surface of the Rechargeable Handpiece Make sure the Rechargeable Hand...

Page 30: ...bial Mouthpiece at least every three months to achieve optimal brushing results To replace the mouthpiece 1 Remove the Antimicrobial Mouthpiece from the Rechargeable Handpiece by pulling both parts apart from each other 2 Replace with a new Antimicrobial Mouthpiece CAUTION The Mouthpiece and the Handpiece are connected via a magnet Be careful when connecting these parts as body parts might get jam...

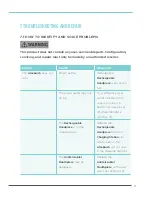
Page 31: ...chargeable Handpiece see section 5 2 The power outlet may not be live Try a different power outlet The electricity supply to outlets in bathrooms may be cut off when the light is switched off The Rechargeable Handpiece is on the charging base Remove the Rechargeable Handpiece from the Charging Station for safety reasons the Amabrush will not work in the Charging Station The Antimicrobial Mouthpiec...

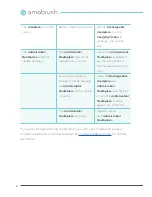
Page 32: ...structions in this manual see section 4 1 2 Excessive toothpaste buildup could be keeping the Antimicrobial Mouthpiece from working correctly Clean the Rechargeable Handpiece and Antimicrobial Mouthpiece and then try to lock the Antimicrobial Mouthpiece in place again see section 6 1 The Antimicrobial Mouthpiece is broken Replace with a new Antimicrobial Mouthpiece If you are still experiencing te...

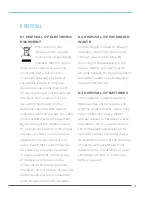
Page 33: ...nt The recycling of materials contributes to the conservation of natural resources Therefore do not dispose of your old electrical and electronic equipment with the unsorted municipal waste 8 2 DISPOSAL OF PACKAGING WASTE The packaging is made of different materials which may be disposed through your local facilities By disposing of the packaging in the proper manner you help to avoid possible haz...

Page 34: ...Amabrush GmbH Weyringergasse 3 Top B3 1040 Vienna Austria Email info amabrush com ...

Reviews: