background image

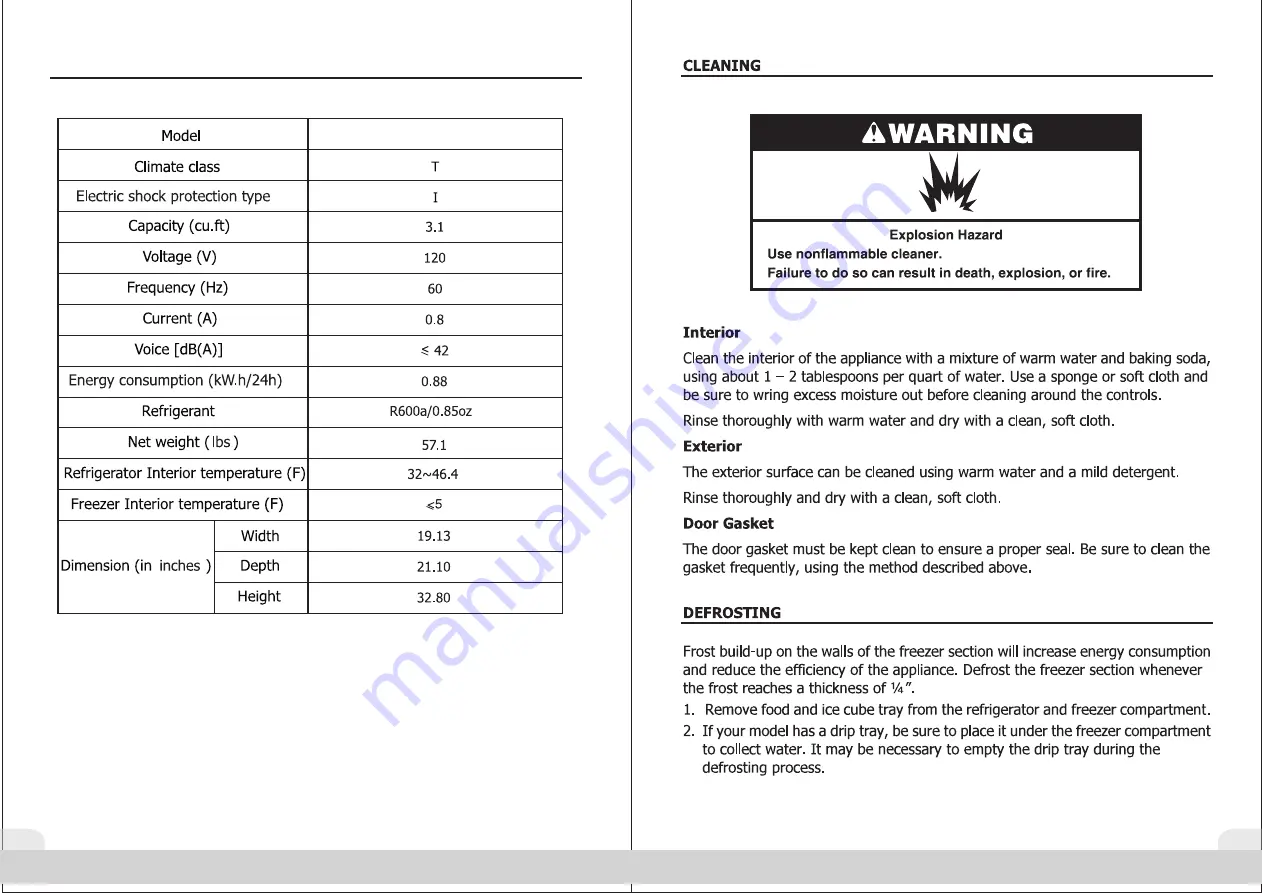
SPECIFICATIONS


7

6

AMA31S1E/AMAR31TS1E

Summary of Contents for AMA31S1E

Page 1: ... rights reserved Manufactured under license by Galanz Zhongshan Galanz Consumer Electric Appliances Co Ltd Guangdong China Limited warranty provided by manufacturer To ensure proper use of this appliance and for your safety please read the following instructions completely before operating this appliance C Model No AMA31S1E AMAR31TS1E ...

Page 2: ...ator in water or other liquid 4 The refrigerant of this product is R600a which is flammable Make sure not to damage the cooling system during the transportation and installation Please note that servicing shall be done by factory authorized service personnel so as to minimize the risk of possible ignition due to incorrect parts or improper service 5 SAVE THESE INSTRUCTIONS IMPORTANT SAFETY INSTRUC...

Page 3: ...TANT GROUNDING INSTRUCTIONS This appliance must be grounded due to the event of an electrical short circuit This appliance is equipped with a cord having a grounding wire with a grounding plug The plug must be plugged into an outlet that is properly installed and grounded 1 Consult a qualified electrician or serviceman if the grounding instructions are not completely understood or if doubt exists ...

Page 4: ...or drying 5 Hot food should be cooled down before placing into the appliance to prevent increase in interior temperature and power consumption Placing food inside too soon will impact the performance 6 Reducing the frequency of door opening can lower power consumption 1 2 3 4 5 6 7 8 ...

Page 5: ...SPECIFICATIONS 7 6 AMA31S1E AMAR31TS1E ...

Page 6: ...he appliance and it should be turned off and unplugged from the outlet Clean the interior according to the directions provided in the Cleaning section of this manual and leave the door open MOVING THE REFRIGERATOR 1 Turn off the refrigerator and unplug from the outlet 2 Remove all food and securely tape down all loose items inside 3 Tape the door shut 4 Do not lift or pull the door or door handle ...

Page 7: ... with a screwing light 120V 10W Refer to the illustrations and instructions below 1 Move the lamp cover 1 2 2 inches according to arrow point direction 2 Take out the lamp cover 3 Rotate and take out the bulb in counterclockwise direction 4 Replace bulb and reinstall lamp cover ...

Page 8: ...13 12 TROUBLESHOOTING TIPS ...

Page 9: ...his period we will repair or replace this product at our option This warranty extends only to the original consumer purchaser and does not cover a defect resulting from abuse misuse neglect including failure to clean product regularly in accordance with manufacturer s instructions use for commercial purposes or any use not in conformity with the printed directions We exclude all claims for special...

Reviews: