background image

12

3.

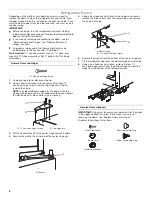
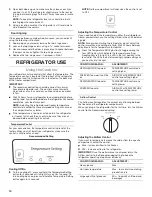
Replace the glass by pushing it straight in.

Crisper Humidity Control 

You can control the amount of humidity in the moisture-sealed 

crisper. Adjust the control to LOW or HIGH.
LOW (open) lets moist air out of the crisper for best storage of 

fruits and vegetables with skins. 

Fruit: Wash, let dry, and store in refrigerator in plastic bag or 

crisper. Do not wash or hull berries until they are ready to use. 

Sort and keep berries in original container in crisper, or store in 

a loosely closed paper bag on a refrigerator shelf.
Vegetables with skins: Place in plastic bag or plastic container 

and store in crisper. 

HIGH (closed) keeps moist air in the crisper for best storage of 

fresh, leafy vegetables. 

Leafy vegetables: Wash in cold water, drain, and trim or tear off 

bruised and discolored areas. Place in plastic bag or plastic 

container and store in crisper.

FREEZER FEATURES

Your model may have some or all of these features. 

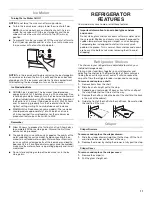
Freezer Shelf

Full-Width Shelf (on some models)

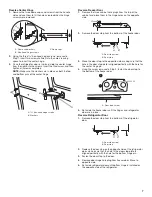
To remove and replace the freezer shelf:
1.

Remove items from the shelf.

2.

Lift back of shelf over stop and slide shelf straight out.

3.

Replace the shelf by sliding the back of the shelf into the 

tracks on walls of cabinet.

4.

Be sure to slide the shelf in all the way.

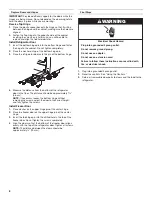
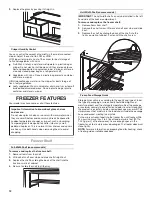
Half-Width Shelf (on some models)

IMPORTANT:

 The half-width shelf can only be installed in the left-

hand side of the freezer compartment. 

To remove and replace the freezer shelf:
1.

Remove items from shelf.

2.

Remove the shelf screw. Lift back of shelf over stop and slide 

it out.

3.

Replace the shelf by sliding the back of the shelf into the 

tracks on walls of cabinet. Fasten with the shelf screw.


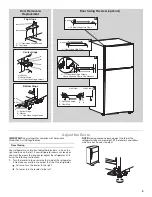
Frozen Food Storage Guide

Storage times will vary according to the quality and type of food, 

the type of packaging or wrap used (should be airtight and 

moisture-proof), and the storage temperature. Seal the package 

or container securely to avoid taste and odor transfer throughout 

the product. Ice crystals inside a sealed package are normal. This 

simply means that moisture in the food and air inside the package 

have condensed, creating ice crystals.
Put no more unfrozen food into the freezer than will freeze within 

24 hours (no more than 2 to 3 lbs of food per cubic foot [907 to 

1,350 g per L] of freezer space). Leave enough space in the 

freezer for air to circulate around packages. The freezer door must 

close tightly. 

NOTE: 

For more information on preparing food for freezing, check 

a freezer guide or reliable cookbook.

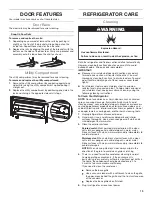
Important information to know about glass shelves 
and covers:

Do not clean glass shelves or covers with warm water when 
they are cold. Shelves and covers may break if exposed to 
sudden temperature changes or impact, such as bumping. 
Tempered glass is designed to shatter into many small, 
pebble-size pieces. This is normal. Glass shelves and covers 
are heavy. Use both hands when removing them to avoid 
dropping.

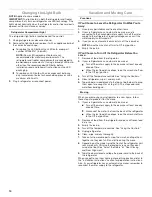
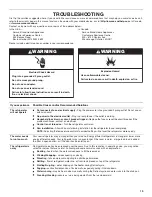
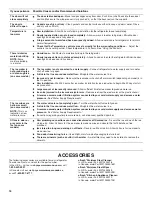
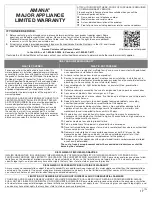
Summary of Contents for ART308FFDM03

Page 1: ... Adjust the Doors 9 REFRIGERATOR USE 10 Using the Controls 10 Ice Maker 11 REFRIGERATOR FEATURES 11 Refrigerator Shelves 11 Crisper 11 FREEZER FEATURES 12 Freezer Shelf 12 DOOR FEATURES 13 Door Rails 13 Utility Compartment 13 REFRIGERATOR CARE 13 Cleaning 13 Changing the Light Bulb 14 Vacation and Moving Care 14 TROUBLESHOOTING 15 ACCESSORIES 16 WARRANTY 17 SÉCURITÉ DU RÉFRIGÉRATEUR 18 Mise au reb...

Page 2: ...cause birth defects or other reproductive harm IMPORTANT SAFETY INSTRUCTIONS WARNING To reduce the risk of fire electric shock or injury when using your refrigerator follow these basic precautions SAVE THESE INSTRUCTIONS Plug into a grounded 3 prong outlet Do not remove ground prong Do not use an adapter Do not use an extension cord Disconnect power before servicing Replace all parts and panels be...

Page 3: ...u Throw Away Your Old Refrigerator or Freezer Take off the doors Leave the shelves in place so that children may not easily climb inside WARNING Suffocation Hazard Remove doors from your old refrigerator Failure to do so can result in death or brain damage Important information to know about disposal of refrigerants Dispose of refrigerator in accordance with Federal and Local regulations Refrigera...

Page 4: ...rn cooling off or turn the control Thermostat Refrigerator or Freezer control depending on the model to OFF and then disconnect the refrigerator from the electrical source When you are finished reconnect the refrigerator to the electrical source and turn cooling on or reset the control Thermostat Refrigerator or Freezer control depending on the model to the desired setting See Using the Controls i...

Page 5: ...off valve to the cold water pipewith the pipe clamp Be sure the outlet end is solidly in the drilled hole in the water pipe and that the washer is under the pipe clamp Tighten the packing nut Tighten the pipe clamp screws slowly and evenly so washer makes a watertight seal Do not overtighten or you may crush the copper tubing 7 Slip the compression sleeve and compression nut on the copper tubing a...

Page 6: ...the top hinge and lift up to remove the hinge NOTE Provide additional support for the doors while the hinges are being moved Do not depend on the door magnets to hold the doors in place while you are working 3 Lift the freezer door off of the center hinge and set it aside 4 Remove the washer from the top of the center hinge pin 5 Using a hex head socket wrench and an open end wrench remove the thr...

Page 7: ... to the opposite side making sure that the hole in the door stop plate is aligned perfectly with the hole for the center hinge pin 4 Using the screw removed in Step 2 fasten the door stop to the bottom of the freezer door 5 Set aside the freezer door until the hinges and refrigerator door are in place Reverse Refrigerator Door 1 Remove the door stop from the bottom of the refrigerator door 2 Repla...

Page 8: ... distance should be approximately 1 4 6 cm NOTE If necessary loosen the bottom hinge without removing the screws adjust the door to the correct height and fully tighten the screws Install Freezer Door 1 Place washer on the upper hinge pin of the center hinge 2 Place the freezer door on the upper hinge pin of the center hinge 3 Insert the top hinge pin into the drilled hole in the top of the freeze...

Page 9: ...refrigerator To raise turn the leveler to the right To lower turn the leveler to the left NOTE Having someone push against the top of the refrigerator takes some weight off the levelers and rollers which makes it easier to adjust Door Removal Replacement Top Hinge A 5 16 Hex Head Hinge Screws B Top Hinge A B A Bottom Hinge Bottom Hinge B Washer C 5 16 Hex Head Hinge Screws Door Swing Reversal opti...

Page 10: ...e the control is still preset as shown Recommended Setting Cooling Off On To turn cooling off press and hold the Temperature Setting button for 4 seconds until all lights turn on for 1 second To turn cooling back on press and hold the Temperature Setting button again for 4 seconds NOTE Neither compartment will cool when the control is set to OFF Adjusting the Temperature Control If you need to adj...

Page 11: ...tened water supply Water softener chemicals such as salt can damage parts of the ice maker and lead to poor quality ice If a softened water supply cannot be avoided make sure the water softener is operating properly and is well maintained Do not store anything on top of the ice maker or in the ice storage bin REFRIGERATOR FEATURES Your model may have some or all of these features Refrigerator Shel...

Page 12: ...e left hand side of the freezer compartment To remove and replace the freezer shelf 1 Remove items from shelf 2 Remove the shelf screw Lift back of shelf over stop and slide it out 3 Replace the shelf by sliding the back of the shelf into the tracks on walls of cabinet Fasten with the shelf screw Frozen Food Storage Guide Storage times will vary according to the quality and type of food the type o...

Page 13: ...s To Clean Your Refrigerator NOTE Do not use abrasive or harsh cleaners such as window sprays scouring cleansers flammable fluids muriatic acid cleaning waxes concentrated detergents bleaches or cleansers containing petroleum products on exterior surfaces doors and cabinet plastic parts interior and door liners or gaskets Do not use paper towels scouring pads or other harsh cleaning tools 1 Unplug...

Page 14: ...controls See Using the Controls 5 Unplug refrigerator 6 Clean wipe and dry thoroughly 7 Take out all removable parts wrap them well and tape them together so they don t shift and rattle during the move 8 Depending on the model raise the front of the refrigerator so it rolls more easily OR raise the leveling screws so they don t scrape the floor See Adjust the Doors or Door Closing and Door Alignme...

Page 15: ...ld fuse blown or circuit breaker tripped Replace the fuse or reset the circuit breaker If the problem continues contact an electrician Control is not turned on Turn the refrigerator control on New installation Allow 24 hours following installation for the refrigerator to cool completely NOTE Adjusting the temperature controls to coldest setting will not cool the refrigerator more quickly The motor...

Page 16: ... closed The ice maker is not producing ice or not enough ice on some models The ice maker is not connected to a water supply Connect refrigerator to water supply and turn water shut off valve fully open A kink in the line can reduce water flow Straighten the water source line Ice maker is not turned on Make sure the ice maker wire shut off arm or switch depending on model is in the On position New...

Page 17: ...or water filters preservation solutions etc 5 Defects or damage caused by the use of non genuine Amana parts or accessories 6 Conversion of products from natural gas or L P gas 7 Damage from accident misuse abuse fire floods acts of God or use with products not approved by Amana 8 Repairs to parts or systems to correct product damage or defects caused by unauthorized service alteration or modifica...

Page 18: ...ISSEMENT réfrigérateur prendre quelques précautions fondamentales y compris les suivantes Pour réduire les risques d incendie de choc électrique ou des blessures lors de l utilisation du IMPORTANTES INSTRUCTIONS DE SÉCURITÉ CONSERVEZ CES INSTRUCTIONS Brancher l appareil sur une prise à 3 alvéoles reliée à la terre Ne pas enlever la broche de liaison à la terre Ne pas utiliser un adaptateur Ne pas ...

Page 19: ...re réfrigérateur Pour plus de renseignements voir Sécurité du réfrigérateur Avertissements de la proposition 65 de l État de Californie AVERTISSEMENT Ce produit contient au moins un produit chimique connu par l État de Californie pour être à l origine de cancers AVERTISSEMENT Ce produit contient au moins un produit chimique connu par l État de Californie pour être à l origine de malformations et a...

Page 20: ...re Il est recommandé d utiliser un circuit distinct pour alimenter uniquement votre réfrigérateur Utiliser une prise murale qui ne peut pas être mise hors circuit à l aide d un commutateur Ne pas utiliser un câble de rallonge REMARQUE Avant d installer ou de nettoyer un quelconque élément ou de retirer une ampoule d éclairage désactiver le refroidissement ou placer la commande du thermostat réfrig...

Page 21: ...ébrancher le réfrigérateur ou déconnecter la source de courant électrique 2 Fermer le robinet principal d arrivée d eau Ouvrir le robinet de puisage le plus proche pendant une période suffisante pour que la canalisation d eau se vide 3 Trouver une canalisation d eau froide verticale de à 1 1 25 cm à 3 18 cm près du réfrigérateur IMPORTANT Assurez vous qu il s agit d un conduit d eau froide Un cond...

Page 22: ... être inversé IMPORTANT Avant de commencer tourner la commande du réfrigérateur à Off arrêt Débrancher le réfrigérateur ou déconnecter la source de courant électrique Retirer les aliments et tout balconnet de la porte du réfrigérateur Si l utilisateur souhaite uniquement enlever et réinstaller les portes voir les sections Démontage des portes et des charnières et Réinstallation des portes et des c...

Page 23: ...s trous laissés lors du retrait des vis de charnières 2 À l aide des trois vis de charnière à tête hexagonale de retirées à l étape 1 insérer deux vis à moitié dans les trous en laissant suffisamment d espace pour insérer la charnière centrale 3 Une fois la porte du réfrigérateur en place faire glisser la charnière centrale de la droite sur les vis insérer la troisième vis et serrer complètement t...

Page 24: ...r et aligner la porte du congélateur plus tard Installation de la porte du réfrigérateur 1 Insérer l axe de la charnière inférieure dans la charnière inférieure et fixer la charnière à la caisse Ne pas serrer complètement 2 Placer la rondelle au sommet de l axe de la charnière inférieure 3 Placer la porte du réfrigérateur sur l axe de charnière inférieure 4 Mesurer la distance entre le bas de la p...

Page 25: ...ner le pied de nivellement vers la gauche REMARQUE Si une autre personne pousse le haut du réfrigérateur le poids devient moins lourd sur les vis de nivellement et les roulettes ce qui rend plus facile l ajustement des vis Démontage et réinstallation de la porte Charnière supérieure A Vis de charnière à tête hexagonale de 5 16 B Charnière supérieure A B Inversion du sens d ouverture de la porte fa...

Page 26: ...et du congélateur à un réglage plus froid que le réglage recommandé ne refroidira pas les compartiments plus rapidement Si la température est trop tiède ou trop froide dans le réfrigérateur ou le congélateur vérifier d abord les évents pour s assurer qu ils ne sont pas bloqués avant de régler les commandes Commandes de température Pour votre commodité les commandes de température sont préréglées à...

Page 27: ...ffre plus élevé plus froid par étapes de un demi numéro Par exemple si la commande est à 3 la déplacer entre 3 et 4 Attendre 24 heures et si nécessaire tourner graduellement la commande du congélateur au réglage le plus élevé en attendant 24 heures entre chaque augmentation Production MAXIMALE de glaçons sur certains modèles La machine à glaçons devrait produire environ de 16 à 20 lots de glaçons ...

Page 28: ...laisse échapper l air humide du bac à légumes pour mieux conserver les fruits et légumes à pelures Fruits Laver laisser sécher et garder au réfrigérateur dans un sac en plastique ou dans le bac à légumes Ne pas laver ni équeuter les baies avant le moment de leur utilisation Répartir et garder les baies dans leur contenant original dans le bac à légumes ou les conserver sur une tablette du réfrigér...

Page 29: ... le congélateur Laisser assez d espace dans le congélateur pour permettre la circulation d air entre les emballages S assurer que la porte du congélateur est bien fermée REMARQUE Pour plus de renseignements sur la préparation des aliments pour la congélation consulter un guide pour congélateur ou un livre de recettes fiable CARACTÉRISTIQUES DE LA PORTE Votre modèle peut comporter l ensemble de ces...

Page 30: ...EMARQUE Lors du nettoyage de l acier inoxydable essuyer toujours dans le sens du grain pour éviter les éraflures 4 Le condenseur n a pas besoin d être nettoyé souvent dans des conditions de fonctionnement normales Si l environnement est particulièrement graisseux poussiéreux ou s il y a des animaux domestiques dans la maison le condenseur devrait être nettoyé tous les deux ou trois mois pour assur...

Page 31: ...r afin d éviter l accumulation d odeurs ou de moisissure Déménagement Lorsque l on déménage le réfrigérateur dans une nouvelle habitation suivre ces étapes pour préparer le déménagement 1 Si le réfrigérateur a une machine à glaçons automatique Fermer l approvisionnement d eau de la machine à glaçons au moins une journée à l avance Débrancher la canalisation d eau de l arrière du réfrigérateur Lors...

Page 32: ... un décès une explosion ou un incendie Sivousrencontrez les problèmes suivants Causes possibles et ou solutions recommandées Le réfrigérateur ne fonctionne pas Non raccordé à l alimentation électrique Brancher le cordon d alimentation dans une prise à 3 alvéoles reliée à la terre Ne pas utiliser de rallonge Pas d alimentation au niveau de la prise Brancher une lampe pour voir si la prise électriqu...

Page 33: ...ouverture des portes et les garder complètement fermées Une grande quantité d aliments tièdes a été récemment ajoutée Attendre quelques heures pour permettre au réfrigérateur de revenir à une température normale Vérifier que le réglage de la des commandes de température est adapté à l environnement de l appareil Ajuster les commandes à un réglage plus froid Vérifier la température au bout de 24 he...

Page 34: ...ation d eau Un système de filtration de l eau par osmose inverse raccordé à votre alimentation en eau froide peut réduire la pression de l eau Voir la section Spécifications de l alimentation en eau Pour d autres questions concernant la pression de l eau contacter un plombier agréé qualifié Mauvais goût mauvaise odeur ou couleur grise des glaçons sur certains modèles Des raccords de plomberie neuf...

Page 35: ...5 Défauts ou dommage résultant de l utilisation de pièces ou accessoires Amana non authentiques 6 Conversion de votre produit du gaz naturel ou du gaz de pétrole liquéfié 7 Dommages causés par accident mésusage abus incendie inondations catastrophe naturelle ou l utilisation de produits non approuvés par Amana 8 Réparations aux pièces ou systèmes dans le but de rectifier un dommage ou des défauts ...

Page 36: ...W10885250A 2016 Used under license in Canada All rights reserved Utilisé sous licence au Canada Tous droits réservés 04 16 ...

Reviews: