15
RS1500000 Rev. 2
Component Testing
To avoid risk electrical shock, personal injury, or death,
always disconnect electrical power source to the freezer
before attempting to service, unless test procedures require
power to be connected. When removing any wiring from terminals they must be replaced on the same terminals.
Ensure all ground wires are connected before certifying unit as repaired and/or operational.
WARNING
!
Testing Main Condenser
Before testing condenser, verify no leaks exist
elsewhere.
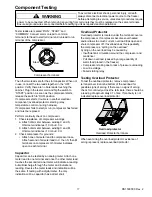
Condenser loop must be disconnected from the system
and tested separately. The following illustration shows
the tubing as it is routed and fastened in the freezer
cabinet flange.
NOTE:
Verify a leak is not present in any external
tubing or joints before performing the following
test.
Following equipment is required to test.
An access fitting
A drum of oil pumped nitrogen.
Pressure regulator.
Two gauges.
Line valve and tubing.
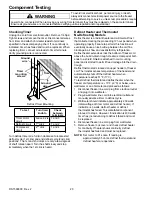
Access fitting should be prepared as follows:
Line
valve
Pressure
regulator
Gauges
Nitrogen Tank and Fittings
Suction
Process
From
condensor
To
condensor
Discharge
Tube
process
Compressor Cutting or Unsoldering
Points Refrigerated Shelf Models
Discharge
From
condensor
Tube
process
To
condensor
To
evaporater
Suction
Condensor
bottom
external
Compressor Cutting or Unsoldering
Points No Defrost Models
Prepare equipment as required and test condenser as
follows:
1. Cut tubing at arrow to condenser and from
condenser as shown in the previous illustration.
2. Crimp and solder the end to condenser that enters
into the cabinet.
3. Silver solder access fitting of test equipment to the
end from condenser tube that emerges from the
cabinet.
4. Pressurize the system to 250 pounds with dry
nitrogen. Test all connections for leaks with a soap
solution.
5. Check the pressure gauge. If pressure drops, there is
a leak. However, it may be necessary to allow as
much as 24 hours for test results to verify no leaks
exist. If there are no leaks, reconnect the tubing.
Evacuate and recharge the system.

