background image


30 

TROUBLE SHOOTING


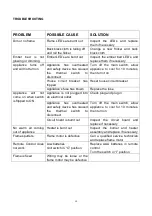
PROBLEM   

POSSIBLE CAUSE 

SOLUTION 

Dim or no flame 

Flame LED’s are burnt out 

Inspect  the  LED’s  and  replace 
them if necessary 

Back black cloth is falling off 
and roll the flicker 

Change  a  new  flicker  and  back 
black cloth 

Ember  bed  is  not 
glowing or dimming 

Ember LED’s are burnt out 

Inspect  the  ember  bed  LED’s  and 
replace them if necessary 

Appliance  turns  off 
and will not turn on 

Appliance  has  overheated 
and safety device has caused 
the 

thermal 

switch 

to 

disconnect 

Turn  off  the  main  switch,  allow 
appliance  to  cool  for  10  minutes, 
then turn it on 

House  circuit  breaker  has 
tripped 

Reset house circuit breaker 

Appliance’s fuse has blown 

Replace the fuse 

Appliance 

will 

not 

come  on  when  switch 
is flipped to ON 

Appliance  is  not  plugged  into 
an electrical outlet 

Check plug and plug in 

Appliance  has  overheated 
and safety device has caused 
the 

thermal 

switch 

to 

disconnect 

Turn  off  the  main  switch,  allow 
appliance  to  cool  for  10  minutes, 
then turn on 

Circuit board is burnt out 

Inspect  the  circuit  board  and 
replace if necessary 

No  warm  air  coming 
out of appliance 

Heater is burnt out 

Inspect  the  burner  and  heater 
assembly and replace if necessary 

Flame sputters 
 

Flame motor is defective 

Call  a  qualified  service  technician 
and replace flame motor 

Remote  Control  does 
not work 

Low batteries 
Unit switch in “O” position 

Replace  AAA  batteries  in  remote 
control 
Turn the switch in “I” position 

Flame is fixed 

Wiring  may  be  loose  or  the 
flame motor may be defective 


Summary of Contents for BI-30-XTRASLIM

Page 1: ...personal injury or loss of life Do not store or use gasoline or other flammable vapors and liquids in the vicinity of this or any other appliance INSTALLER LEAVE THIS M ANUAL WITH THE APPLIANCE CONSUM...

Page 2: ...IMPORTANT INSTRUCTIONS 3 UNPACKING AND TESTING APPLIANCE 6 GROUNDING APPLIANCE 6 LOCATING THE FIREPLACE 6 BI 40 XTRASLIM 8 BI 50 XTRASLIM 9 BI 60 XTRASLIM 10 SAFETY DRILL SCREW AREA OUTDOOR INSTALLATI...

Page 3: ...fire electric shock or injury 12 Avoid the use of an extension cord the extension cord will overheat and cause a fire This heater is not to be used with an extension cord 13 Always use properly ground...

Page 4: ...or mental capabilities or lack of experience and knowledge if they have been given supervision or instruction concerning use of the appliance in a safe way and understand the hazards involved Children...

Page 5: ...ed to prevent it from being tipped over Always use a fireguard when young children and infirm persons can come into contact with the heater Don ts Never leave children unsupervised in a room where the...

Page 6: ...onsider a location where the fireplace screen will not be exposed to direct sunlight from windows or doors Carefully remove the appliance from the box Prior to installing the appliance test to make su...

Page 7: ...3 8 or 73 66 cm X 52 cm BTU 4800 This appliance has been tested in accordance with the UL Standard 2021 for fixed and location dedicated electric room appliances in the United States and Canada If yo...

Page 8: ...20 3 8 or 99 1 cm X 52 cm BTU 4800 This appliance has been tested in accordance with the UL Standard 2021 for fixed and location dedicated electric room appliances in the United States and Canada If...

Page 9: ...m BTU 4800 This appliance has been tested in accordance with the UL Standard 2021 for fixed and location dedicated electric room appliances in the United States and Canada If you need assistance durin...

Page 10: ...50 cm X 52 cm BTU 4800 This appliance has been tested in accordance with the UL Standard 2021 for fixed and location dedicated electric room appliances in the United States and Canada If you need assi...

Page 11: ...e If it is necessary to hard wire this appliance a qualified electrician must remove the cord connection and wire the appliance directly to the household wiring This appliance must be electrically con...

Page 12: ...must be installed away from shows tubs etc Never locate fireplace where it may fall into a bathtub or other water container All wiring connections to line power shall be in accordance with local buil...

Page 13: ...ctive PAN COVER The BI XTRASLIM series electric fireplaces are suitable for installation in outdoor areas protected from direct water impingement In addition to maintaining the listed mantel and combu...

Page 14: ...emoved from the unit by simply pulling it off It is recommended that two people remove the surround The rough wall opening size of the fireplace W D H BI 40 XTRASLIM 39 4 1 2 20 3 8 BI 50 XTRASLIM 49...

Page 15: ...2 Remove the optional trim from the unit as illustrated below Remove the wall framing plates from the unit 3 Re attach the framing plates to the unit as shown below 15...

Page 16: ...16 4 Bend the framing plates as shown 5 Lift the unit into the wall opening Note Two people are required...

Page 17: ...mounting screws threw the framing plates securing the unit into the wall studs 7 Using desired materials finish to the glass for a clean face installation OR re attach the steel surround that was rem...

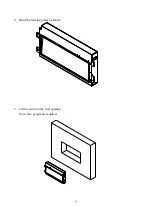
Page 18: ...it from the box Please do the pre test before you install the fireplace 2 Pull out the optional trim from the unit as shows below Remove the framing plates from the unit Note The mantel is available f...

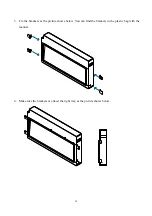
Page 19: ...19 3 Fix the brackets as the picture shows below You can find the brackets in the plastic bag with the manual 4 Make sure the brackets are fixed the right way as the picture shows below...

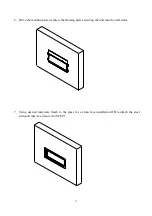
Page 20: ...5 Put the fireplace into the back of the wooden frame 6 Screw the brackets with the wooden frame and make sure the fireplace and the wooden frame are firmly fixed 20...

Page 21: ...least 0 91 m or 3 feet away from combustible materials such as curtains drapes furniture bedding paper etc Before drill check the wall to ensure there is no wiring pipe wires etc in the area Drill 8 o...

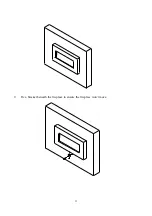
Page 22: ...9 Fix a bracket beneath the fireplace to ensure the fireplace won t move 22...

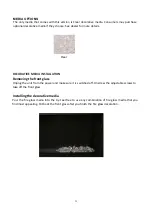
Page 23: ...ional decorative media if they choose See dealer for more details Unplug the unit from the power and make sure it is switched off Unscrew the adjustable screws to take off the front glass Pour the fir...

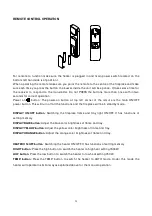
Page 24: ...0W When the room temperature goes above 25 77 the heater will be turned off and the cycle will continue The LED indicator will be PURPLE in colour under this mode 4 Flame effect Press the button marke...

Page 25: ...all the functions and the fireplace will be in standby mode DISPLAY ON OFF button Switching the fireplace flame and tray light ON OFF It has functions of setting memory DISPLAY BLUE button Adjust the...

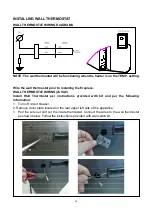
Page 26: ...fireplace WALL THERMOSTAT WIRING 24 VAC Install Wall Thermostat per instructions provided with kit and per the following information 1 Turn off circuit breaker 2 Remove cover plate located on the rea...

Page 27: ...2 0 1 6 601140B LED LIGHT LED3 33 2 1 1 3 3 7 3133504 3135504 3137504 FLICKER ASSEMBLY 1 8 10101225 FLICKER MOTOR 1 10 10702176 10702178 10702180 EMBER BED GLASS 1 11 10114001B TEMPERATURE SENSOR 1 12...

Page 28: ...28 EXPLODED VIEW...

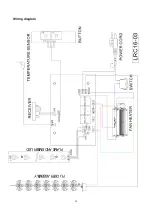
Page 29: ...Wiring diagram 29...

Page 30: ...s fuse has blown Replace the fuse Appliance will not come on when switch is flipped to ON Appliance is not plugged into an electrical outlet Check plug and plug in Appliance has overheated and safety...

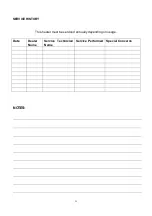
Page 31: ...31 SERVICE HISTORY NOTES This heater must be serviced annually depending on usage Date Dealer Name Service Technician Name Service Performed Special Concerns...

Page 32: ...32...

Reviews: