background image

ear sa

NOTE: BEFORE YOU INSTALL

FRONT INSTALLATION

It is re

commended th

at t

wo people in

stall the 

f

ro

n

t o

n

t

o the appliance, w

f

e

ty glasses and 

gloves when handling glass.

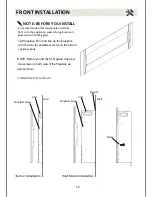
appliance body 

Wall

Unit

Shoulder Sc

re

w

Wall

Mount

Unit

Shoulder Sc

re

w

Screw

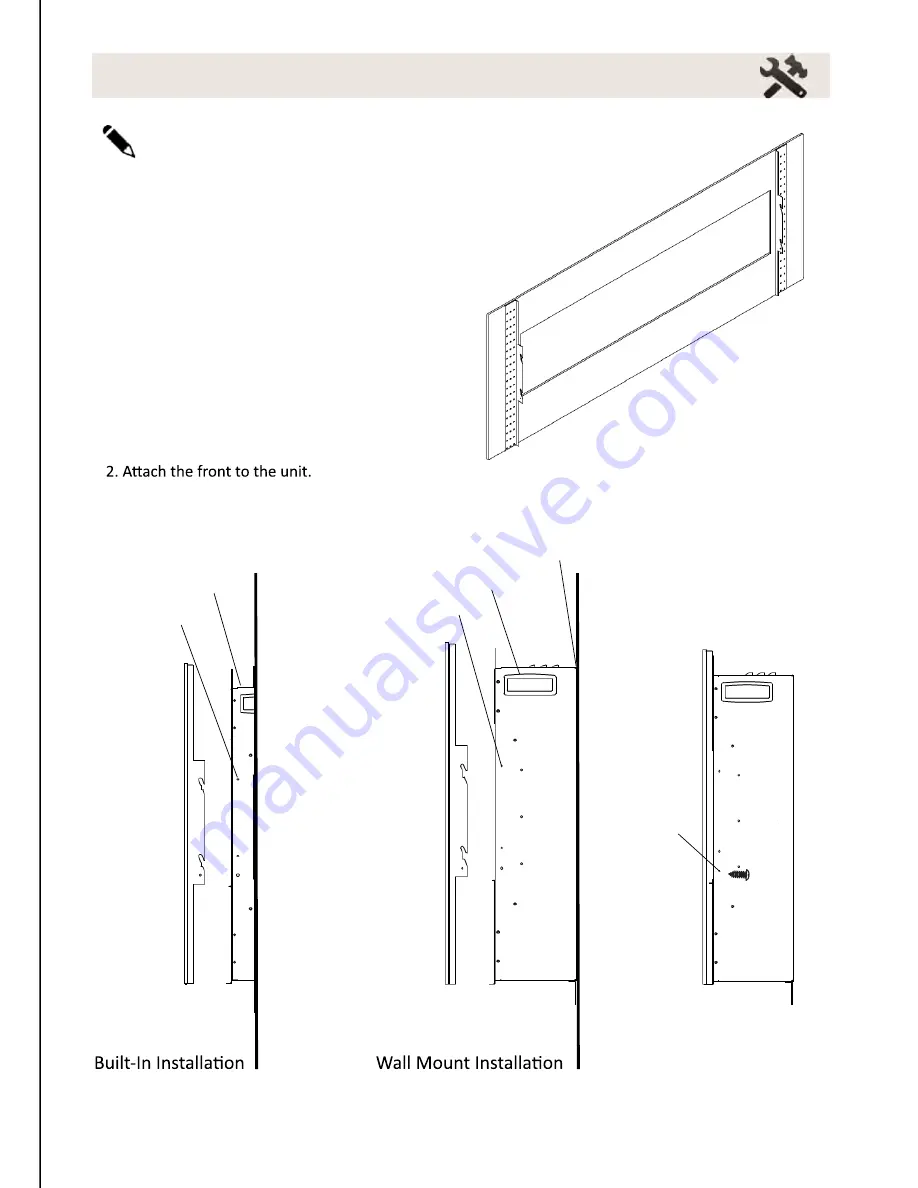
NOTE: Before you lift the front glass. Unscrew

 two screws on both side of the fireplace as

below shown.

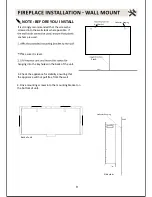
1.Lift fireplace front and line up the brackets

with the four (4) shoulder screws on the side of 

12

Summary of Contents for BI-50-FI-FLUSHMT-BLKGLS

Page 1: ...INSTALLATION AND OPERATION INSTRUCTIONS FOR WALL MOUNT AND BUILT IN UNITS 09 13 01 BI 50 FLUSHMT BLKGLS BI 50 FLUSHMT WHTGLS BI 50 FI FLUSHMT BLKGLS operation...

Page 2: ...instructions included here will as sure that you have many years of dependable and enjoyable service from your Amantii product Important instructions Page 3 Page 4 Page 5 Page 6 Page 7 BI 50 FLUSHMT B...

Page 3: ...TIONS B A C D Fig 1 Grounding Pin Cover Of Grounded Outlet Box Metal Screws Adapter Grounding Means Grounding Pin 15 5 Do not use outdoors 3 properly grounded outlet box The adapter should not be used...

Page 4: ...ith the UL Standand 2021 for appliances in the United States and Cana da If you need assistance during installa BI 50 FLUSHMT BLKGLS WHTGLS 1500W 19W 6 1 8 or 15 5 cm 21 1 8 or 53 6 cm 25W side Left t...

Page 5: ...l hardware fr ox and r ove all packaging relat aterials prior to installa WARNING T Phillip rewdriver aw and aw Level Tape Pliers re Gloves E Fr aterials Wall Finishing Mar terials aterials stable TOO...

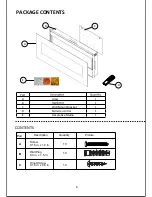
Page 6: ...A E B C D Part 1 s s a l G A B 1 C Wall Mount Bracket 1 D 1 E Decorative Media 1 CONTENTS Part Description Quantity Picture Screw 0 16 in x 1 0 in Wall Plug 0 3 in x 1 5 in 10 10 B A 0 16 in x 0 6 in...

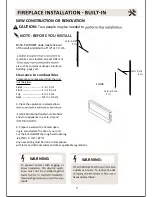
Page 7: ...electrician WARNING To prevent contact with sagging or ance must not be installed against result WARNING Sides 2 in 5 cm Floor 1 in 2 5 cm Top 2 in 5 cm Back 1 4 in 0 6 cm min 5 cm 2 in min 5 cm 2 in...

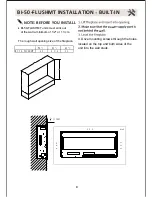
Page 8: ...I 50 FLUSHMT units must stick out of the wall a minimum of 1 2 or 1 3 cm BUILT IN W D H W D H BI 50 FLUSHMT 49 6 3 8 22 The rough wall opening size of the fireplace 8 4 Drive mounting screws through t...

Page 9: ...nto the wall studs where possible If anchors are used ke sure it is level hanging into the keyholes on the back of the unit 3 Check the appliance for stability ensuring that the appliance will not pul...

Page 10: ...page 16 for log removal instruc ons See page 16 for media installa on instruc ons Models diamond shaped media See page 16 for media installa on instruc ons Clear Glass nuggets clear and blue diamond...

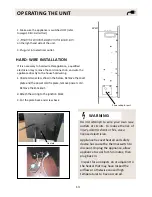
Page 11: ...d o The LED log is shipped in place The log has tabs on each side that hold it secure Remove the side panel to remove the log set and the LED strip Installing the re glass media Pour the re glass medi...

Page 12: ...w fety glasses and gloves when handling glass appliance body Wall Unit Shoulder Screw Wall Mount Unit Shoulder Screw Screw NOTE Before you lift the front glass Unscrew two screws on both side of the f...

Page 13: ...l outlets or circuits To reduce the risk of licensed electrician WARNING Power adaptor port Appliance has overheated and safety device has cause the thermal switch to discount Unplug the appliance all...

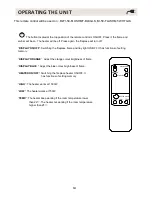
Page 14: ...lame and tray light ON OFF It has functions of setting memory DISPLAY ORANGE Adjust the orange colour brightness of flame HEATER ON OFF Switching the fireplace heater ON OFF It has functions of settin...

Page 15: ...f setting memory FLAME ORANGE Adjust the orange colour brightness of flame FLAME YELLOW Adjust the yellow colour brightness of flame TRAY ORANGE Adjust the orange colour brightness of tray TRAY WHITE...

Page 16: ...OUTPUT HEATER LED Blue 750W HEAT OUTPUT HEATER LED Purple AUTO MODE Auto Mode In this mode the heater will automatically turn on and off When the room temperature drops below 71 F 22 C the heater wil...

Page 17: ...for Ingestion Batteries may contain hazardous substances which could be endangering to the enviroment and to human health This symbol marked on the battery and or packaging indicates that used battery...

Page 18: ...r is turned off before proceeding Any electrical repairs or rewiring of this unit should be carried out by a licensed electrician in accordance with national and local codes If repairing or replacing...

Page 19: ...ED LIGHT BULB REPLACEMENT LED light bulbs are to be replaced by the manufacturer it s service agent or similar quali WARNING UNIT DISPOSAL Do not dispose with other household wastes To prevent possibl...

Page 20: ...nd or connectors as necessary not turn on a Appliance has overheated and mal switch to disconnect OR b House circuit breaker has tripped a Unplug the appliance allow appliance to cool for 15 min utes...

Page 21: ...601123N LED STRIP FOR LOG 9 601120J LED STRIP FOR EMBER 10 601121G LED STRIP FOR EMBER 11 601140 LED STRIP FOR FLAME 12 601141 LED STRIP FOR LOG 13 10105031 REMOTE 14 10105048 REMOTE 15 10101200B FLAM...

Page 22: ...SERVICE HISTORY NOTES This heater must be serviced annually depending on usage Date Dealer Name service technician Name service Performed special Concerns 22...

Page 23: ...rized components will render this warranty null and void Service Under Limited Warranty Davie Street Vancouer BC V6E 4L2 Please have your proof of purchase catalogue model and serial numbers available...

Page 24: ...ELECTRIC FIREPLACES...
Reviews: