background image

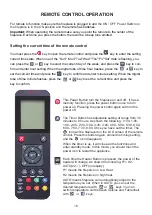
The Moodlight Button turn the moodlight on and off.  When in on position, the display 

screen of the remote control shows AD 1, when the number “1” flash, you can set the color 

of moodlight with       or        keys. There are 10 different moodlight colors(AD1-10) and 

dynamic condition(AD11) to choose from.

The Ember Bed Button turn the Ember bed light on and off.  When in on position, the 

display screen of the remote control default shows  8  8  8.  You can press       or      or                     

keys to change the corresponding color. 

Each time Speed Button is pressed, the speed of the flame will change. Three options are 

available: Medium- High- Low.

Each time the Red Button is pressed the brightness of the red color decrease. There 

are 7 brightness levels (8-2), dynamic level(1) and OFF ( no display) settings that can 

be cycled through. When no number is displayed on the remote control LCD screen 

then the ember bed color is off.

Each time the Green Button is pressed the brightness of the green color decrease. 

There are 7 brightness levels (8-2), dynamic level(1) and OFF ( no display) settings 

that can be cycled through. When no number is displayed on the remote control LCD 

screen then the ember bed color is off.

Each time the Blue Button is pressed the brightness of the blue color decrease. There 

are 7 brightness levels (8-2), dynamic level(1) and OFF ( no display) settings that can 

be cycled through. When no number is displayed on the remote control LCD screen 

then the ember bed color is off.

The Flame Button turn the Flame on and off.  When in on position, the LCD screen of the 

remote control default shows 6  6  6.  You can press        or        or        key to change the 

corresponding color. 

Each time the Red Button is pressed the brightness of the red color decrease. There 

are 6 brightness levels (6-1) and OFF ( no display) settings that can be cycled 

through. When no number is displayed on the remote control LCD screen then the 

flame color is off.

Each time the Yellow Button is pressed the brightness of the yellow color decrease.  

There are 6 brightness levels (6-1) and OFF ( no display) settings that can be cycled 

through. When no number is displayed on the remote control LCD screen then the 

flame color is off.

Each time the Orange Button is pressed the brightness of the orange color decrease. 

There are 6 brightness levels (6-1) and OFF ( no display) settings that can be cycled 

through. When no number is displayed on the remote control LCD screen then the 

flame color is off.

17

Summary of Contents for BS1900034-1

Page 1: ...iring which is are known to the State of California to cause birth defects of other reproductive harm For more information visit www p65warnings ca gov SAFETY INFORMATION Do not store or use gasoline...

Page 2: ...f dependable and enjoyable service from your Amantii product 2 IMPORTANT INSTRUCTIONS CAUTIONS UNPACKING AND TESTING APPLIANCE GROUNDING APPLIANCE LOCATING THE FIREPLACE PRODUCT SPECIFICATION OUTDOOR...

Page 3: ...use of an extension cord the extension cord will overheat and cause a fire This heater is not to be used with an extension cord 12 Always use properly grounded fused and polarized outlets 13 Always us...

Page 4: ...prevent it from being tipped over Always use a fireguard when young children and infirm persons can come into contact with the heater Never leave children unsupervised in a room where the heater is O...

Page 5: ...e for connecting three blade grounding type plugs to two slot The green grounding lug extending from the adapter must be connected to a permanent ground such as a properly grounded outlet box The adap...

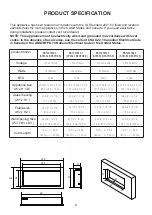
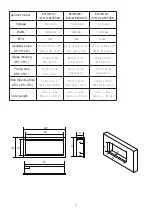
Page 6: ...ength Frame size W2 x H2 Wall Opening Size W3 x H3 x D3 Glass Viewing W1 x H1 SYM 34 BESPOKE BS1900034 1 SYM 42 BESPOKE BS1900042 1 SYM 50 BESPOKE BS1900050 1 SYM 60 BESPOKE BS1900060 1 W2 D H2 H1 H W...

Page 7: ...7 x 43 cm 74 3 4 x 16 x 6 189 9 x 40 6 x 152 cm 86 3 8 x 13 1 8 219 5 x 33 2 cm 98 3 8 x 13 1 8 250 x 33 2 cm 88 1 4 x 15 5 8 x 5 1 2 224 1 x 39 6 x 14 cm 90 1 4 x 16 7 8 229 3 x 43 cm 102 1 4 x 16 7...

Page 8: ...onstructed to the front and to each side of the installed appliance See illustration below All wiring connections to line power shall be in accordance with local building code requirements Inquires ab...

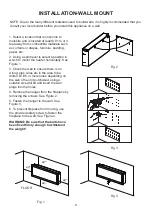
Page 9: ...ount the heater horizontally See Figure 1 3 Check the wall to ensure there is no wiring pipe wires etc in the area to be drilled Drill 6 or more holes depending on the size of he unit purchased using...

Page 10: ...d opening to accommodate the size of your unit Leave at least 1 4 6mm around the edge of the appliance Any new wiring must be done in compliance with local and national codes and other applicable regu...

Page 11: ...ews located on each side and take off the inner side steel panels 4 Put the trim back onto the appliance and fasten with screws NOTE This step is to make sure that the fireplace fits the wall opening...

Page 12: ...opening and fix it to the wall by screwing 2 screws each side 6 Remove the trim following STEP 1 Screw back the inner side steel panels 7 Put back the front glass panel and screw back the trim after y...

Page 13: ...e with local codes if hard wired In the absence of local codes use the current CSA C22 1 CANADIAN ELECTRICAL CODE in Canada or the current ANSI NFPA 70 NATIONAL ELECTRICAL CODE in the United States 1...

Page 14: ...e trim is removed magnetic stone locations screws locations 2 When the trim is removed take off the front glass panel 3 Pour the media into the tray Feel free to use any combination of the fire glass...

Page 15: ...heating function is on 4 Press for the first time to display the current timing press the button again to clear the current timing If the timing in off position the second press will show 30 Multiple...

Page 16: ...7 30 8 00 Once you have set the timer The icon will be displayed on the LCD screen of the remote control Press this button again cancel the timing setting and the icon disappears When the timer is up...

Page 17: ...emote control LCD screen then the ember bed color is off Each time the Blue Button is pressed the brightness of the blue color decrease There are 7 brightness levels 8 2 dynamic level 1 and OFF no dis...

Page 18: ...the time to turn on and off is set When the 7 day timer is set the icon will be displayed on the LCD screen of the remote control Then press the key again to cancel the 7 day timer and the icon will...

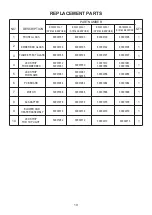
Page 19: ...0195 60000194 30001981 30001984 30001868 30001859 EMBER BED GLASS FLAME EFFECT GLASS LED STRIP FOR EMBER BED LED STRIP FOR FLAME PCB BOARD MOTOR PART NUMBER QTY 1 1 1 1 1 1 1 1 2 3 4 5 6 7 30001978 30...

Page 20: ...30001961 30001959 60000202 60000204 60000203 30001981 30001981 30001984 30001868 EMBER BED GLASS FLAME EFFECT GLASS LED STRIP FOR EMBER BED LED STRIP FOR FLAME PCB BOARD MOTOR PART NUMBER QTY 1 1 1 1...

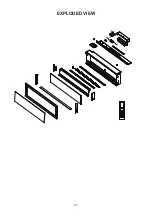
Page 21: ...EXPLODED VIEW 21...
Reviews: