Summary of Contents for SYM XT Series

Page 1: ...Repair Guide SYM XT Series ...

Page 2: ...ow to replace LED light How to replace flicker motor How to replace heating element How to replace the PCB board How to replace the signal receiver How to replace the canopy light How to replace the touch panel ...

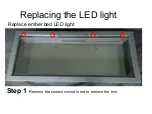
Page 3: ...Replacing the LED light Step 1 Replace ember bed LED light Remove the screws circled in red to remove the trim ...

Page 4: ...Magnetic stone Trim Please note Magnetic stones are in place to secure the bottom of the trim to the fireplace ...

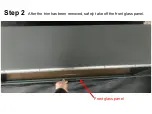
Page 5: ...Step 2 After the trim has been removed safely take off the front glass panel Front glass panel ...

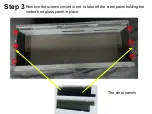
Page 6: ...Step 3 Remove the screws circled in red to take off the steel panel holding the ember bed glass panel in place The steel panels ...

Page 7: ...Step 4 After the steel panels have been removed remove the ember bed glass panel Please note Lift one corner of the glass upward for easy removal of the glass As shown in the diagram below ...

Page 8: ...The ember bed LED strips are situated below the ember bed glass panel ...

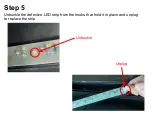
Page 9: ...Step 5 Unbuckle the defective LED strip from the hooks that hold it in place and unplug to replace the strip Unplug Unbuckle ...

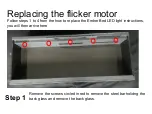
Page 10: ...light Follow steps 1 to 4 from the how to replace the Ember Bed LED light instructions you will then arrive here Step 1 Remove the screws circled in red to remove the steel bar holding the back glass and remove the back glass ...

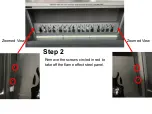
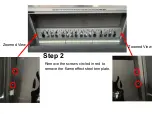
Page 11: ...Zoomed View Zoomed View Step 2 Remove the screws circled in red to take off the flame effect steel panel ...

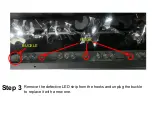
Page 12: ...HOOK BUCKLE Remove the defective LED strip from the hooks and unplug the buckle to replace it with a new one Step 3 ...

Page 13: ...m the how to replace the Ember Bed LED light instructions you will then arrive here Step 1 Remove the screws circled in red to remove the steel bar holidng the back glass and remove the back glass Replacing the flicker motor ...

Page 14: ...Zoomed View Zoomed View Step 2 Remove the screws circled in red to remove the flame effect steel template ...

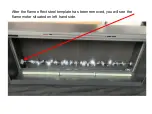
Page 15: ...After the flame effect steel template has been removed you will see the flame motor situated on left hand side ...

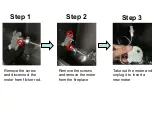
Page 16: ...Step 1 Step 2 Step 3 Remove the screw and disconnect the motor from flicker rod Remove the screws and remove the motor from the fireplace Take out the motor and unplug it to insert a new motor ...

Page 17: ...om the how to replace the Ember Bed LED light instructions you will then arrive here Step 1 Remove the screws circled in red to remove the steel bar holding the back glass remove the back glass Replacing the heating element ...

Page 18: ...Zoomed View Zoomed View Step 2 Remove the screws circled in red to take off the flame effect steel template ...

Page 19: ...Remove the screws circled in red Step 3 ...

Page 20: ...Remove the screws circled in red to remove the inner top panel The heating element PCB board canopy light and signal receiver are all located here Step 4 ...

Page 21: ...HEATING ELEMENT INNER TOP PANEL PLEASE NOTE For the SYM 74 88 100 XT there are 2 sets of heating elements one is for the 120V and the other is for the 240V please replace the right heating element ...

Page 22: ...Remove the screws circled in red to remove the heating element assembly from the inner top panel Step 5 ...

Page 23: ...s circled in red and remove the metal pieces from the heating element Unplug the defective heater to replace it with a new heater Step 6 NOTE Don t forget to put on these rubber circles in same position as you removed ...

Page 24: ...Follow steps 1 to 4 from replacing the heating element Replacing the PCB board PCB board INNER TOP PANEL ...

Page 25: ...Remove the screws circled in red and replace the defective PCB board with a new one Step 1 ...

Page 26: ...om Replace the heating element to remove the inner top panel Replacing the signal receiver The signal receiver is situated here Step 1 Remove the 2 screws located at the foot of the receiver set and replace it with a new one ...

Page 27: ...Step 2 Unplug the signal receiver from the PCB board and replace it with a new one ...

Page 28: ...Follow steps 1 to 4 in Replace the heating element to remove the inner top panel Replacing the Canopy light The canopy light assembly ...

Page 29: ...Step 1 Remove the screws circled in red to disconnect the canopy light assembly from the inner top panel ...

Page 30: ...Step 2 Unplug the canopy light from the PCB board and pull it out as shows in picture 2 Replace it with a new one Picture 1 Picture 2 ...

Page 31: ...Follow steps 1 to 4 in Replace the heating element to remove the inner top panel Replacing the Touch Panel Touch panel lies here ...

Page 32: ...Step 1 Remove the screws circled in red to disconnect the touch panel from the inner top steel panel ...

Page 33: ...Unplug and replace it with a new touch panel ...

Reviews: