background image

7

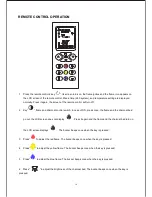
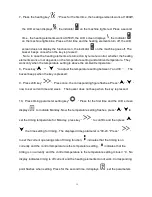
Press the heating key“

  .” Press for the first time ,the heating elements work at 1900W, 

the LCD screen displays

, the indicator 

  on the machine lights red. Press a second 

time , the heating elements work at 950W, the LCD screen displays


, the indicator 


on the machine lights blue. Press a third time and the heating elements turn off, the LCD 

screen does not display the function icon, the indicator


  on the machine goes off. The 

buzzer beeps once when the key is pressed; 

      Note: in case the heating elements are turned on by remote control, whether the heating 
elements work or not depends on the temperature setting and ambient temperature. They 
work only when the temperature setting is above the ambient temperature. 

8

Press key“

    ”“   

    ” to adjust the temperature setting between 7 and 30 

  The 

buzzer beeps when the key is pressed; 

9

Press shift key“

”. Press once, the corresponding figure flashes. Press “

” “

  ” 

now to set current time and week.    The buzzer does not beep when the key is pressed; 

10

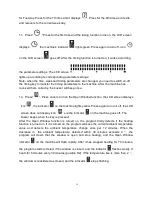
Press timing parameter setting key“

  .” Press for the first time and the LCD screen 

displays

  to indicate Monday. Now the temperature setting flashes, press “

” 

to 

set the timing temperature for Monday, press key “

” to confirm and then press “

” 

  the time setting for timing.. The displayed time parameter is “00-23.” Press “ 

” 

to set the current operating state of timing function; 

  indicates that the timing is on 

currently and the control temperature is the temperature setting,      indicates that the 

timing is on currently and the control temperature is the temperature setting minus 3 

, No 

display indicates timing is off current and the heating elements do not work. Corresponding 

point flashes when setting. Press for the second time, it displays


set the parameters 

15

Summary of Contents for WM-BI-26-3623

Page 1: ...mation in these instructions are not followed exactly a fire or explosion may result causing property damage personal injury or loss of life Do not store or use gasoline or other flammable vapors and...

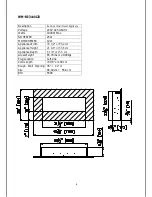
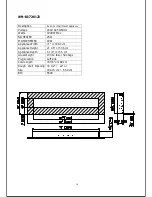
Page 2: ...of dependable and enjoyable service from your Stanley product IMPORTANT INSTRUCTIONS 3 UNPACKING AND TESTING APPLIANCE 6 LOCATING THE FIREPLACE 6 WM BI 34 4423 8 WM BI 48 5823 9 WM BI 72 8123 10 INSTA...

Page 3: ...may cause electric shock or fire or damage to the heater 11 Always unplug or disconnect the appliance from the mains power supply when not in use or when moving or cleaning it Do not pull the cord to...

Page 4: ...s Particular attention has to be given where children and vulnerable people are present 26 This appliance can be used by children aged from 8 years and above and persons with reduced physical sensory...

Page 5: ...can come into contact with the heater Don ts Never leave children unsupervised in a room where the heater is ON and unguarded Never obstruct or cover the fan outlet or force items into heater openings...

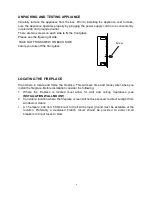
Page 6: ...onsider the following 1 Where the fireplace is located must allow for wall and ceiling clearances see INSTALLATION WALL MOUNT 2 Consider a location where the fireplace screen will not be exposed to di...

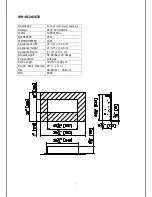
Page 7: ...900W Max NO HEATER 25W MOTOR HEATER 19W Appliance Width 25 1 2 or 64 9 cm Appliance Height 21 1 8 or 53 6 cm Appliance Depth 6 1 8 or 15 5 cm Gross Weight 55 68 lbs or 25 31kgs Plug Location Left side...

Page 8: ...1900W Max NO HEATER 25W MOTOR HEATER 19W Appliance Width 33 1 2 or 85 2 cm Appliance Height 21 1 8 or 53 6 cm Appliance Depth 6 1 8 or 15 5 cm Gross Weight 65 78 lbs or 29 90kgs Plug Location Left sid...

Page 9: ...1900W Max NO HEATER 25W MOTOR HEATER 19W Appliance Width 47 1 2 or 120 7 cm Appliance Height 21 1 8 or 53 6 cm Appliance Depth 6 1 8 or 15 5 cm Gross Weight 82 17 lbs or 37 35kgs Plug Location Left si...

Page 10: ...1900W Max NO HEATER 25W MOTOR HEATER 19W Appliance Width 71 or 180 4 cm Appliance Height 21 1 8 or 53 6 cm Appliance Depth 6 1 8 or 15 5 cm Gross Weight 133 12 lbs or 52 41kgs Plug Location Left side...

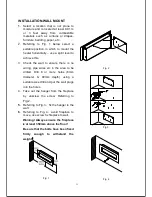
Page 11: ...ensure there is no wiring pipe wires etc in the area to be drilled Drill 8 or more holes 8mm diameter 40mm depth using a suitable size drill and put the wall plugs into the holes 4 Take out the hanger...

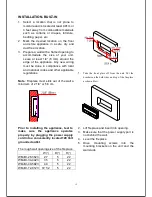
Page 12: ...ble regulations Note Fireplace must stick out of the wall a minimum of 2 1 4 or 5 8 cm Prior to installing the appliance test to make sure the appliance operates properly by plugging the power supply...

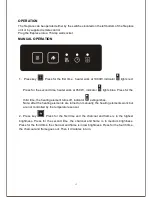
Page 13: ...lights blue Press for the third time the heating element turns off indicator extinguishes Note after the heating elements are turned on manually the heating elements work but are not controlled by th...

Page 14: ...N press once the flame and the charcoal bed go out the LCD screen does not display Press it again and the flame and the charcoal bed turn on the LCD screen displays The buzzer beeps once when the key...

Page 15: ...etween 7 and 30 The buzzer beeps when the key is pressed 9 Press shift key Press once the corresponding figure flashes Press now to set current time and week The buzzer does not beep when the key is p...

Page 16: ...splays icon the indicator on the machine lights yellow Press again to turn it off the LCD screen does not display icon and the indicator on the machine goes off The buzzer beeps when the key is presse...

Page 17: ...battery items in separate collection schemes which cater for the recovery and recycling of materials contained within Your co operation is vital to ensure the success of these schemes and for the pro...

Page 18: ...8 3093017C 3094006C 3095006C 3096006C 1 9 3093003 3093003 3093003 3093003 BLOWER MOUNT 1 10 GLASS BRACKET 2 11 LED BRACKET 1 12 10702143B 10702144B 10702145B 10702146B BOTTOM GLASS 1 13 10101221C 101...

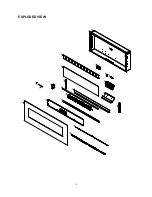
Page 19: ...19 EXPLODED VIEW...
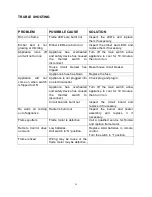
Page 20: ...lugged into an electrical outlet Check plug and plug in Appliance has overheated and safety device has caused the thermal switch to disconnect Turn off the main switch allow appliance to cool for 10 m...

Page 21: ...21 SERVICE HISTORY This heater must be serviced annually depending on usage Date Dealer Name Service technician Name Service Performed Special Concerns NOTES...

Page 22: ...expressly excluded Limitations to Coverage Under Limited Warranty This limited warranty does not apply to products that have been repaired excepted by Stanley or its authorized representatives or oth...

Page 23: ...tation of incidental or consequential damages so the above limitation or exclusion may not apply to the purchaser Application of Provincial and State Law This limited warranty gives you specific legal...

Reviews: