background image

P

P

P

PA

A

A

AR

R

R

RT

T

T

T    L

L

L

LI

I

I

IS

S

S

ST

T

T

T

1

2

3

4

5

6

7

8

9

10

11

12

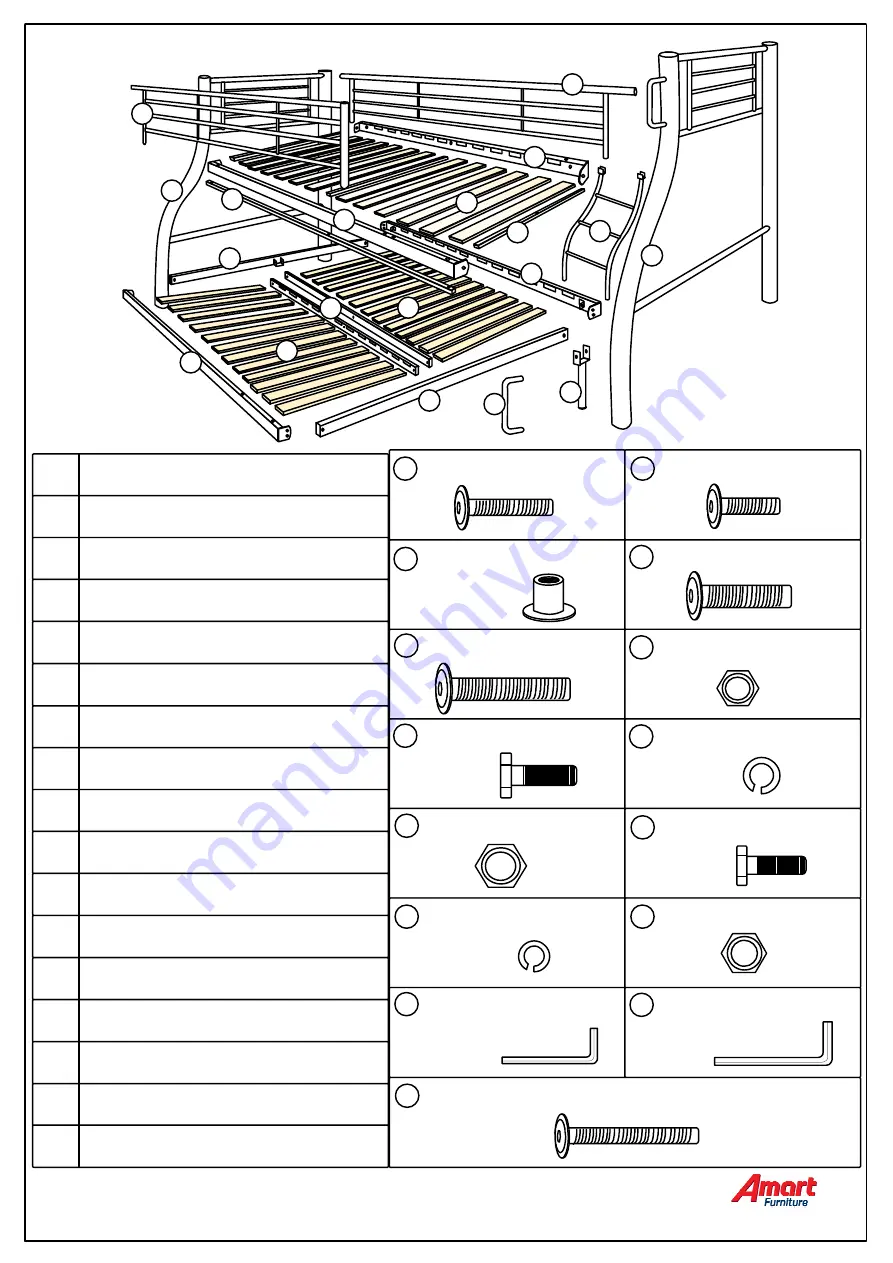
Left End Frame x 1pc

Right End Frame x 1pc

Back Guardrail x 1pc

Front Guardrail x1pc

Upper Bunk Back Siderail x 1pc

( 2 holes on the top surface for assembly of Back Guardrail)

Upper Bunk Front Siderail x 1pc

Lower Bunk Back Siderail x 1pc

( No holes on the top surface. )

Centre Bar x 1pc

13

14

15

16

17

(

4

 holes on the top surface for assembly of front guardrail & ladder)

Upper Bunk Across Bar x 3pcs

Lower Bunk Front Siderail x 1pc

( 2 holes on the top surface for assembly of Ladder)

Lower Bunk Across Bar  x 2pcs

(with U-bracket & 2 holes)

Lower Bunk Centre rail  x 2pcs

(with 3 holes)

Support Leg x 1pc

Ladder x 1pc

Longer Wood Slats x 12pcs

(970mmx65mmx11mm)

Shorter Wood Slats x 24pcs

(707mmx65mmx11mm)

Handrail x 1pc

(for upper bunk base)

(for lower bunk base)

M6x50mm bolts x 8pcs

A

JCN M6x12mm nuts 
x 3pcs

C

M6x30mm bolts x 3pcs

B

M8x40mm bolts x 4pcs

D

1

2

3

4

5

6

7

8

9

10

11

11

12

13

14

15

16

16

17

M8x70mm bolts x 3pcs

E

M8 Hex Nut x 7pcs

F

 M10x30mm Hex bolts
 x 4pcs

G

H  M10 Spring Washer 

 x 4pcs

I

M10 Hex Nut x 4pcs

J

 M3/8x25mm Hex bolts
 x 8pcs

K

 M3/8 Spring Washer 
 x 8pcs

L

M3/8 Hex nut x 8pcs

M

N

O

M4 Allen Key x 1pc

(used with M6 bolts)

M5 Allen Key x 1pc

(used with M8 bolts)

M6x80mm bolts x 11pcs

3-6

ITEM CODE - 48938

2018-9-7

Summary of Contents for 48938

Page 1: ... than 2m from any ceiling fan Important DUE TO THE SIZE OF THIS UNIT WE RECOMMEND THAT ASSEMBLING IS DONE IN THE ROOM INTENDED FOR USE AND ASSEMBLED BY TWO PEOPLE A A A AS S S SS S S SE E E EM M M MB B B BL L L LY Y Y Y I I I IN N N NS S S ST T T TR R R RU U U UC C C CT T T TI I I IO O O ON N N N S S S SU U U US S S SI I I IE E E E D D D DO O O OU U U UB B B BL L L LE E E E B B B BU U U UN N N NK ...

Page 2: ...e than 8mm Ensure the upper bunk is more than 2m from any ceiling fan Prohibit horseplay on under bed Prohibit more than one person on the upper bunk Before you start 1 Choose a clean level spacious assembly area Avoid hard surfaces that may damage the product 2 Take care when lifting Product should be assembled as near as possible to the point of use 3 Ensure that you have all required contents f...

Page 3: ... of Ladder Lower Bunk Across Bar x 2pcs with U bracket 2 holes Lower Bunk Centre rail x 2pcs with 3 holes Support Leg x 1pc Ladder x 1pc Longer Wood Slats x 12pcs 970mmx65mmx11mm Shorter Wood Slats x 24pcs 707mmx65mmx11mm Handrail x 1pc for upper bunk base for lower bunk base M6x50mm bolts x 8pcs A JCN M6x12mm nuts x 3pcs C M6x30mm bolts x 3pcs B M8x40mm bolts x 4pcs D 1 2 3 4 5 6 7 8 9 10 11 11 1...

Page 4: ...oden slats into the slots Do the same for the other side Assembling Upper Bunk Bedbase S S S ST T T TE E E EP P P P 2 2 2 2 Assembling Lower Bunk Bedbase Attach Upper Bottom Bunk Bed Siderail with cross bar and Centre Bar to Upper Bunk Siderail 5 7 8 6 5 6 7 7 7 8 A B C Attach one end of the Siderail to the Across Bar only Insert the Wood Slat one by one into the slots while moving the other end o...

Page 5: ...me 1 2 Tool needed Adjustable spanner not provided Attach the Ladder S S S ST T T TE E E EP P P P 4 4 4 4 Attach the Back Guardrail and Front Guardrail 3 4 Attach the Handrail Attach the Support Leg 14 14 14 1 2 G H I J K L O O 17 13 3 4 17 4 3 O 17 A O 13 12 E F ASSEMBLY 5 6 ITEM CODE 48938 2018 9 7 ...

Page 6: ...fully tightened but not forced 3 When moving your fully assembled bed you must first remove the mattress and lift the frame into position take care when lifting and always have two people handling the bed PLEASE DO NOT DRAG THE BED as this will cause damage to the rail 4 It is advisable to use approved cleaning products when cleaning the furniture and bed frame as certain chemical based cleaners c...

Reviews: