Thank you for purchasing the 2.4 G Indoor /Outdoor ASC-1000. Please read this instruction booklet as it
contains valuable information on how to properly fly and care for your ASC-1000.
FEATURES
• Air Pressure Sensor Locks Flight Altitude
• Built In 6 Axis Gyroscopic Chip Keeps the ASC-1000 Extremely Stable in All Conditions
• Automatically Starts and Lands
• Different Speed Settings for Slow to High Speed Flying
• Head Light
REMOTE CONTROL BATTERY INSTALLATION
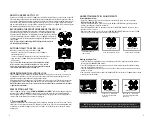
1. Unscrew and remove the battery cover from the back of the remote control as shown in diagram A.
2. Install 2 “AAA” alkaline batteries into the battery compartment as shown in the diagram A1.
3. Replace the battery cover and secure it.
TABLE OF CONTENTS
Features
. . . . . . . . . . . . . . . . . . . . . . . . . . . . . . . . . . . . . . . . . . . . . . . . . . . . . . . . . . . . . . . . . . . . . . . . . . . . . . . . . . . . . . . . . . . . . . . . . . . . . . . . . . . . 2
Remote Control Battery Installation
. . . . . . . . . . . . . . . . . . . . . . . . . . . . . . . . . . . . . . . . . . . . . . . . . . . . . . . . . . . . . . . . . . . . . . . . . . . . . . 2
Charging the ASC-1000
. . . . . . . . . . . . . . . . . . . . . . . . . . . . . . . . . . . . . . . . . . . . . . . . . . . . . . . . . . . . . . . . . . . . . . . . . . . . . . . . . . . . . . . . . . . . . 2
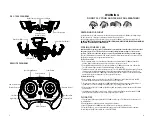
ASC-1000 Diagram, Remote Diagram
. . . . . . . . . . . . . . . . . . . . . . . . . . . . . . . . . . . . . . . . . . . . . . . . . . . . . . . . . . . . . . . . . . . . . . . . . . . . . 3
Preparing for Flight
. . . . . . . . . . . . . . . . . . . . . . . . . . . . . . . . . . . . . . . . . . . . . . . . . . . . . . . . . . . . . . . . . . . . . . . . . . . . . . . . . . . . . . . . . . . . . . .
4
Syncing Your ASC-1000
. . . . . . . . . . . . . . . . . . . . . . . . . . . . . . . . . . . . . . . . . . . . . . . . . . . . . . . . . . . . . . . . . . . . . . . . . . . . . . . . . . . . . . . . . . . .
4
Flying Tips
. . . . . . . . . . . . . . . . . . . . . . . . . . . . . . . . . . . . . . . . . . . . . . . . . . . . . . . . . . . . . . . . . . . . . . . . . . . . . . . . . . . . . . . . . . . . . . . . . . . . . . . . . . 4
Now You Are Ready To Fly !
. . . . . . . . . . . . . . . . . . . . . . . . . . . . . . . . . . . . . . . . . . . . . . . . . . . . . . . . . . . . . . . . . . . . . . . . . . . . . . . . . . . . . . . . 5
Recognizing the Front and Rear of the ASC-1000
. . . . . . . . . . . . . . . . . . . . . . . . . . . . . . . . . . . . . . . . . . . . . . . . . . . . . . . . . . . . . . . . 5
Automatically Take Off / Land
. . . . . . . . . . . . . . . . . . . . . . . . . . . . . . . . . . . . . . . . . . . . . . . . . . . . . . . . . . . . . . . . . . . . . . . . . . . . . . . . . . . . . 5
Understanding The Altitude Lock
. . . . . . . . . . . . . . . . . . . . . . . . . . . . . . . . . . . . . . . . . . . . . . . . . . . . . . . . . . . . . . . . . . . . . . . . . . . . . . . . 5
Speed Setting Button
. . . . . . . . . . . . . . . . . . . . . . . . . . . . . . . . . . . . . . . . . . . . . . . . . . . . . . . . . . . . . . . . . . . . . . . . . . . . . . . . . . . . . . . . . . . . . 5
T (Training)Mode
. . . . . . . . . . . . . . . . . . . . . . . . . . . . . . . . . . . . . . . . . . . . . . . . . . . . . . . . . . . . . . . . . . . . . . . . . . . . . . . . . . . . . . . . . . . . . . . . . . 5
Understanding Trim Adjustments
. . . . . . . . . . . . . . . . . . . . . . . . . . . . . . . . . . . . . . . . . . . . . . . . . . . . . . . . . . . . . . . . . . . . . . . . . . . . . . . . 6
Forward / Backward Trim
. . . . . . . . . . . . . . . . . . . . . . . . . . . . . . . . . . . . . . . . . . . . . . . . . . . . . . . . . . . . . . . . . . . . . . . . . . . . . . . . . . . . . . . 6
Banking Left / Right Trim
. . . . . . . . . . . . . . . . . . . . . . . . . . . . . . . . . . . . . . . . . . . . . . . . . . . . . . . . . . . . . . . . . . . . . . . . . . . . . . . . . . . . . . . 6
Flight Control
. . . . . . . . . . . . . . . . . . . . . . . . . . . . . . . . . . . . . . . . . . . . . . . . . . . . . . . . . . . . . . . . . . . . . . . . . . . . . . . . . . . . . . . . . . . . . . . . . . . . . . 7
Calibrating the ASC-1000
. . . . . . . . . . . . . . . . . . . . . . . . . . . . . . . . . . . . . . . . . . . . . . . . . . . . . . . . . . . . . . . . . . . . . . . . . . . . . . . . . . . . . . . . . . 8
How To Do 360º Stunt Rolls
. . . . . . . . . . . . . . . . . . . . . . . . . . . . . . . . . . . . . . . . . . . . . . . . . . . . . . . . . . . . . . . . . . . . . . . . . . . . . . . . . . . . . . . 8
ASC-1000 Warning:
. . . . . . . . . . . . . . . . . . . . . . . . . . . . . . . . . . . . . . . . . . . . . . . . . . . . . . . . . . . . . . . . . . . . . . . . . . . . . . . . . . . . . . . . . . . . . . . . 9
Battery Warnings, Care and Maintenance
. . . . . . . . . . . . . . . . . . . . . . . . . . . . . . . . . . . . . . . . . . . . . . . . . . . . . . . . . . . . . . . . . . . . . . 9
Replacing the Propeller Blade
. . . . . . . . . . . . . . . . . . . . . . . . . . . . . . . . . . . . . . . . . . . . . . . . . . . . . . . . . . . . . . . . . . . . . . . . . . . . . . . . . . . 9
Limited 90-Day Warranty
. . . . . . . . . . . . . . . . . . . . . . . . . . . . . . . . . . . . . . . . . . . . . . . . . . . . . . . . . . . . . . . . . . . . . . . . . . . . . . . . . . . . . . . . 1 0
FCC Part 15 C Notice
. . . . . . . . . . . . . . . . . . . . . . . . . . . . . . . . . . . . . . . . . . . . . . . . . . . . . . . . . . . . . . . . . . . . . . . . . . . . . . . . . . . . . . . . . . . . . . 1 1
Battery Compartment
(2 “AAA” batteries not included)
A
A1
1
2
CHARGING YOUR ASC-1000 BATTERY
1. Turn the ASC-1000 Off. Plug the charging cable into the ASC-1000 charging socket.(see diagram B).
2. Connect the USB end of the cable to your computers USB port or a USB wall charger (see diagram B1).
The red LED on the USB plug lights up when charging is complete.
Note: If the red LED lights up, either the charging is complete or the USB plug is not properly connected.
3. Average charging time is approximately 40 minutes ( via 5.0V 2A USB wall charger). The ASC-1000 operates
for approximately 5-6 minutes on full charge.
Note: Periodically examine the charger for external damage. External damage to the charger may
result in the risk of fire, electric shock, or injury to persons. Never use a damaged adapter.
IMPORTANT: ALWAYS REMEMBER TO UNPLUG YOUR CHARGING CORD WHEN NOT IN USE!
B
B1
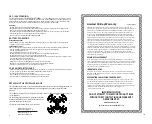
HOW TO EXPAND AND FOLD YOUR ASC-1000
Before flying your ASC-1000, you need to expand the foldable arms out. Turn your ASC-1000 over, bottom side
facing you, pull and expand the 4 arms as shown in the diagram below carefully. Make sure the arms are fully
expanded to the position with a click sound. After flying your ASC-1000, it is recommended to fold all 4 arms back
in. When expanding or folding your ASC-1000, make sure to be gentle.(see diagram C)
C
The red LED on the
USB plug lights up
when charging is
complete


