background image

HOW TO DO 360º STUNT ROLLS

1. In order to make your ASC-1000 do 360º rolls you must fully charge your battery.  


    Note: The ASC-1000 will not do 360º stunt rolls under low battery  indication.
2. Once you are ready to attempt a 360º roll, simply depress and let go of the "STUNT" button on the top  
   right hand side of your controller (see Remote Diagram on page 3). You will hear beeping sounds, this  
   means you are now in “STUNT MODE."
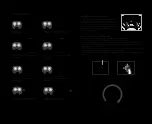
3. Now quickly move your right control stick in any of 4 directions; up, down, left or right. Your ASC-1000  
   drone will instantly roll in the associated direction. See diagram below. 

    Note: After performed the stunt roll, the beeping sounds will stop. Repeat step 2 to 3 if you wish to do it  
   again.

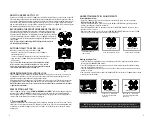
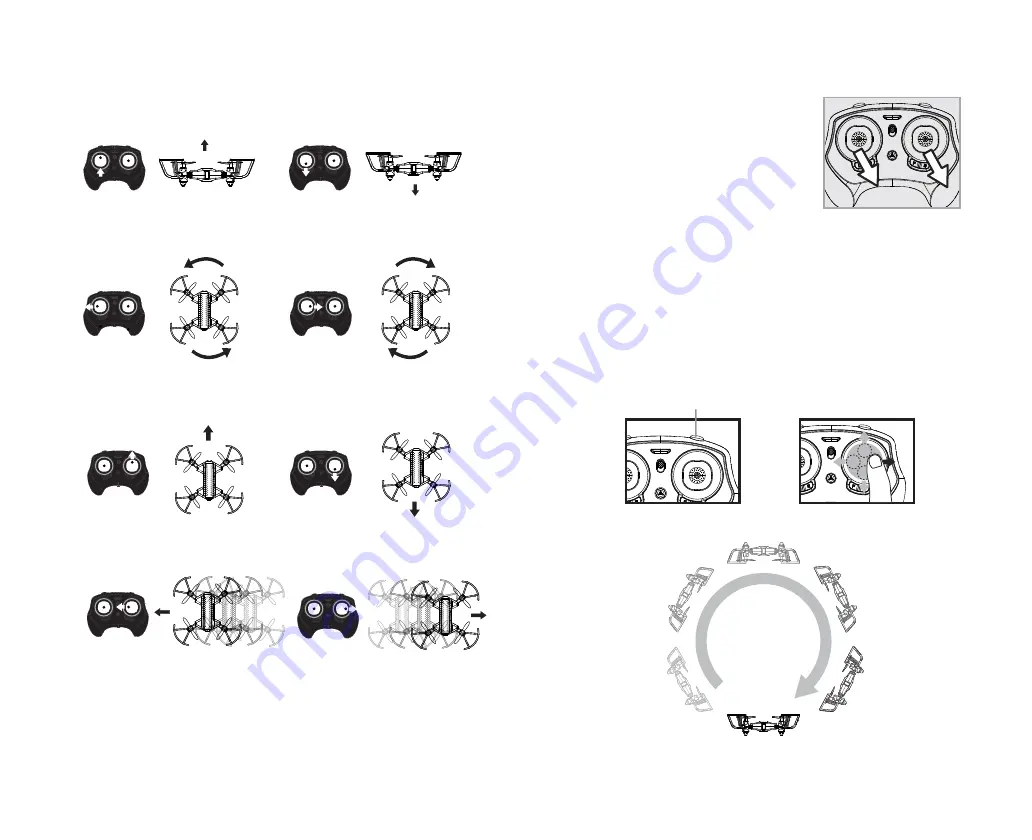
If the ASC-1000 becomes unstable during the course of flying, 
you may need to calibrate the internal gyros. To do this place 
the ASC-1000 on a flat level surface. Do not start the blades. 
Instead move both the throttle and control stick down and to 
the right corner . The LEDs on the ASC-1000 will flash quickly 
and then remain solid. This indicates your drone has been 
recalibrated (see diagram E). 

FLIGHT CONTROL 

Move the Throttle up to increase the speed of 

the motors and the ASC-1000 will rise up.

Move the Throttle down to decrease the speed of 

the motors and the ASC-1000 will descend.

Move the Throttle stick left and the ASC-1000 

will rotate left.

Move the Throttle stick right and the ASC-1000 

will rotate right.

Move the Direction Control up and the ASC-1000 

will move forward.

Move the Direction Control down and the 

ASC-1000 will move backward.

Move the Direction Control left and the 

ASC-1000 will bank to the left.

Move the Direction Control right and the 

ASC-1000 will bank to the right.

7

8

F

360˚Stunt Roll

G

CALIBRATING THE ASC-1000

E

Summary of Contents for ASC-1000

Page 1: ...nicalspecifications Ceproduitrépondauxspécificationstechniquespertinentesd Innovation ScienceetDéveloppementéconomiqueapplicables FCC Part 15 C Notice CAUTION Changes or modifications not expressly approved by the party responsible for compliance could void the user s authority to operate the equipment NOTE This equipment has been tested and found to comply with the limits for a Class B digital de...

Page 2: ...nce 9 Replacing the Propeller Blade 9 Limited 90 Day Warranty 10 FCC Part 15 C Notice 11 Battery Compartment 2 AAA batteries not included A A1 1 2 CHARGING YOUR ASC 1000 BATTERY 1 Turn the ASC 1000 Off Plug the charging cable into the ASC 1000 charging socket see diagram B 2 Connect the USB end of the cable to your computers USB port or a USB wall charger see diagram B1 The red LED on the USB plug...

Page 3: ...hen pull the throttle all the way back A 2nd beep will sound and the ASC 1000 s lights should turn to solid This indicates your controller and the quadrocopter are successfully synced If not repeat above steps For Multi Person Play 4 Before starting make sure that the power on all ASC 1000 drones and Controllers are in the OFF position Make sure that there are no other 2 4 G devices in the area 5 ...

Page 4: ...kward Trim Push the R trim button to increase Right banking sensitivity Make sure you have properly synced The ASC 1000 simply press the Auto Start Land button your ASC 1000will automatically take off To stop or land the ASC 1000 just Press the Auto Start Land button again and the ASC 1000 will descend and land automatically seediagramD Tips You also can move the two control sticks simultaneously ...

Page 5: ...o calibrate the internal gyros To do this place the ASC 1000 on a flat level surface Do not start the blades Instead move both the throttle and control stick down and to the right corner The LEDs on the ASC 1000 will flash quickly and then remain solid This indicates your drone has been recalibrated see diagram E FLIGHT CONTROL Move the Throttle up to increase the speed of the motors and the ASC 1...

Page 6: ... the propeller blades gently remove the blade from the rotor shaft Make sure to match the indication letter on the blade with the letter on the aircraft 3 Replace the broken blade with the correct spare blade 9 10 Front Blade Front Left A Blade Front Right B Blade Rear Left B Blade Rear Right A Limited 90 Day Warranty NORTH AMERICA AMAX Group USA warrants to the original consumer that this product...

Reviews: