11
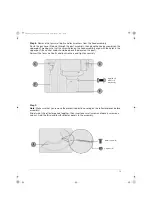
Slide the reflector center cap (B) onto the assembled reflector panels. Insert one small screw
and loosely screw on a cap nut. Repeat with two more small screws and cap nuts to complete
reflector assembly. Fully tighten all screws and cap nuts.
Assembly Tip
:
If the reflector sections aren't aligning, loosen each screw before further
assembly and retighten after the sections are aligned.
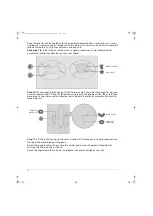
Step 10:
While supporting the heater, tilt the head assembly and slide three large flat washers
over the reflector studs. Place the reflector assembly onto the reflector studs, then slide three
more large flat washers over the reflector studs and onto the reflector assembly. Secure with
three wing nuts.
Step 11:
Lift the tank housing up and rest a standard 20 lb. propane tank (sold separately) on
the top of the assembled post supports.
Screw the regulator onto the gas hose (be careful not to cross-thread) and hand-tighten
securely, then tighten with a wrench.
Attach the regulator to the valve on the propane tank and hand-tighten securely.
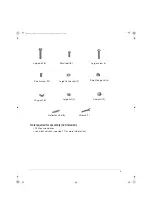
Small screw (3)
Cap nut (3)
Wing nut (3)
Large flat
washer (3)
Large flat
washer (3)
Patio Heater_15-0285_V6_ENG.book Page 11 Friday, March 6, 2015 7:55 AM
Summary of Contents for B00LILH3V4
Page 2: ...2 English 5 Patio Heater_15 0285_V6_ENG book Page 2 Friday March 6 2015 7 55 AM...
Page 3: ...3 Safety and compliance Patio Heater_15 0285_V6_ENG book Page 3 Friday March 6 2015 7 55 AM...
Page 4: ...4 Patio Heater_15 0285_V6_ENG book Page 4 Friday March 6 2015 7 55 AM...
Page 18: ...18 Patio Heater_15 0285_V6_ENG book Page 18 Friday March 6 2015 7 55 AM...
Page 19: ...19 Patio Heater_15 0285_V6_ENG book Page 19 Friday March 6 2015 7 55 AM...
Page 20: ...V6 15 0285 Made in China Patio Heater_15 0285_V6_ENG book Page 33 Friday March 6 2015 7 55 AM...


