background image

96

组装

步骤 

3


向上拉撑角滑块,直至它们卡到位。

B076N6P6T4 (115323)-AmazonBasics-IM-V05 (Global).indb   96

2/7/18   2:39 PM

Summary of Contents for B076N5V6LN

Page 1: ...mm B076N6P6T4 B076N6P8HC B076N5V6LN Pop up Canopy Tent 10 Foot x 10 Foot Auvent Pop up 3 m x 3 m Pop Up Pavillon 3 m x 3 m Gazebo Pop Up 3 m x 3 m Carpa Desplegable 3 m x 3 m 3m x 3m 3 x 3 76N6P6T4 1...

Page 2: ...English 3 Fran ais 18 Deutsch 33 Italiano 48 Espa ol 63 78 93 76N6P6T4 115323 AmazonBasics IM V05 Global indb 2 2 7 18 2 38 PM...

Page 3: ...up Canopy Tent 10 Foot x 10 Foot Contents Before getting started ensure the package contains the following components Part Qty Canvas 1 Storage bag 1 Rope 4 Pegs 8 76N6P6T4 115323 AmazonBasics IM V05...

Page 4: ...4 Assembly Step 1 Place the frame with the canvas in the chosen assembly area 76N6P6T4 115323 AmazonBasics IM V05 Global indb 4 2 7 18 2 38 PM...

Page 5: ...5 Assembly Step 2 Carefully pull the frame outward until it is fully extended 76N6P6T4 115323 AmazonBasics IM V05 Global indb 5 2 7 18 2 38 PM...

Page 6: ...6 Assembly Step 3 Pull the corner sliders upward until they click into place 76N6P6T4 115323 AmazonBasics IM V05 Global indb 6 2 7 18 2 38 PM...

Page 7: ...7 Assembly Step 4 Fully extend the legs until they are securely locked into place The height of the legs can be adjusted 76N6P6T4 115323 AmazonBasics IM V05 Global indb 7 2 7 18 2 38 PM...

Page 8: ...Use the hook and loop fastener strips attached to the canvas to secure the canvas to the frame and the corners of the canvas to the corner of each leg 76N6P6T4 115323 AmazonBasics IM V05 Global indb...

Page 9: ...9 Assembly Step 6 Pegs can be used to secure the 4 legs to the ground to further stabilize the structure in case of wind 76N6P6T4 115323 AmazonBasics IM V05 Global indb 9 2 7 18 2 38 PM...

Page 10: ...10 Assembly Step 7 Tie one end of the rope to the canopy and the other end to a peg Stake the peg into the ground 76N6P6T4 115323 AmazonBasics IM V05 Global indb 10 2 7 18 2 38 PM...

Page 11: ...11 Assembly Step 8 Press on the pins on the legs to unlock and retract them 76N6P6T4 115323 AmazonBasics IM V05 Global indb 11 2 7 18 2 38 PM...

Page 12: ...12 Assembly Step 9 Pull the pin to disengage the corner slider 76N6P6T4 115323 AmazonBasics IM V05 Global indb 12 2 7 18 2 38 PM...

Page 13: ...13 Assembly Step 10 Fold the frame with canvas as shown above 76N6P6T4 115323 AmazonBasics IM V05 Global indb 13 2 7 18 2 38 PM...

Page 14: ...14 Assembly Step 11 Ensure the canvas is dry and clean Place the frame with canvas inside the storage bag 76N6P6T4 115323 AmazonBasics IM V05 Global indb 14 2 7 18 2 38 PM...

Page 15: ...nvas is fully extended and tight Do not use the product in heavy wind or rain If water collects on the roof remove the water immediately or dismantle the product to prevent damage This product is for...

Page 16: ...bleach the material and damage the fabric Do not use any alkali or acidic detergents or steam blasters to clean the product Do not bleach Do not iron Do not tumble dry Do not dry clean Warranty Infor...

Page 17: ...e up to your high standards We encourage you to write a review sharing your experiences with the product Please visit amazon com review review your purchases For further services Visit amazon com gp h...

Page 18: ...up 3 m x 3 m Contenu Avant de commencer veuillez vous assurer que l emballage contient les composants suivants Composant Qt Toile 1 Housse de protection 1 Corde 4 Sardines 8 76N6P6T4 115323 AmazonBas...

Page 19: ...19 Montage tape 1 Placez l armature avec la toile sur la zone de montage choisie 76N6P6T4 115323 AmazonBasics IM V05 Global indb 19 2 7 18 2 38 PM...

Page 20: ...20 Montage tape 2 Tirez avec pr caution l armature vers l ext rieur jusqu ce qu elle soit compl tement d ploy e 76N6P6T4 115323 AmazonBasics IM V05 Global indb 20 2 7 18 2 38 PM...

Page 21: ...21 Montage tape 3 Enclenchez le m canisme de fixation des angles en poussant vers le haut 76N6P6T4 115323 AmazonBasics IM V05 Global indb 21 2 7 18 2 38 PM...

Page 22: ...22 Montage tape 4 D ployez compl tement les pieds jusqu ce qu ils soient correctement enclench s La hauteur des pieds est ajustable 76N6P6T4 115323 AmazonBasics IM V05 Global indb 22 2 7 18 2 38 PM...

Page 23: ...23 Montage tape 5 Utilisez les fixations scratch pour attacher la toile l armature et les coins de la toile chaque angle 76N6P6T4 115323 AmazonBasics IM V05 Global indb 23 2 7 18 2 38 PM...

Page 24: ...24 Montage tape 6 Les sardines peuvent tre utilis es pour fixer les 4 pieds au sol et stabiliser davantage la structure en cas de vent 76N6P6T4 115323 AmazonBasics IM V05 Global indb 24 2 7 18 2 38 PM...

Page 25: ...25 Montage tape 7 Nouez une extr mit de la corde sur l auvent et l autre extr mit sur une cheville Plantez la cheville dans le sol 76N6P6T4 115323 AmazonBasics IM V05 Global indb 25 2 7 18 2 38 PM...

Page 26: ...26 Montage tape 8 Appuyez sur le cran de s curit des pieds pour les d senclencher et les r tracter 76N6P6T4 115323 AmazonBasics IM V05 Global indb 26 2 7 18 2 38 PM...

Page 27: ...27 Montage tape 9 Tirez la goupille pour d sengager le syst me de fixation de l angle 76N6P6T4 115323 AmazonBasics IM V05 Global indb 27 2 7 18 2 38 PM...

Page 28: ...28 Montage tape 10 Pliez l armature avec la toile comme indiqu ci dessus 76N6P6T4 115323 AmazonBasics IM V05 Global indb 28 2 7 18 2 38 PM...

Page 29: ...29 Montage tape 11 Assurez vous que la toile est s che et propre Placez l armature et la toile dans la housse de protection 76N6P6T4 115323 AmazonBasics IM V05 Global indb 29 2 7 18 2 38 PM...

Page 30: ...nt d ploy e et tendue N utilisez pas le produit en cas de fortes intemp ries Si une poche d eau se forme sur le toit enlevez l eau imm diatement ou d montez le produit pour viter tout dommage Ce produ...

Page 31: ...colorer et endommager le tissu N utilisez aucun d tergent alcalin ou acide ni de nettoyeur vapeur pour nettoyer le produit N utilisez pas de Javel Ne repassez pas Ne s chez pas par culbutage Ne nettoy...

Page 32: ...r pondant vos normes lev es Nous vous encourageons r diger un commentaire visant partager vos exp riences sur le produit Veuillez visiter amazon fr review review your purchases Pour obtenir d autres s...

Page 33: ...Pop Up Pavillon 3 m x 3 m Inhalt Bevor Sie beginnen pr fen Sie ob die Verpackung die folgenden Teile enth lt Teil Anzahl Plane 1 Aufbewahrungsbeutel 1 Seil 4 Haken 8 76N6P6T4 115323 AmazonBasics IM V0...

Page 34: ...34 Montage Schritt 1 Stellen Sie den Rahmen mit der Plane im gew hlten Montagebereich auf 76N6P6T4 115323 AmazonBasics IM V05 Global indb 34 2 7 18 2 38 PM...

Page 35: ...35 Montage Schritt 2 Ziehen Sie den Rahmen vorsichtig nach au en bis er vollst ndig ausgeklappt ist 76N6P6T4 115323 AmazonBasics IM V05 Global indb 35 2 7 18 2 38 PM...

Page 36: ...36 Montage Schritt 3 Ziehen Sie die Eckschieber nach oben bis sie einrasten 76N6P6T4 115323 AmazonBasics IM V05 Global indb 36 2 7 18 2 38 PM...

Page 37: ...37 Montage Schritt 4 Ziehen Sie die Beine ganz heraus bis sie sicher einrasten Die H he der Beine kann eingestellt werden 76N6P6T4 115323 AmazonBasics IM V05 Global indb 37 2 7 18 2 38 PM...

Page 38: ...ge Schritt 5 Verwenden Sie die Klettverschlussstreifen an der Plane um sie am Rahmen und an den Ecken der Plane und jeder Beinecke zu sichern 76N6P6T4 115323 AmazonBasics IM V05 Global indb 38 2 7 18...

Page 39: ...ge Schritt 6 Die Haken k nnen dazu verwendet werden um die 4 Beine am Untergrund zur weiteren Stabilisierung der Struktur bei Wind zu sichern 76N6P6T4 115323 AmazonBasics IM V05 Global indb 39 2 7 18...

Page 40: ...Montage Schritt 7 Verbinden Sie ein Ende des Seils mit der Plane und das andere Ende mit einem Hering Stecken Sie den Hering in den Boden 76N6P6T4 115323 AmazonBasics IM V05 Global indb 40 2 7 18 2 39...

Page 41: ...41 Montage Schritt 8 Dr cken Sie auf die Stifte an den Beinen um sie zu entriegeln und einzuziehen 76N6P6T4 115323 AmazonBasics IM V05 Global indb 41 2 7 18 2 39 PM...

Page 42: ...42 Montage Schritt 9 Ziehen Sie den Stift heraus um den Eckschieber zu l sen 76N6P6T4 115323 AmazonBasics IM V05 Global indb 42 2 7 18 2 39 PM...

Page 43: ...43 Montage Schritt 10 Klappen Sie den Rahmen mit der Plane zusammen wie oben dargestellt 76N6P6T4 115323 AmazonBasics IM V05 Global indb 43 2 7 18 2 39 PM...

Page 44: ...ge Schritt 11 Achten Sie darauf dass die Plane trocken und sauber ist Stecken Sie den Rahmen zusammen mit der Plane in den Aufbewahrungsbeutel 76N6P6T4 115323 AmazonBasics IM V05 Global indb 44 2 7 18...

Page 45: ...ollst ndig ausgezogen und dicht ist Verwenden Sie das Produkt nicht bei starken Sturmb en oder Regen Wenn sich Wasser auf dem Dach angesammelt hat entfernen Sie es sofort oder demontierten Sie das Pro...

Page 46: ...en und den Stoff besch digen Verwenden Sie keine alkali oder s urehaltigen Reinigungsmittel und reinigen Sie das Produkt nicht mit einem Dampfstrahler Nicht bleichen Nicht b geln Nicht in einem W sche...

Page 47: ...e hohen Qualit tsstandards zu erf llen Bitte schreiben Sie eine Rezension in der Sie Ihre Erfahrungen mit dem Produkt teilen Bitte besuchen Sie amazon de review review your purchases M chten Sie mehr...

Page 48: ...no Gazebo Pop Up 3 m x 3 m Contenuto Prima di iniziare assicurarsi che la confezione contenga i seguenti componenti Pezzo Qt Telo 1 Custodia 1 Corda 4 Picchetti 8 76N6P6T4 115323 AmazonBasics IM V05 G...

Page 49: ...49 Montaggio Passo 1 Posizionare il telaio con il telo nell area di montaggio desiderata 76N6P6T4 115323 AmazonBasics IM V05 Global indb 49 2 7 18 2 39 PM...

Page 50: ...50 Montaggio Passo 2 Estrarre delicatamente il telaio fino a estenderlo completamente 76N6P6T4 115323 AmazonBasics IM V05 Global indb 50 2 7 18 2 39 PM...

Page 51: ...51 Montaggio Passo 3 Tirare i meccanismi di scorrimento sugli angoli verso l alto fino a bloccarli in posizione 76N6P6T4 115323 AmazonBasics IM V05 Global indb 51 2 7 18 2 39 PM...

Page 52: ...52 Montaggio Passo 4 Estendere completamente le gambe fino a bloccarle in posizione L altezza delle gambe pu essere regolata 76N6P6T4 115323 AmazonBasics IM V05 Global indb 52 2 7 18 2 39 PM...

Page 53: ...io Passo 5 Utilizzare il gancio e le fasce di velcro del telo per fissare il telo al telaio e gli angoli del telo agli angoli di ciascuna gamba 76N6P6T4 115323 AmazonBasics IM V05 Global indb 53 2 7 1...

Page 54: ...gio Passo 6 I picchetti possono essere utilizzati per fissare le 4 gambe al terreno e stabilizzare ulteriormente la struttura in caso di vento 76N6P6T4 115323 AmazonBasics IM V05 Global indb 54 2 7 18...

Page 55: ...gio Passo 7 Legare un estremit della corda all angolo superiore della tenda e l altra estremit al picchetto Fissare poi il paletto nel terreno 76N6P6T4 115323 AmazonBasics IM V05 Global indb 55 2 7 18...

Page 56: ...56 Montaggio Passo 8 Premere i perni sulle gambe per sbloccarle e ritrarle 76N6P6T4 115323 AmazonBasics IM V05 Global indb 56 2 7 18 2 39 PM...

Page 57: ...57 Montaggio Passo 9 Tirare l anello per sbloccare il meccanismo di scorrimento sull angolo 76N6P6T4 115323 AmazonBasics IM V05 Global indb 57 2 7 18 2 39 PM...

Page 58: ...58 Montaggio Passo 10 Piegare il telaio con il telo come illustrato sopra 76N6P6T4 115323 AmazonBasics IM V05 Global indb 58 2 7 18 2 39 PM...

Page 59: ...59 Montaggio Passo 11 Assicurarsi che il telo sia asciutto e pulito Posizionare il telaio con il telo all interno della custodia 76N6P6T4 115323 AmazonBasics IM V05 Global indb 59 2 7 18 2 39 PM...

Page 60: ...empre che il telo sia esteso completamente e fissato correttamente Non utilizzare il prodotto in condizioni di forte vento o pioggia Se l acqua ristagna sul soffitto rimuoverla immediatamente o smonta...

Page 61: ...ero scolorire il materiale e danneggiare il tessuto Non utilizzare solventi alcalini o acidi o pulitori a vapore per la pulizia del prodotto Non candeggiare Non stirare Non asciugare in asciugatrice N...

Page 62: ...degli standard pi elevati Pertanto invitiamo i clienti a scrivere una recensione per condividere le proprie esperienze con il prodotto Visitare amazon it review review your purchases Per ulteriori ser...

Page 63: ...legable 3 m x 3 m Contenido Antes de comenzar compruebe que el embalaje incluye los siguientes componentes Componente Cant Lona 1 Bolsa de almacenamiento 1 Cuerda 4 Estacas 8 76N6P6T4 115323 AmazonBas...

Page 64: ...64 Montaje Paso 1 Coloca la estructura con la lona en el rea de montaje elegida 76N6P6T4 115323 AmazonBasics IM V05 Global indb 64 2 7 18 2 39 PM...

Page 65: ...65 Montaje Paso 2 Tira cuidadosamente de la estructura hacia afuera hasta que quede completamente extendida 76N6P6T4 115323 AmazonBasics IM V05 Global indb 65 2 7 18 2 39 PM...

Page 66: ...66 Montaje Paso 3 Tira de las barras deslizantes de las esquinas hacia arriba hasta que queden encajadas 76N6P6T4 115323 AmazonBasics IM V05 Global indb 66 2 7 18 2 39 PM...

Page 67: ...67 Montaje Paso 4 Extienda las patas hasta que queden fijadas de forma segura en su lugar La altura de las patas puede ajustarse 76N6P6T4 115323 AmazonBasics IM V05 Global indb 67 2 7 18 2 39 PM...

Page 68: ...el gancho y las tiras afianzadoras adjuntas a la lona para que la lona quede bien amarrada a la estructura y las esquinas de la lona a la esquina de cada pata 76N6P6T4 115323 AmazonBasics IM V05 Glob...

Page 69: ...taje Paso 6 Puede utilizar estacas para amarrar las 4 patas al suelo con el fin de estabilizar la estructura si se dan condiciones de viento 76N6P6T4 115323 AmazonBasics IM V05 Global indb 69 2 7 18 2...

Page 70: ...70 Montaje Paso 7 Ate un extremo de la cuerda al toldo y el otro extremo a una piqueta Clave la piqueta al suelo 76N6P6T4 115323 AmazonBasics IM V05 Global indb 70 2 7 18 2 39 PM...

Page 71: ...71 Montaje Paso 8 Presione las clavijas situadas en las patas para desbloquearlas y plegarlas 76N6P6T4 115323 AmazonBasics IM V05 Global indb 71 2 7 18 2 39 PM...

Page 72: ...72 Montaje Paso 9 Tire de la clavija para soltar la barra deslizante 76N6P6T4 115323 AmazonBasics IM V05 Global indb 72 2 7 18 2 39 PM...

Page 73: ...73 Montaje Paso 10 Pliegue la estructura con la lona tal y como se muestra m s arriba 76N6P6T4 115323 AmazonBasics IM V05 Global indb 73 2 7 18 2 39 PM...

Page 74: ...74 Montaje Paso 11 Aseg rese de que la lona est seca y limpia Coloque la estructura con la lona dentro de la bolsa de almacenamiento 76N6P6T4 115323 AmazonBasics IM V05 Global indb 74 2 7 18 2 39 PM...

Page 75: ...ho de la carpa Aseg rese siempre de que la carpa est completamente extendida y ajustada No utilice el producto si se dan condiciones de viento o lluvia Si se acumula agua en el techo ret rela de inmed...

Page 76: ...ar el material y da ar el tejido No utilice detergentes alcalinos o cidos o arenado con vapor para limpiar el producto No usar blanqueador No planchar No secar en secadora No lavar en seco Informaci n...

Page 77: ...st n a la altura de sus elevados est ndares de calidad Le animamos a que escriba una opini n sobre su experiencia con el producto Por favor visite amazon es review review your purchases Para otros ser...

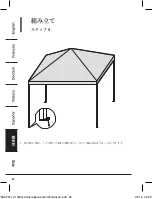
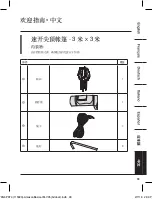
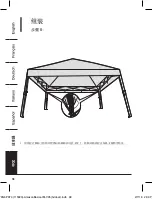
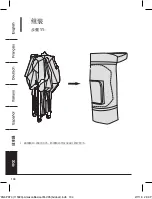
Page 78: ...78 3m x 3m 1 1 4 8 76N6P6T4 115323 AmazonBasics IM V05 Global indb 78 2 7 18 2 39 PM...

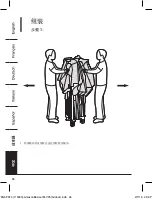
Page 79: ...79 1 76N6P6T4 115323 AmazonBasics IM V05 Global indb 79 2 7 18 2 39 PM...

Page 80: ...80 2 76N6P6T4 115323 AmazonBasics IM V05 Global indb 80 2 7 18 2 39 PM...

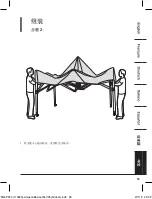
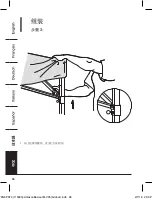
Page 81: ...81 3 76N6P6T4 115323 AmazonBasics IM V05 Global indb 81 2 7 18 2 39 PM...

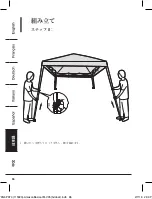
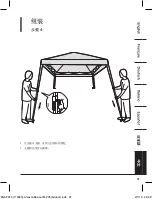
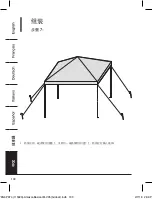
Page 82: ...82 4 76N6P6T4 115323 AmazonBasics IM V05 Global indb 82 2 7 18 2 39 PM...

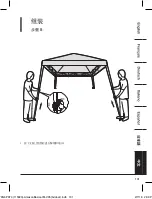
Page 83: ...83 5 76N6P6T4 115323 AmazonBasics IM V05 Global indb 83 2 7 18 2 39 PM...

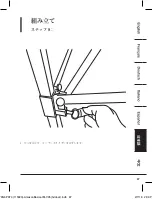
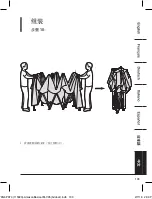
Page 84: ...84 6 76N6P6T4 115323 AmazonBasics IM V05 Global indb 84 2 7 18 2 39 PM...

Page 85: ...85 7 76N6P6T4 115323 AmazonBasics IM V05 Global indb 85 2 7 18 2 39 PM...

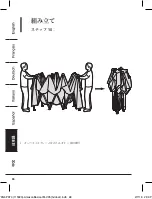
Page 86: ...86 8 76N6P6T4 115323 AmazonBasics IM V05 Global indb 86 2 7 18 2 39 PM...

Page 87: ...87 9 76N6P6T4 115323 AmazonBasics IM V05 Global indb 87 2 7 18 2 39 PM...

Page 88: ...88 10 76N6P6T4 115323 AmazonBasics IM V05 Global indb 88 2 7 18 2 39 PM...

Page 89: ...89 11 76N6P6T4 115323 AmazonBasics IM V05 Global indb 89 2 7 18 2 39 PM...

Page 90: ...90 3 40km 3m 76N6P6T4 115323 AmazonBasics IM V05 Global indb 90 2 7 18 2 39 PM...

Page 91: ...91 amazon jp AmazonBasics Warranty 0120 899 276 76N6P6T4 115323 AmazonBasics IM V05 Global indb 91 2 7 18 2 39 PM...

Page 92: ...92 Amazon amazon jp review review your purchases amazon jp gp help customer contact us 0120 899 276 76N6P6T4 115323 AmazonBasics IM V05 Global indb 92 2 7 18 2 39 PM...

Page 93: ...93 3 x 3 1 1 4 8 76N6P6T4 115323 AmazonBasics IM V05 Global indb 93 2 7 18 2 39 PM...

Page 94: ...94 1 76N6P6T4 115323 AmazonBasics IM V05 Global indb 94 2 7 18 2 39 PM...

Page 95: ...95 2 76N6P6T4 115323 AmazonBasics IM V05 Global indb 95 2 7 18 2 39 PM...

Page 96: ...96 3 76N6P6T4 115323 AmazonBasics IM V05 Global indb 96 2 7 18 2 39 PM...

Page 97: ...97 4 76N6P6T4 115323 AmazonBasics IM V05 Global indb 97 2 7 18 2 39 PM...

Page 98: ...98 5 76N6P6T4 115323 AmazonBasics IM V05 Global indb 98 2 7 18 2 39 PM...

Page 99: ...99 6 4 76N6P6T4 115323 AmazonBasics IM V05 Global indb 99 2 7 18 2 39 PM...

Page 100: ...100 7 76N6P6T4 115323 AmazonBasics IM V05 Global indb 100 2 7 18 2 39 PM...

Page 101: ...101 8 76N6P6T4 115323 AmazonBasics IM V05 Global indb 101 2 7 18 2 39 PM...

Page 102: ...102 9 76N6P6T4 115323 AmazonBasics IM V05 Global indb 102 2 7 18 2 39 PM...

Page 103: ...103 10 76N6P6T4 115323 AmazonBasics IM V05 Global indb 103 2 7 18 2 39 PM...

Page 104: ...104 11 76N6P6T4 115323 AmazonBasics IM V05 Global indb 104 2 7 18 2 39 PM...

Page 105: ...105 40 3 76N6P6T4 115323 AmazonBasics IM V05 Global indb 105 2 7 18 2 39 PM...

Page 106: ...106 amazon cn AmazonBasics Warranty 400 810 5666 76N6P6T4 115323 AmazonBasics IM V05 Global indb 106 2 7 18 2 39 PM...

Page 107: ...107 amazon cn review review your purchases amazon cn gp help customer contact us 400 810 5666 76N6P6T4 115323 AmazonBasics IM V05 Global indb 107 2 7 18 2 39 PM...

Page 108: ...MADE IN CHINA amazon com AmazonBasics 76N6P6T4 115323 AmazonBasics IM V05 Global indb 108 2 7 18 2 39 PM...

Reviews: