background image

13

EN

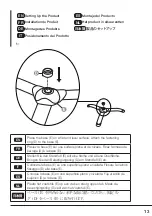
 Setting Up the Product

ES

 Montaje del Producto

FR

 Installation du Produit

NL

 Het product in elkaar zetten

DE

 Montage des Produkts

日本語


製品のセットアップ

IT

 Posizionamento del Prodotto

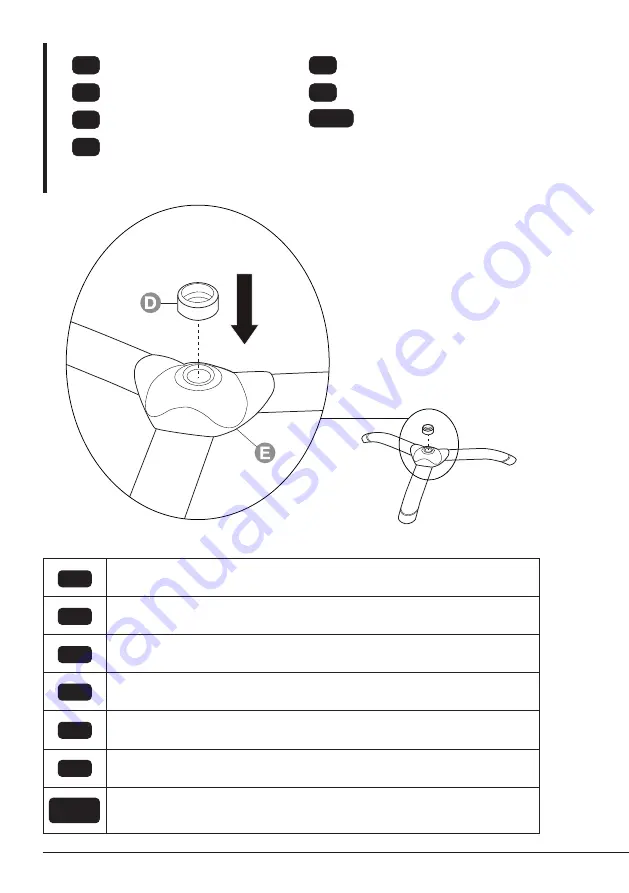
1:

EN

Place the base (E) on a flat and level surface. Attach the fastening 
ring (D) to the base (E).

FR


Placez la base (E) sur une surface plane et de niveau. Fixez l’anneau de 
serrage (D) à la base (E). 

DE


Stellen Sie den Standfuß (E) auf eine flache und ebene Oberfläche. 
Bringen Sie den Befestigungsring (D) am Standfuß (E) an.

IT


Collocare la base (E) su una superficie piana e livellata. Fissare l’anello di 
fissaggio (D) alla base (E).

ES


Coloque la base (E) en una superficie plana y nivelada. Fije el anillo de 
sujeción (D) a la base (E).

NL


Plaats het voetstuk (E) op een vlak en stevig oppervlak. Maak de 
bevestigingsring (D) vast aan het voetstuk (E).

日本語


ベース (E) を凹凸のない水平な面に置いてください。固定リン

グ (D) をベース (E) に取り付けます。

Summary of Contents for B018FCZBMG

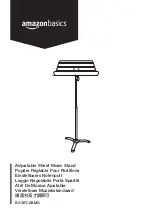
Page 1: ...B018FCZBMG Adjustable Sheet Music Stand Pupitre Réglable Pour Partitions Einstellbares Notenpult Leggio Regolabile Porta Spartiti Atril De Música Ajustable Verstelbare Muziekstandaard 譜面台高さ調節可 ...

Page 2: ...English 3 Français 4 Deutsch 5 Italiano 6 Español 7 Nederlands 8 日本語 9 Contents Contenu Inhalt Contenuto Contenido Inhoud 内容 11 Assembly Montage Montage Montaggio Montaje Montage 組み立て 12 ...

Page 3: ...n the product Before assembly Make sure that all parts have been delivered and are in good condition The product should be placed on a flat horizontal surface The maximum load weight of the product is 2 2 lbs 1 kg Feedback and Help Love it Hate it Let us know with a customer review AmazonBasics is committed to delivering customer driven products that live up to your high standards We encourage you...

Page 4: ... tapis Ne placez pas des objets lourds sur le produit Avant l assemblage assurez vous que toutes les pièces sont présentes et en bon état Le produit doit être installé sur une surface plate et horizontale La charge maximale du produit s élève à 2 2 livres 1 kg Vos Avis et Aide Vous l adorez Vous le détestez Faites le nous savoir en laissant un commentaire AmazonBasics s engage à vous offrir des pr...

Page 5: ...kt auf einer weichen Oberfläche wie zum Beispiel einem Teppich zusammen Stellen Sie keine schweren Gegenstände auf das Produkt Vor dem Zusammenbau Prüfen Sie die Vollständigkeit des Lieferumfangs und ob alle Teile in gutem Zustand sind Das Produkt muss auf einem ebenen und waagerechten Untergrund aufgestellt werden Die maximale Tragfähigkeit des Produkts beträgt 2 2 Pfund 1 kg Feedback und Hilfe G...

Page 6: ...orbida come un tappeto Non posizionare oggetti pesanti sul prodotto Prima del montaggio Assicurarsi che tutte le parti siano presenti nella confezione e in buone condizioni Il prodotto deve essere collocato su una superficie piana e orizzontale Il peso di carico massimo del prodotto corrisponde a 2 2 libbre 1 kg Feedback e Aiuto Ti piace Oppure no Faccelo sapere scrivendo la tua recensione AmazonB...

Page 7: ...objetos pesados sobre el producto Antes del armado Asegúrese de que todas las piezas hayan sido recibidas en buen estado El producto debe colocarse en una superficie horizontal plana El peso de la carga máxima del producto es de 2 2 libras 1 kg Comentarios y Ayuda Le encanta No le gusta nada Escriba una opinión como cliente En AmazonBasics nos comprometemos a proveer productos pensados para satisf...

Page 8: ...e ondergrond zoals een vloerkleed in elkaar Plaats geen zware voorwerpen op het product Vóór montage Controleer of alle onderdelen geleverd zijn en zich in een goede staat bevinden Het product moet op een vlak horizontaal oppervlak worden geplaatst Het max draagvermogen van het product is 2 2 pond 1 kg Feedback en Hulp Vind je het leuk Vind je het niet leuk Beoordeel het product dan op onze websit...

Page 9: ......

Page 10: ...い Amazonベーシック は 皆様の高い水準に答えるこ とのできるよ うな消費者志向 型の製品をお届けするのを旨と し ています この製品についてのレビューで製品に ついてのご意見をお聞かせく ださい amazon jp review review your purchases amazon jp gp help customer contact us 販売元 アマゾンジャパン合同会社 所在地 153 0064 東京都目黒区下目黒 1 丁目 8 1 アルコタワーアネックス URL https www amazon co jp ...

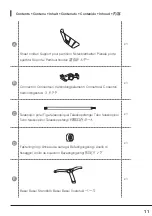
Page 11: ...ー x1 B Connector Connecteur Verbindungselement Connettore Conector Verbindingsstuk コネクタ x1 C Telescopic pole Tige télescopique Teleskopstange Tubo telescopico Tubo telescópico Telescoopstang 伸縮自在ポール x1 D Fastening ring Anneau de serrage Befestigungsring Anello di fissaggio Anillo de sujeción Bevestigingsring 固定リング x1 E Base Base Standfuß Base Base Voetstuk ベース x1 ...

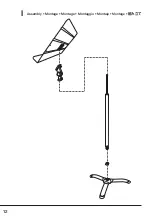
Page 12: ...12 Assembly Montage Montage Montaggio Montaje Montage 組み立て ...

Page 13: ...veau Fixez l anneau de serrage D à la base E DE Stellen Sie den Standfuß E auf eine flache und ebene Oberfläche Bringen Sie den Befestigungsring D am Standfuß E an IT Collocare la base E su una superficie piana e livellata Fissare l anello di fissaggio D alla base E ES Coloque la base E en una superficie plana y nivelada Fije el anillo de sujeción D a la base E NL Plaats het voetstuk E op een vlak...

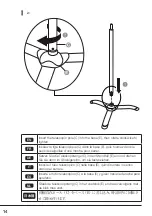
Page 14: ...e die Teleskopstange C in den Standfuß E ein und drehen Sie sie dann im Uhrzeigersinn um sie festzuziehen IT Inserire il tubo telescopico C nella base E quindi ruotare in senso orario per serrare ES Inserte el tubo telescópico C a la base E y gírelo hacia la derecha para apretarlo NL Steek de telescoopstang C in het voetstuk E en draai vervolgens met de klok mee vast 日本語 伸縮自在ポール C をベース E に差し込み 時計回...

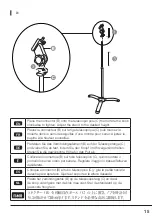
Page 15: ... indem Sie den Knopf im Uhrzeigersinn drehen Stellen Sie die gewünschte Höhe für das Pult ein IT Collocare il connettore B sul tubo telescopico C quindi ruotare il pomello in senso orario per serrare Regolare il leggio in base all altezza desiderata ES Coloque el conector B al tubo telescópico C y gire la perilla hacia la derecha para apretarlo Ajuste el soporte a la altura deseada NL Plaats het v...

Page 16: ...itz des Verbindungselements B und drehen Sie den Knopf im Uhrzeigersinn um ihn festzuziehen IT Infilare il pianale porta spartito A nella fessura del connettore B quindi ruotare il pomello in senso orario per serrare ES Deslice el soporte A a la ranura del conector B y a continuación gire la perilla hacia la derecha para apretarlo NL Schuif de partituurhouder A in de gleuf van het verbindingsstuk ...

Page 17: ...otenblatthalter A den gewünschten Winkel ein und drehen Sie dann den Knopf im Uhrzeigersinn um ihn festzuziehen IT Ruotare il pomello più grande in senso antiorario per allentarlo Regolare il pianale porta spartito A secondo l inclinazione desiderata quindi ruotare il pomello in senso orario per serrare ES Gire la perilla grande hacia la izquierda para aflojarlo Ajuste el soporte A al ángulo desea...

Page 18: ...中国製 HECHO EN CHINA GEMAAKT IN CHINA PRODOTTO IN CINA HERGESTELLT IN CHINA FABRIQUÉ EN CHINE MADE IN CHINA amazon com AmazonBasics V2 09 20 ...

Reviews: