background image

02

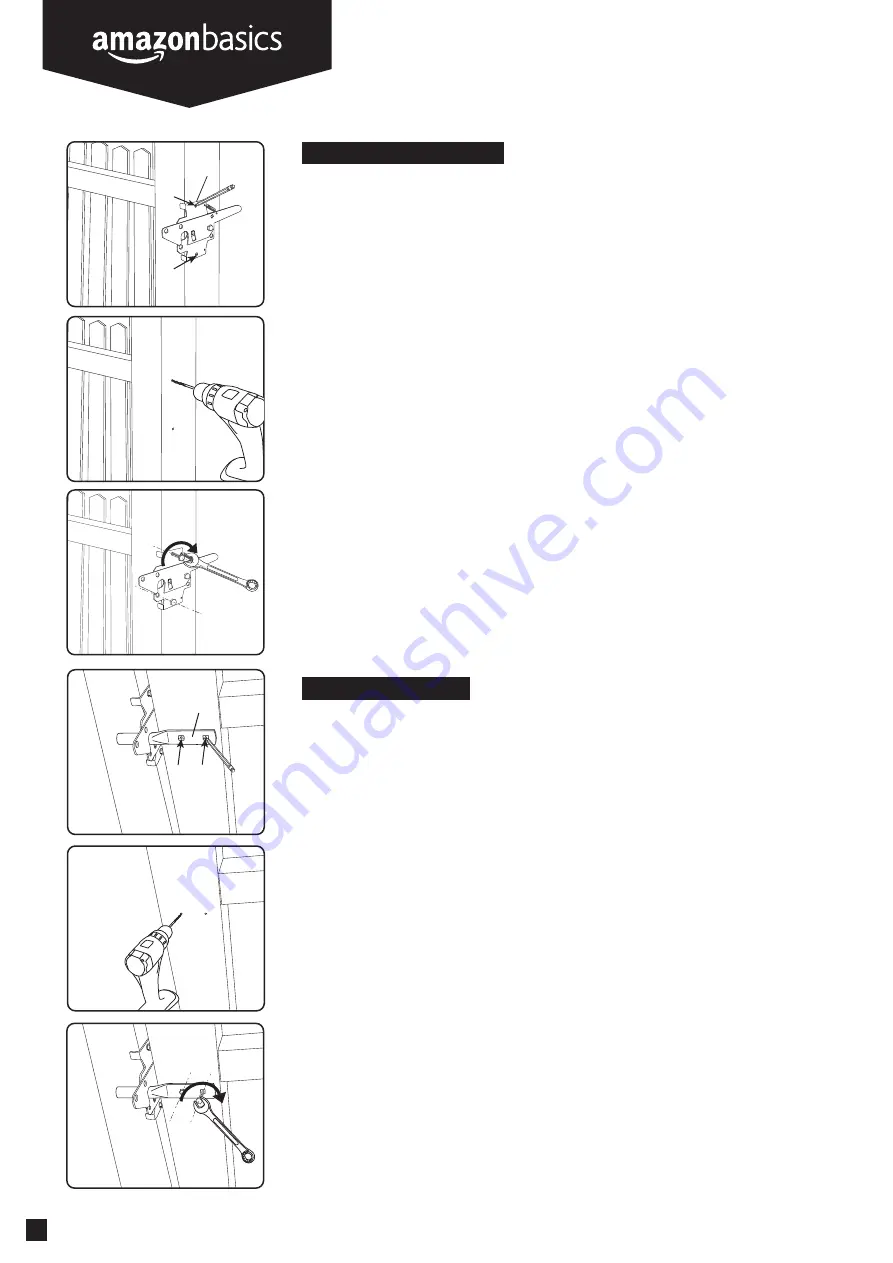
Installing Latch Assembly

Installing Keeper bar

Step 1: Using a pencil, mark the two holes on the inside edge of the fence post for the mounting plate.

Step 2: Drill 2 pilot holes using a power drill and a 1/8" (3mm) drill bit. 

Step 2: Drill 2 pilot holes using a power drill and a 1/8" (3mm) drill bit. 

Step 1: With gate closed, inset the keeper bar (B) into the latch assembly.

            Mark the two holes with a pencil.

Step 3: To install the latch assembly, tighten the 2 lag bolts "clockwise" using a 17/32" (13mm) wrench. 

            You may also use a 17/32" (13mm) socket on your power drill. Do not over-tighten.

Step 3: To install the keeper bar, tighten the 2 lag bolts "clockwise" using a 17/32" (13mm) wrench. 

            You may also use a 17/32" (13mm) socket on your power drill. Do not over-tighten.

B

A

Summary of Contents for B088XR9TJW

Page 1: ...ise with 17 32 in 13mm wrench Step 2 Remove spring from mounting plate Rotate latch This product contains small items that could be a choking hazard if swallowed Keep these items away from young children Make sure these instructions are read and completely understood before attempting installation If you are unsure of any part of this installation please contact a professional installer for assist...

Page 2: ...d a 1 8 3mm drill bit Step 1 With gate closed inset the keeper bar B into the latch assembly Mark the two holes with a pencil Step 3 To install the latch assembly tighten the 2 lag bolts clockwise using a 17 32 13mm wrench You may also use a 17 32 13mm socket on your power drill Do not over tighten Step 3 To install the keeper bar tighten the 2 lag bolts clockwise using a 17 32 13mm wrench You may...

Page 3: ...a puerta cerrada inserte la barra retenedora B en el cerrojo Marque los dos orificios usando un lápiz Paso 3 Para instalar la barra retenedora apriete los 2 tirafondos hacia la derecha usando una llave de 17 32 pulgadas 13 mm También puede usar una punta de llave de cabeza hexagonal de 17 32 pulgadas 13 mm en su taladro eléctrico No apriete en exceso Déterminez si vous avez besoin d une configurat...

Page 4: ...付けるには 17 32 インチ 13 mm レンチで 2 つのラグボルトを 時計回りに 回転させて締め付けます 電動ドリルに 17 32 インチ 13 mm ソケットを使用することもできます 締めすぎ ないようにしてください ステップ 2 電動ドリルと 1 8 インチ 3 mm ドリルビットで 2 つ のパイロット穴を空けます ステップ 1 ゲートを閉じた状態で キーパーバー B をラッチアセン ブリに差し込みます 2 つの穴に鉛筆で印を付けます ステップ 3 キーパーバーを取り付けるには 17 32 インチ 13 mm レンチで 時計回りに 回転させて 2 本のラッチボル トを締め付けます 電動ドリルに 17 32 インチ 13 mm ソケットを使用することもできます 締めすぎないように してください 保証について この製品の保証書のコピーを入手するには amazon jp Amazon...

Reviews: