Setting up your Kindle Fire HD
1. Turn on your Kindle Fire HD by pressing the power
button located in
Figure 1.1
.
2. Slide your finger on the lock icon from right to left,
located in
Figure 1.2
. This will unlock your Kindle
device, launching a “Welcome to Kindle Fire” screen.
3. Slide your finger from right to left to get to the next
screen where you can register your Kindle Fire
with Amazon.
4. Connect to a wireless network by sliding your
finger down from the top of the screen and selecting
the wireless icon.
NOTE
: To register your Kindle Fire HD, you must
be connected to a wireless network.
5. Select the network you wish to connect to.
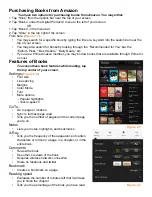
6. Return to the home screen, and slide your finger
from top to bottom to select the “More” option.
7. Tap “My Account”, and select the “Register” button
located in
Figure 1.3
.
8. If you already have an Amazon account, enter your
email and password. If you do not have an account,
tap “Create Account” and follow those instructions.
Congratulations!
You have registered
your Kindle Fire HD!
Now, you can access the
many features available on your device.
Welcome to the Kindle Fire HD!
This quick start guide will help you get started with some of the key features available on your
device.
E-readers are great tools for those who are often on the go, those who want to save space, or those
who simply love the ability to read on a technologically advanced device. While this guide only takes
you through the registration process and the primary book features, you can accomplish many other
tasks on your device as well, such as taking pictures and videos, playing games, and even watching TV
shows and movies! This guide will help you as you get started reading on your Kindle Fire HD.
Figure 1.1
Figure 1.2
Figure 1.3


