background image

MODEL: SM-1004SP   PRODUCT CODE: 61618   07/2018

MODEL: SM-1004SP   PRODUCT CODE: 61618   07/2018

11

info@tempo.org

AFTER SALES SUPPORT

1300 886 649

AUS

10

info@tempo.org

AFTER SALES SUPPORT

1300 886 649

AUS

Instructions

Using the Pie Maker 

Preparation

•  Prepare your pie filling; recipes start on page 16. Set the filling aside to cool.
•  Prepare your pie crusts. 

Unless the recipe states otherwise, we recommend 

using shortcrust pastry for the pie base and puff pastry for the top. 

•  Let frozen, ready rolled pastry thaw for 5–10 minutes before cutting it to 

shape with

 the reversible pastry cutter; use the larger side for the pie base 

and the smaller for the top. The slits in the base crust allow you to overlap 
the dough for a better fit in the mould. 

Preheating

•  Place the Pie Maker on a level and stable, heat and flameproof work surface, 

with enough room for ventilation all around it. 

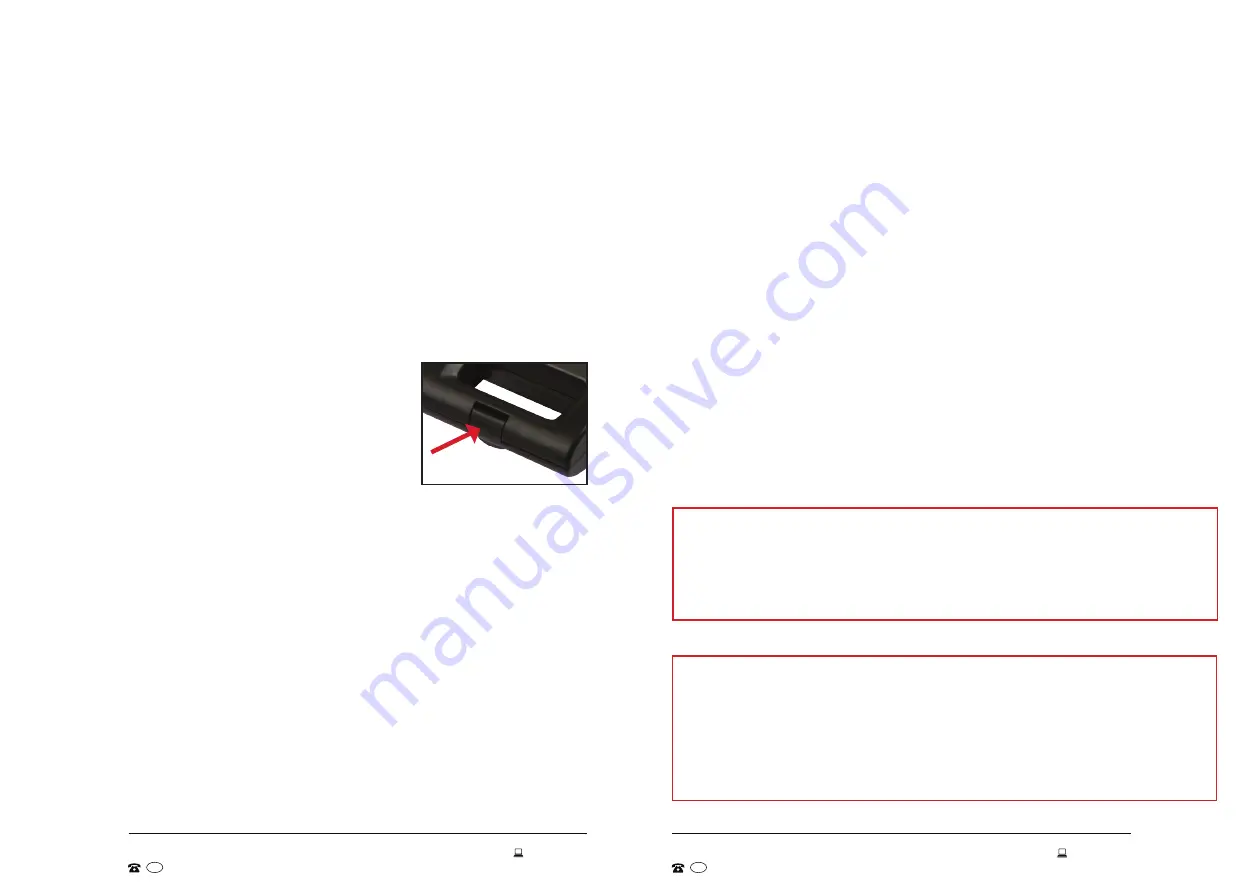
•  The handle lock (Fig. 1) must be  closed when  

using the appliance. Close the lid and push the  
latch towards the back to lock. 

•  Unwind the power cord, insert the plug into the 

mains power supply and switch on power at the 
outlet. The red Power light indicates that the Pie 
Maker is powered and preheating. 

•  After about 3–8 minutes, 

when the green Ready indicator lights up, the 

Pie Maker is ready to use. The light will cycle off and on as the thermostat 

in the unit maintains the correct operating temperature. Always keep the lid 
closed when preheating or in-between uses.

Baking pies

•  Disengage the handle lock and open the preheated Pie Maker.


Carefully 

place


your (large) cut out pie base over the lower pie mould, taking care as 

the mould surface will be hot. Overlap the pastry slits to ensure they are 
properly joined to form the pie base.

•  Add about 2 level cups of your cooled filling to 3/4 fill the mould. The weight 

of the filling will cause the dough to drop down into the mould. You can also 
use the bottom of a ladle to gently press the filling into the mould, however, 
take care not to tear the pastry. 

WARNING!

 Cooking surfaces are hot. Never touch them directly with your 

hands.

•  Place your (small) cut out pie top over the pie filling,


close the cover and 

push down the locking latch until you hear it click into place, indicating that 
the handles are securely locked.

•  We recommend you set a timer for 10 or 15 minutes, depending on the 

filling and your desired level of browning.


During baking, 

the green Ready 

light will cycle on and off, indicating that the correct temperature is being 
maintained.

•  At the end of the baking time, pull up the handle locking latch and carefully 

lift the lid. If your pie needs additional browning, simply close the lid and 
cook for an extra few minutes. 

•  When your pie is cooked to your liking, unplug the Pie Maker from the wall 

outlet. Carefully remove the pie from the mould by using a non-metallic 
(silicone, nylon or wooden) spatula.

CAUTION! 

Do not use metal utensils as this will damage the non-stick 

surface.

•  Let the Pie Maker cool down completely before cleaning and storage.
 

WARNING! 

The Pie Maker gets hot! When in use or until it has cooled 

completely, do not touch any of the metal surfaces. Use the cool-touch 
handle to open and close the Pie Maker.

Instructions (Cont.)

CAUTION!

• Be careful to avoid burns! Hot steam may escape during baking and when 

opening the appliance, and the pie moulds get very hot during use.

• Do not use a knife, fork or any other sharp object when removing the pie from 

the moulds as this will damage the non-stick cooking surfaces. 

Baking Times

• Baking a pie in the preheated Pie Maker can take between 10 and 20 

minutes, depending on the desired level of browning and the filling – fruit or 
vegetable pies generally take a little less time than meat pies.  

• Most pies will cook in about 15 minutes. Open the lid briefly and check after 

10 minutes and if the pastry looks too pale, add a little more time until golden 
brown.

Fig. 1

Summary of Contents for SM-1004SP

Page 1: ...Model Number SM 1004SP Pie Maker INSTRUCTION MANUAL AFTER SALES SUPPORT 1300 886 649 info tempo org AUS MODEL SM 1004SP PRODUCT CODE 61618 07 2018 E209 ...

Page 2: ...y Ambiano are manufactured to the highest standards of performance and safety and as part of our philosophy of customer service and satisfaction are backed by our comprehensive 1 Year Warranty We hope you will enjoy using your purchase for many years to come 02 Welcome 04 Warranty Details 05 General Safety Instructions 08 Product Overview 09 Getting Started 10 Instructions 13 FAQs and Troubleshoot...

Page 3: ...it frequency correspond to the voltage stated on the appliance rating label If it does not match contact our after sales support line and do not use the appliance Exclusive outlet separate circuit Insert the plug firmly into a properly earthed mains socket that is within easy reach so that the plug can easily be removed if necessary This appliance should be the only appliance operating on the circ...

Page 4: ...ure they do not play with the appli ance Close supervision is necessary when any appliance is used by or near children Keep the appliance and cord out of reach of children less than 8 years WARNING Do not leave unattended Do not leave the appliance unattended when plugged in General Safety Instructions Cont Flammable materials Do not use the appliance in close vicinity of flammable materials such ...

Page 5: ...the appliance if anything appears to be damaged or not working properly In case of damage contact our after sales support centre for advice Read Make sure you have read and understood all instructions and warnings in this manual Refer to the Product Overview opposite to familiarise yourself with the product and identify all parts Pay particular attention to the safety instructions on the previous ...

Page 6: ...o drop down into the mould You can also use the bottom of a ladle to gently press the filling into the mould however take care not to tear the pastry WARNING Cooking surfaces are hot Never touch them directly with your hands Place your small cut out pie top over the pie filling close the cover and push down the locking latch until you hear it click into place indicating that the handles are secure...

Page 7: ...should be cut into small pieces of similar size Glazing If you want to glaze the top of the pie crust with an egg wash for a shiny golden brown crust make sure that no egg wash drips between the crust and the mould otherwise the cooked pie will stick to the mould FAQs and Troubleshooting Guide How do I know the moulds are hot enough for baking pies When you connect the Pie Maker to the power suppl...

Page 8: ...nderside of the Pie Maker For compact storage in a space saving vertical position store the Pie Maker up right on its back using the stand for support Alternatively place the appliance in its original carton and store in a clean dry place out of children s reach Service and Repair If the Pie Maker is damaged do not attempt to repair it yourself There are no spare parts available for purchase All r...

Page 9: ... until golden brown This will take between 10 and 20 minutes depending on the desired level of browning and the filling stewed fruit fillings generally take a little less time than meat based fillings When the pie is cooked to your liking unplug the Pie Maker from the wall outlet Carefully remove the pie from the mould by using a non metallic silicone nylon or wooden spatula Recipes Cont Aussie Me...

Page 10: ...hicken stock powder Set aside Heat the oil in a medium size frypan add the onion carrots and celery and sauté until softened Add the peas and chicken pieces and stir to combine Add the white sauce stirring until everything is well combined If the vegetables require further cooking cook them in the sauce over medium heat until cooked to your liking Season to taste and set aside to cool Minted Sprin...

Page 11: ...utes or until the mixture boils and thickens Set aside to cool Peaches Cream Pie Ingredients 100g cream cheese 1 tbsp honey 1 cups canned peaches drained and chopped Method Beat the cream cheese and honey together until soft Stir the peaches through the cheese mixture Caramel Pears Pie Ingredients 2 tbsp unsalted butter cup cream 2 tbsp brown sugar Cinnamon and nutmeg to taste 3 small pears cored ...

Page 12: ...ory stick during the process of repair some or all of your stored data may be lost We recommend you save this data elsewhere prior to sending the product for repair You should also be aware that rather than repairing goods we may replace them with refurbished goods of the same type or use refurbished parts in the repair process Please be assured though refurbished parts or replacements are only us...

Page 13: ...Description V1 0 16 February 2016 Original release V2 0 15 November 2016 2017 Release V3 0 19 January 2018 2018 Release Warranty returns Should you for any reason need to return this product for a warranty claim make sure to include all accessories with the product Product does not work If you encounter problems with this product or if it fails to perform to your expectations make sure to contact ...

Reviews: