


Version 1.0
©Copyright 2018, Ambient LLC. All Rights Reserved.
Page 4
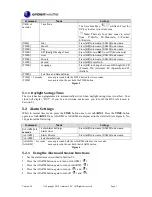
Figure 2
No
Description
No
Description
1
Transmitter LED (flashes when the remote
is transmitting)
5
Wall hanger
2
Reset button (press reset to restart the
transmitter)
6
Battery cover
3
Transmitter channel (assign the transmitter
to 1,2 or 3, default = 1)
7
Table stand
4
2 x AA batteries
Note:
The RC-8365 supports three wireless channels. If you have one sensor, leave the transmitter
channel at Channel 1. If you have more than one sensor, refer to Section 5.9.
3.2
Parts List
QTY
Item
1
Clock
Frame Dimensions (LxWxH): 5.25" L x 1.5"D x 3.5"H
1
Wireless Transmitter (LxWxH): 4.0” L x 2.5” W x 1.5” D
1
UL Rated AC Adapter
1
User Manual
3.3
Powering Up
Note:
The power up sequence must be performed in the order shown in this section (remote
transmitter
FIRST
, Display Clock
SECOND
) to avoid the Clock synchronization time out.
The Transmitter:
1.
Remove the battery door on the back of the transmitter and insert 2 new AA batteries,
according to the polarity information marked on the battery compartment, and replace the
battery door, as shown in Figure 2. Place the transmitter about 5 feet from the clock.
The Clock:
1.
Plug the AC adaptor into the DC jack of the clock.
2.
Remove the battery door on the bottom of the clock and insert 3 new AA batteries, according
to the polarity information marked on the battery compartment, and replace the battery door.
3.
Once the batteries are inserted, all of the LCD segments will light up briefly before entering
the sensor search mode.
4.
The RCC clock will clock 2:00am and will attempt to synchronize with the RCC (good