


Version 1.0
©Copyright 2018, Ambient LLC. All Rights Reserved.
Page 7
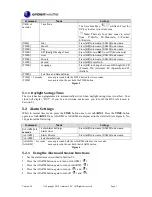
Command
Mode
Settings
[TIME] + 2
seconds
Time Zone
The Time Zone Map
will flash.
Press the
UP key to select your time zone.
Note:
There are four time zones to select
from: P=Pacific, M=Mountain, C=Central,
E=Eastern.
[TIME]
Year
Press [
UP
] to increase, [DOWN] to decrease.
[TIME]
Month
Press [
UP
] to increase, [DOWN] to decrease.
[TIME]
Day
Press [
UP
] to increase, [DOWN] to decrease.
[TIME]
DST (Daylight Savings Time)
Press [
UP
] to turn
DST
On or Off (Arizona only)
[TIME]
Hour
Press [
UP
] to increase, [DOWN] to decrease.
[TIME]
Minute
Press [
UP
] to increase, [DOWN] to decrease.
[TIME]
Second
Press [
UP
] to reset to 0.
[TIME]
Language
Press [
UP
]
to change between GB (English), FR
(French), DE (German), ES (Spanish) and IT
(Italian).
[TIME]
Exit Time and Date Settings
[TIME] + 2 seconds
means press and hold the TIME button for two seconds.
[TIME]
means press but do not hold the TIME button.
Figure 5
5.1.1
Daylight Savings Time
The clock has been programmed to automatically switch when daylight saving time is in effect. Your
clock will display “DST”. If you live in Arizona, make sure you turn off the DST referenced in
Section 5.1.
5.2
Alarm Settings
While in normal time mode, press the
TIME
button once to set
ALARM1
. Press the
TIME
button
again to set
ALARM2
. Once ALARM1 or ALARM2 are displayed in the date field (see Figure 4, No.
10), perform the following:
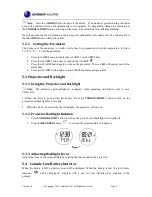
Command
Mode
Settings
[
ALARM
] + 2
seconds
Enter Alarm Settings
Alarm Hour
Press [
UP
] to increase, [DOWN] to decrease.
[ALARM]
Alarm Minute
Press [
UP
] to increase, [DOWN] to decrease.
[ALARM]
Exit Alarm Settings
[ALARM] + 2 seconds means press and hold the ALARM button for two seconds.
[ALARM]
means press but do not hold the ALARM button.
Figure 6
5.2.1
Using the Alarm and Snooze Functions
1.
Set the alarm time as described in Section 5.2.
2.
Press the ALARM button once to turn on ALARM1
1.
3.
Press the ALARM button again to turn on ALARM2
2.
4.
Press the ALARM button again to turn on
1 and
2.
5.
Press the ALARM button again to turn off
1 and
2.


