background image


Version 1.0  


©Copyright 2015, Ambient LLC. All Rights Reserved. 


Page 2 


1


Introduction 

Thank  you  for  your  purchase  of  the  Ambient  Weather  WS-70  Wireless  Indoor/Outdoor  8-Channel 
Thermo-Hygrometer with Jumbo Display. The following user guide provides step by step instructions 
for  installation,  operation  and  troubleshooting.  To  download  the  latest  manual  and  additional 
troubleshooting tips, please visit: 
 

http://ambientweather.wikispaces.com/ws70


2


Getting Started 

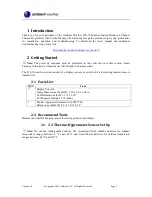
Note: 

The  power  up  sequence  must  be  performed  in  the  order  shown  in  this  section  (insert 

batteries in the remote transmitter(s) first, Display Console second). 
 
The WS-70 weather station consists of a display console (receiver), and a thermo-hygrometer (remote 
transmitter). 

2.1


Parts List 

QTY 

Item 

Display Console 
Frame Dimensions (LxHxW): 4.50 x 5.0 x 1.00 in 
LCD Dimensions (LxW): 3.75 x 3.50” 
LCD Segment Height: 1.25 inches 

Thermo-hygrometer transmitter (FT007TH) 
Dimensions (LxHxW): 4.5” x 2.0” x 0.75” 


2.2


Recommend Tools 

Hammer and nail for hanging remote thermo-hygrometer transmitter. 

1.1


2.3 Thermo-Hygrometer Sensor Set Up 

Note: 

Do  not  use  rechargeable  batteries.  We  recommend  fresh  alkaline  batteries  for  outdoor 

temperature  ranges  between  -4  °F  and  140  °F  and  fresh  lithium  batteries  for  outdoor  temperature 
ranges between -40 °F and 140 °F. 

Summary of Contents for WS-70

Page 1: ...ensor Installation 6 4 Console Operation 7 4 1 Min Max Mode 7 4 2 Clearing Min Max Daily 7 4 3 Outdoor Channel Selection 8 4 4 Temperature Units of Measure 8 4 5 Sensor Search Mode 8 4 6 Best Practices for Wireless Communication 8 4 7 Adjustment or Calibration 8 4 7 1 Indoor Temperature and Humidity Calibration 9 4 7 2 Outdoor Temperature and Humidity Calibration 9 5 Glossary of Terms 10 6 Specifi...

Page 2: ...ert batteries in the remote transmitter s first Display Console second The WS 70 weather station consists of a display console receiver and a thermo hygrometer remote transmitter 2 1 Parts List QTY Item 1 Display Console Frame Dimensions LxHxW 4 50 x 5 0 x 1 00 in LCD Dimensions LxW 3 75 x 3 50 LCD Segment Height 1 25 inches 1 Thermo hygrometer transmitter FT007TH Dimensions LxHxW 4 5 x 2 0 x 0 75...

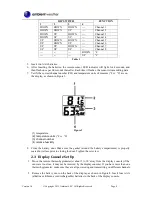
Page 3: ...he inside cover of the lid of the transmitter Figure 2 displays all four switches in the OFF position factory default setting Figure 2 3 Channel Number The WS 70 supports up to eight transmitters To set each channel number the default is Channel 1 change Dip Switches 1 2 and 3 as referenced in Table 1 4 Temperature Units of Measure To change the transmitter display units of measure F vs C change D...

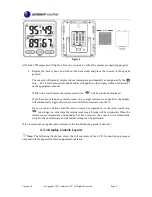
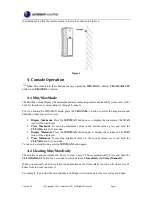
Page 4: ...measure F vs C are on the display as shown in Figure 3 Figure 3 1 temperature 2 temperature units F vs C 3 channel number 4 relative humidity 8 Close the battery door Make sure the gasket around the battery compartment is properly seated in its trace prior to closing the door Tighten the set screw 2 3 Display Console Set Up 1 Move the remote thermo hygrometer s about 5 to 10 away from the display ...

Page 5: ... If you have more than once remote sensor up to eight remotes are supported the display will automatically toggle between sensors until all sensors have reported in Do not touch any buttons until the remote sensor has reported in or the radio search icon is no longer on otherwise the remote sensor search mode will be terminated When the remote sensor temperature and humidity has been received the ...

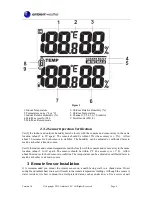
Page 6: ...rs to stabilize The humidity can be adjusted or calibrated later to match each other a known source Verify the indoor and outdoor temperature match closely with the console and sensor array in the same location about 5 to 10 apart The sensors should be within 2 F the accuracy is 1 F Allow about 30 minutes for both sensors to stabilize The temperature can be adjusted or calibrated later to match ea...

Page 7: ...e MAX icon will be displayed 2 Clear Maximum To reset the maximum values to the current values press and hold the CLEAR button for 3 seconds 3 Display Minimum Press the MIN MAX button again to display the minimum The MIN icon will be displayed 4 Clear Minimum To reset the minimum values to the current values press and hold the CLEAR button for 3 seconds To return to normal mode press the MIN MAX b...

Page 8: ...le to interference distance walls and metal barriers We recommend the following best practices for trouble free wireless communication 1 Electro Magnetic Interference EMI Keep the console several feet away from computer monitors and TVs 2 Radio Frequency Interference RFI If you have other 433 MHz devices and communication is intermittent try turning off these other devices for troubleshooting purp...

Page 9: ...al or uncalibrated measurement press the ADJUST button Once the displayed temperature or humidity equals the calibrated source press and hold the ADJUST button for three seconds or wait 15 seconds for timeout and the indoor temperature or humidity value will stop flashing Discussion Humidity is a difficult parameter to measure electronically and drifts over time due to contamination In addition lo...

Page 10: ...l dial and other digital thermometers are not a good source and have their own margin of error Using a local weather station in your area is also a poor source due to changes in location timing airport weather stations are only updated once per hour and possible calibration errors many official weather stations are not properly installed and calibrated Place the sensor in a shaded controlled envir...

Page 11: ...ere you can contact us as follows 1 Email Support support ambientweather com 2 Live Chat Support www ambientweather com chat html M F 8am to 4pm Arizona Time 3 Technical Support 480 283 1644 M F 8am to 4pm Arizona Time Problem Solution Wireless remote thermo hygrometer not reporting in to console There are dashes on the display console If any of the sensor communication is lost dashes will be disp...

Page 12: ...ee Allow up to one hour for the sensors to stabilize due to signal filtering The indoor and outdoor temperature sensors should agree within 2 F the sensor accuracy is 1 F Use the calibration feature to match the indoor and outdoor temperature to a known source Indoor and Outdoor Humidity do not agree Allow up to one hour for the sensors to stabilize due to signal filtering The indoor and outdoor h...

Page 13: ...he User manual is highly recommended The manufacturer and supplier cannot accept any responsibility for any incorrect readings and any consequences that occur should an inaccurate reading take place This product is designed for use in the home only as indication of weather conditions This product is not to be used for medical purposes or for public information The specifications of this product ma...

Page 14: ... TV technician for help 11 Warranty Information Ambient LLC provides a 1 year limited warranty on this product against manufacturing defects in materials and workmanship This limited warranty begins on the original date of purchase is valid only on products purchased and only to the original purchaser of this product To receive warranty service the purchaser must contact Ambient LLC for problem de...

Reviews: