background image


Version 1.0  


©Copyright 2011, Ambient LLC. All Rights Reserved. 


Page 2 

meter is now ready for use. 
 

Important  Note: 

This  is  an  air  temperature  probe  only.

  DO  NOT  SUBMERSE  IN  LIQUID.   

DO NOT PLACE IN OPEN FLAME. 

This will damage the sensor board and void the warranty. Do 

not  use  in  extreme  cold  or  extreme  hot  temperatures  (such  as  an  oven  or  non-ambient  environment 
such as carbon dioxide gas). Only use within the recommended ambient temperature range (-22 °F to 
140 °F). 

3.


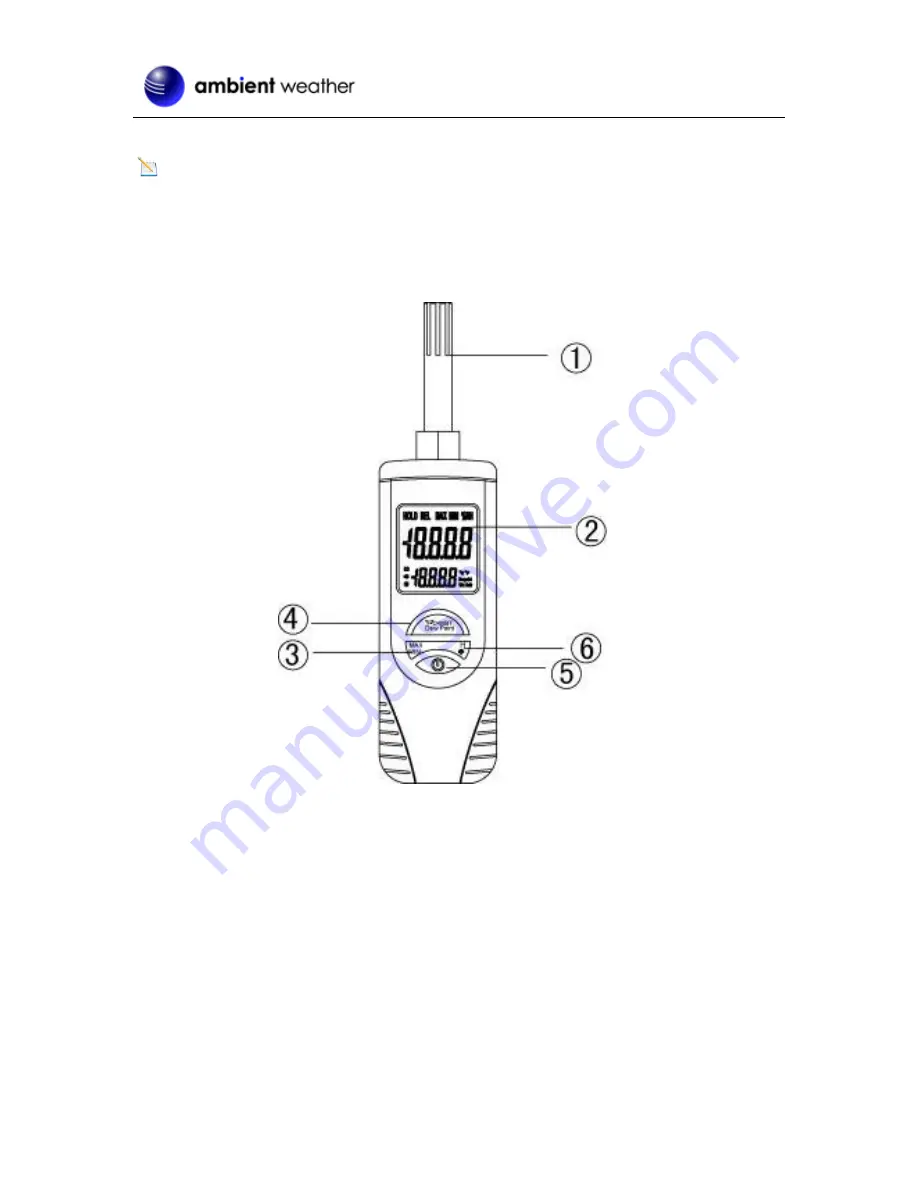
Display Console Layout 


Figure 1 

1.


Sensor probe. The humidity sensors are located inside this probe tip. DO NOT SUBMERSE 
IN LIQUID. 

2.


LCD Display 

3.


MIN / MAX Button 

4.


°F, °C, Dew Point, Wet Bulb Temperature Selection Button 

5.


ON / OFF Button 

6.


BACKLIGHT / HOLD Button 

4.1 Display Layout 

The LCD display shows the relative humidity in the top portion of the display, and the air temperature, 
dew point or wet bulb temperature in the bottom portion of the display. 

4.2


ON / OFF 

To turn on the display, press the 

ON/OFF

 button. To turn off the display, press the 

ON/OFF

 button 


Summary of Contents for WS-HT350

Page 1: ...Information 5 1 Introduction Thank you for your purchase of the Ambient Weather WS HT350 Fast Response Thermo Hygrometer with Wet Bulb Dew Point Meter The following user guide provides step by step instructions for operation and troubleshooting To download the latest manual and additional troubleshooting tips please visit http ambientweather wikispaces com wsht350 2 Getting Started The WS HT350 co...

Page 2: ...ecommended ambient temperature range 22 F to 140 F 3 Display Console Layout Figure 1 1 Sensor probe The humidity sensors are located inside this probe tip DO NOT SUBMERSE IN LIQUID 2 LCD Display 3 MIN MAX Button 4 F C Dew Point Wet Bulb Temperature Selection Button 5 ON OFF Button 6 BACKLIGHT HOLD Button 4 1 Display Layout The LCD display shows the relative humidity in the top portion of the displ...

Page 3: ...ot in a position to view the display Press the Hold Backlight button to hold the last measured value Press the Hold Backlight button again to return to normal mode To turn on the backlight press and hold the Hold Backlight button To turn off the backlight press and Hold the Hold Backlight button 5 Glossary of Terms Term Definition Accuracy Accuracy is defined as the ability of a measurement to mat...

Page 4: ...80 RH non condensing Storage Conditions 14 o F to 140 o F 10 o C to 60o C 80 RH non condensing Auto Power Off Meter automatically shuts down after 15 minutes of inactivity Sleep Mode To override Auto Power Off function Non Sleep Mode press and hold the Hold Backlight button then press power button after the full display appears and then release both buttons The non sleep mode Icon will not be disp...

Page 5: ...CC part 15 21 Modifications not expressly approved by this company could void the user s authority to operate the equipment 10 Warranty Information Ambient LLC provides a 1 year limited warranty on this product against manufacturing defects in materials and workmanship This limited warranty begins on the original date of purchase is valid only on products purchased and only to the original purchas...

Reviews: