background image


- 7 -

Initial Calibration with DocketSCAN

®


………………………


NOTE: Calibration is a critical step in setting up your scanner.    It allows the image quality to 
be optimally balanced for your computer and scanner combination.    If at any time you switch 
the computer that you use with your scanner, or change scanners, you will be required to 
recalibrate your scanner. 


STEP 1   

-  

Launch DocketSCAN

®


To open the DocketSCAN

®

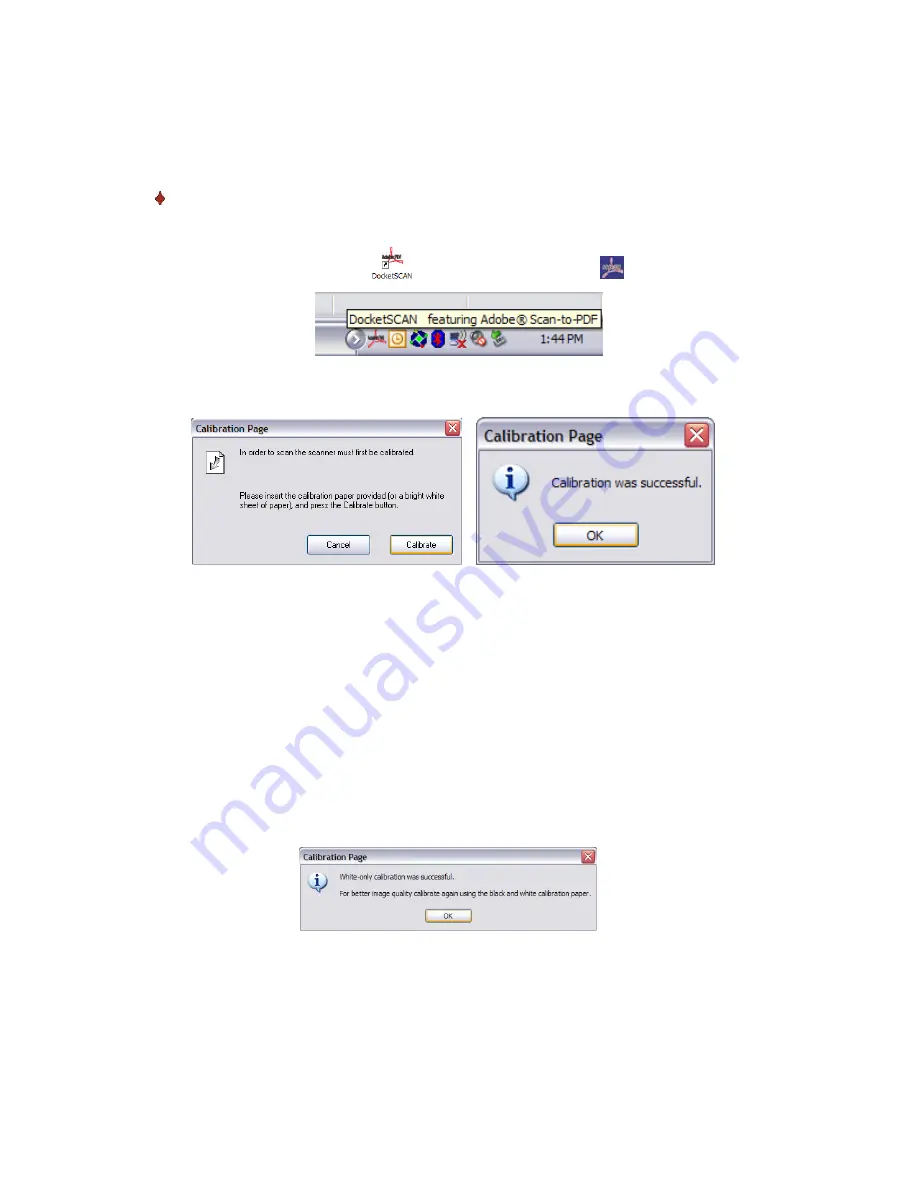
 application you can either double-click the Adobe PDF   

 
short cut icon on your desktop              or the “Taskbar tray” icon          (usually in the lower 
right-hand corner of the Windows Desktop). 


Once you have launched DocketSCAN

®

, you should select the SCAN button and the 

step-by-step calibration instructions will appear in a succession of prompts. 


This calibration process will require the special black and white calibration sheet that 
was included with your scanner.    When calibrating, make sure the page with the black 
bars are facing down and note the direction of the arrows for proper insertion.    When 
the calibration process has been completed successfully, you will see the message above; if 
you do not see this message you will need to recalibrate. 


If you switch scanners or your image quality has become unsatisfactory, you can 
recalibrate your scanner by choosing the CUSTOM button in the DocketSCAN

® 

window 

and select the Calibrate button. 


Should you lose the black and white calibration paper that was included with your 
Ambir scanner, you can simply use any plain white (the brighter the white the better) 
piece of letter size (or A4) printer paper to perform the calibration.    Simply fold the 
paper in half and insert the folded end into the scanner first when calibrating. 
The following message will be displayed (see below). 


Summary of Contents for DS485

Page 1: ......

Page 2: ...ere is no guarantee that interference will not occur in a particular installation If this equipment does cause harmful interference to radio or television reception which can be determined by turning the equipment off and on the user is encouraged to try to correct the interference by one or more of the following measures Reorient the receiving antenna Increase the separation between the equipment...

Page 3: ... capture manage and archive documents of many types We encourage you to read this short but important User Guide carefully Your Ambir scanner has the latest technology and compatible drivers These drivers have been certified by Microsoft and tested to be in compliance with their Windows 2000 SP4 Windows XP SP2 and Vista operating systems We also feature a TWAIN 1 9 compatible driver that will work...

Page 4: ...talled the software STEP 1 Install Software a Insert the installation CD that came with your Ambir scanner The installation program should begin automatically b If your CD does not start automatically please double click the MY COMPUTER icon on your Windows desktop then double click the CD icon If this installation program does not begin then double click the SETUP icon c Follow the on screen step...

Page 5: ...be Reader 7 0 button before you click FINISH You may also print out the User Guide after installing the Adobe Reader for your future reference If you choose to install ADOBE Reader 7 0 you will see the screen below shortly please follow the instructions to install the software Note After you have completed all software installations we strongly recommend that you restart your computer even though ...

Page 6: ... previously installed Scanner software will be removed from your computer with the exception of the Adobe Reader 7 0 STEP 2 Install Hardware After you have installed the software and restarted your computer a Connect the USB cable from the scanner to your USB port on your computer as shown below If necessary please check your computer s user guide to identify the available USB ports and their loca...

Page 7: ...low the step by step Wizard installation and finish your hardware installation d When you finish your Hardware Wizard installation the computer will automatically detect the new hardware device installed and it will be ready for use Note Under Windows Me you may be required to browse to the installation CD where Windows will retrieve additional driver components to complete the installation ...

Page 8: ...equire the special black and white calibration sheet that was included with your scanner When calibrating make sure the page with the black bars are facing down and note the direction of the arrows for proper insertion When the calibration process has been completed successfully you will see the message above if you do not see this message you will need to recalibrate If you switch scanners or you...

Page 9: ...nel which you can find by pressing the Custom button on the DocketSCAN control panel The TWAIN control panel shown below allows you to control all details and settings of the scanner This type of fine tuning of your scans may be required for some of your document needs 3 Please notice the Page Tabs at the top of the TWAIN control panel they are Pre defined Setting Custom Settings Information and L...

Page 10: ...u want to return to the original slide bar control settings press the RESET button which restores these to the scanner default settings Once your settings are defined select either Preview to take a quick look at how your image will look in the scanning window or ress SCAN to initiate the final scanning Using the Ambir Scanner with other application programs Your Ambir scanner is fully TWAIN compl...

Page 11: ... of adhesive material even POST IT paper Make sure the leading edge of your documents are very straight not wrinkled or folded and are inserted level to the intake slot If your document does have a fold sharp bend or is wrinkled please use the document sleeve included in the scanner package Clean the scanner with the included cleaning paper and 70 isopropyl alcohol not included Place a few drops o...

Page 12: ...conomic Community Scanner model PS465 PS665 DS485 or DS685 Warranty Period 1 year Contact your place of purchase for warranty service information Scanner Warranty The manufacturer warrants that each scanner is free from defects in materials and workmanship and conforms to the manufacturers published specifications The warranty period for a scanner is a specified fixed period commencing on its date...

Reviews: