0501UCA
14/25
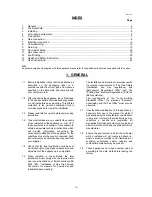
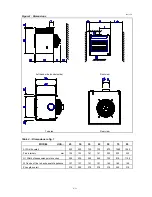
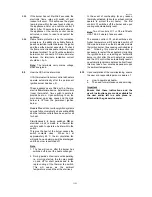
Figure 11.
BURNER ASSEMBLY REMOVAL
9.8
Burner tray removal :
Refer to figs. 11, 15 & 16
1 Disconnect
gas
supply
at the unions below the
inlet gas service tap and adjoining the gas
control valve.
2
Disconnect the wires leading to the gas valve
at the valve terminal end.
3
Disconnect wires leading to the thermal
overheat cut off device terminals.
4
Unscrew qty. 2 burner tray fixing screws.
5
Withdraw the burner assembly by pulling from
its runners until it is released.
6
To reassemble reverse procedure 1 thru. 5.
9.9 Note :
Appliances for use on propane or butane gas
have an aeration shutter fitted to the burner
inlet air venturi (see fig. 17). This device may
also be fitted to natural gas appliances which
have been converted. The shutter is set and
sealed by a multi- functional sealing plate
marked LPG + NG. Ensure it is correctly reset
after any burner service work is carried out.
9.10
To renew or service the gas valves :
Remove burner rack assembly as described
9.7 above. To dismantle valve from manifold,
take care when using spanners not to damage
valve bodies which are constructed from soft
die cast aluminium. It is necessary to remove
the burner manifold from the burner ribbon tray
assembly to unscrew the gas valve.
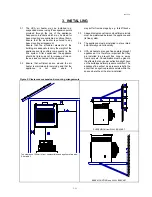
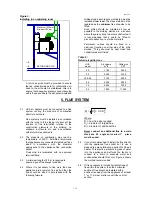
Figure 12.
DRAUGHT DIVERTER REMOVAL
1.Draught diverter securing screws left and right hand side.
9.11 Electrical:
Check all visible wiring for damage, check
terminal security.
When removing for service or renewal any
electrical component follow a logical sequence
to ensure that replacement will be correct. Mark
wiring to ensure before disconnection to ensure
that circuits are re-connected correctly.
9.12
Flue system:
Check that flue is in good condition adequately
supported and that the flue and supports are
free from corrosion and that the flue is
unobstructed. Test for a positive up-draught
when re-commissioning the appliance by using
smoke introduced into the draught hood slot at
the front of the air heater.
On flue systems fitted with an Euroventer refer
to the separate instructions supplied with the
Euroventer.
9.13
Fan assembly:
When it is necessary to remove the fan blade
from the motor it should be noted that the
securing screw is fitted using a thread sealing
compound. local heat may be required to soften
the compound so that the screw may be
loosened.


