background image

Data/File Operation

1. Take a Photo

 - Press the snapshot button          once. The photo will then be     


retained and accessed via the mobile app. 

2. Take a Video 

-  Press the video button          once to start filming video. To recording video, 

press the video button again. The video taken will then be retained and accessed via the 

mobile app. 

3. Access Photos/Videos 

- Press the gallery button once           to access the media storage 

interface. Press the 

Photos

 icon to access photos. Press the 

Videos

 button to access                                                                                                        

stored videos. Press the 

SD Card

 button to access data stored on an inserted SD card.

4. Back Button 

- Press the 

Back

 Button           once to return to the real-time app interface. 

FCC Compliance

This device complies with part 15 of the FCC Rules. Operation is subject to the following two 

conditions: 

(1) This device may not cause harmful interference, and

(2) This device must accept any interference received, including interference that may cause 

undesired operation. 

Chanes or modifications not expressly approved by the party responsible for compiiance 

could void the user’s authority to operate the equipment. 

Compliance Information

FCC Warning Message

Any changes or modifications not expressly approved by the party responsible for compli-

ance could void the user’s authority to operate the equipment. 

This device complies with part 15 of the FCC Rules. Operation is subject to the following two 

conditions: (1) This device may not cause harmful interferencem and (2) this device must 

accept any interference received, including interference that may cause undesired operation. 

FCC Radiation Exposure Statement:


This equipment complies with FCC radiation exposure limits set forth for an uncontrolled 

environment. This equipment should be installed and operated with minimum distance of 

20cm between the radiator and your body. This transmitter must not be co-located or 

operating in conjunction with any other antenna or transmitter. 

ote: This equipment has been tested and found to comply with the limits for a class B digital, 

pursuant to part 15 of the FCC Rules. These limits are designed to provide reasonable 

protection against harmful interference in a residential installation. 

-12-

Summary of Contents for A4-W

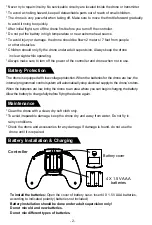
Page 1: ...e or throw the battery against any hard surface Do not immerse the battery in water Always store the battery in a cool dry place When recharging the device only use the battery charger intended for th...

Page 2: ...power of the controller and drone when not in use The drone is equipped with low voltage protection When the batteries for the drone are low the internal programmed control system will automatically...

Page 3: ...ht will flash while taking picture and remian on while recording video Press once to go into headless mode press again to quit headless mode For more information on Headless mode refer to the Headless...

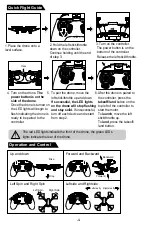
Page 4: ...ove the left stick throttle up To land press the takeoff land button 3 Turn on the controller The power button is on the bottom of the controller Release the left stick throttle 4 Turn on the drone Th...

Page 5: ...ide fine tuning Left right spin fine tuning Backward Trim Forward Trim Leftside Trim Rightside Trim Backward Trimmer Forward Trimmer LeftSide trimmer RightSide trimmer Left spin Trim Right spin Trim L...

Page 6: ...ll remain on until thecalibration process is complete Press this button To quit this function move in any direction Left flip Right flip Forward flip Backward flip Push in on the right stick rudder an...

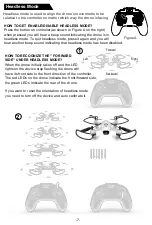
Page 7: ...RECOGNIZE THE FORWARD SIDE UNDER HEADLESS MODE When the drone initially takes off and the LED lights on the device stop flashing the drone will have its front side to the front direction of the contro...

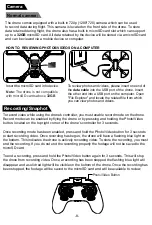
Page 8: ...using the drone s controller you must enable record mode on the drone Record mode can be enabled by flying the drone or by pressing and holding the Photo Video button located on the top right corner o...

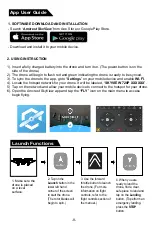
Page 9: ...ne 6 Open the Amcrest SkyView app and tap the FLY icon on the main menu to access begin flying Search Amcrest SkyView from App Store or Google Play Store Download and install it to your mobile device...

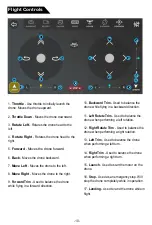
Page 10: ...d direction 10 Backward Trim Used to balance the drone while flying in a backward direction 11 Left Rotate Trim Used to balance the drone when performing a left rotation 12 Right Rotate Trim Used to b...

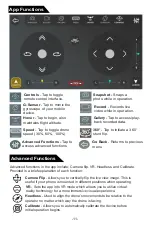
Page 11: ...pp include Camera flip VR Headless and Calibrate Provided is a brief explanation of each function Camera Flip Allows you to vertically flip the live view image This is useful if your phone is mounted...

Page 12: ...roved by the party responsible for compiiance could void the user s authority to operate the equipment Compliance Information FCC Warning Message Any changes or modifications not expressly approved by...

Page 13: ...use undesired operation This device has been designated to operate with the antennas provided within the equip ment Use of other antennas may violate industry Canada rules and void the user s authorit...

Reviews: