How to View Saved Video and Images
1.
Turn the camera on while using the included car adapter or USB cable. Once the camera is
booted up automatic recording will begin.
2.
Press the OK button to stop recording.
3.
Press the M (Mode) button twice to switch to the Playback Mode.
4.
Displayed in the upper right left corner will be one of the two icons. The
icon indicates you
are viewing a still image and the
icon indicates you are viewing a video.
5.
Press the UP and DOWN buttons to browse through the saved videos and images.
6.
Press the OK button to play/pause videos, the UP button to fast forward, and DOWN button to
rewind while viewing video.
Camera Installation
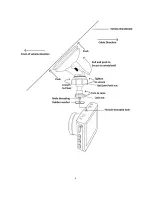
The following steps will guide you through the installation process (see image below):
1)
Locate the female threaded hole on the top of the camera.
2)
Before attaching the mount to the camera, spin the lock nut so it is positioned at the top of the
male threading.
3)
Insert the male threaded shaft into the female threaded hole and fasten the bracket.
4)
Ensure the lock nut is tightly fastened onto the camera.
5)
Position the camera onto the vehicle's windshield. Ensure the locking lever is in the down position.
6)
Push the suction cup up against the vehicle’s windshield to lock it in place.
Spin the lock nut so
that it is threaded up against the camera tightly.
7)
Loosen the ball joint lock nut and position the camera by pivoting the ball joint to the desired
direction.
8)
Tighten the ball joint lock nut to lock the cameras direction in place.
Note: Always loosen the grip nut before pivoting the camera in any direction. Failure to do so may
cause mount failure.


