4211-189 08-09-11
page 5
A220FP Fragrance Injector Pump
Installation and Operating Instructions
2 GANG ROUGH-IN BOX
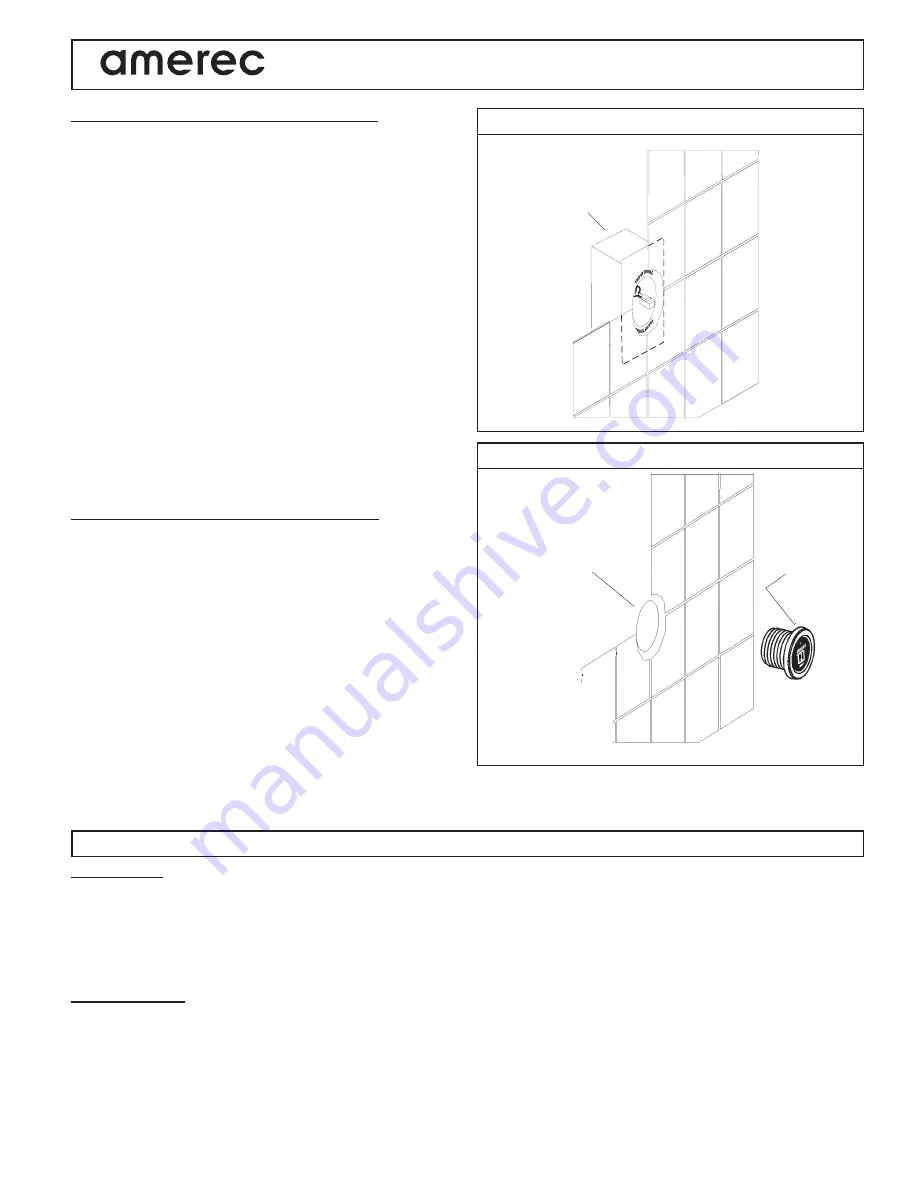
DIAGRAM 14
DIAGRAM 13
APPLY SEALANT
(100% SILICONE CAULK)
TILE UP TO
45 mm DIAMETER HOLE
IN FINISHED WALL
(OPTIONAL NUT IF BACK OF
WALL IS ACCESSABLE)
DIAGRAM 13
DIAGRAM 12
Single Position
Rough-in Box
(optional)
Apply Sealant
(100% Silicone
Caulk)
Tile up to 1-3/4"
diameter hole in
finished wall
Install the Fragrance Controller (continued)
while pressing the terminal block tabs with a small tip
screw driver. Release the tabs to secure the wires.
• Place a strain relief (provided, not shown) around the
cable Close to the controller's end and squeeze it closed
with pliers while pushing it into the hole to secure the
cable.
• Plug the adapter into a convenient wall outlet.
• Secure the cord to the wall as needed to prevent stress or
other risks of damage.
• Run the pump's power cord to the controller and through
the second hole in the controller's end. Connect the cord
to the terminals block's PUMP positions and install a
strain relief and secure the cord in the same manner used
for the power cable.
•Run the thermal switch's cable to the controller and
through the third hole in the controller's end. Connect the
stripped wires ends to the terminals block's
SWITCH
positions, install a strain relief and secure the cable in
the same manner used for the power cable.
Install the On/Off Switch (Diagrams 12 & 13)
The low voltage control can be mounted directly to a
finished wall either inside or outside the steam room.
• Rough-in the control cable (this cable has an plug on
each end similar to a telephone's).
• Using a 1-3/4" hole saw, drill a hole in the finished wall
where the control is to be mounted.
• Locate the control cable, pull it out through the 1-3/4" hole
and plug the cable into the connector in the back of the
control housing.
• Run a bead of 100% silicone caulk around the perimeter
on the back of the control housing. Insert the control into
the 1-3/4" hole.
• Using the methods previously listed, connect the other
end of the control cable to the Fragrance Controller's
CONTROL
jack and secure the cable..
OPERATING INSTRUCTIONS
Initial Set-Up
• Make sure the essence bottle is filled with fragrance oil. * Note:
Never let the essence container or tubing run dry.
An extended lack of oil could cause damage to the tubing or pump
.
• Make sure the power adapter is connected to 120VAC then turn the pump on by pressing the pump's On/Off/Mom
switch in to the center ON position. Note: the pump will not run until the Fragrance Controller is turned on by the
On/Off switch and steam is enterring the room.
Basic Operation
To turn on the injector system, simply press the switch on the On/Off switch. Once pressed:
• The switch's LED will light, indicating that the injector system is running.
• The pump will run for a short time every 2 minutes, if the steam is heating the room.
• After about 15 minutes, the system will automatically turn off and the switchs LED will turn off.
Note: Fragrance will not be injected until the room is over 100° F.
Summary of Contents for A220FP
Page 1: ......


