98
HELIX™
Manual (P/N 26291)
Chapter 6: Recharge
Rev A (February 2018)
HELIX™
PCU Fire Suppression System
For Systems Using Electric Control Head (P/N 14032
-
R):
For systems using an Electric Control Head (P/N 14032
-
R), perform the following steps. The control
head must be disassembled, cleaned, and reassembled after each use.
Control Head Removal (See Figure 4.3.1):
1.
Unplug Linear Actuator (P/N 20500
-
R) from Linear Actuator circuit and unscrew Linear
Actuator from Control Head Body.
2.
Carefully remove Electric Control Head from Agent Cylinder Valve by removing (2) 5/16”
-
18
bolts.
3.
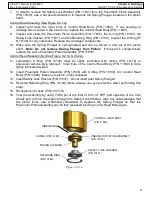
Install Shipping Plate (P/N 10099) in place of Electric Control Head (See Figure 2.1a).
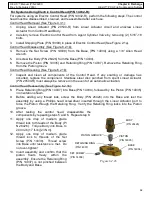
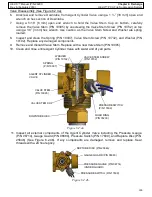
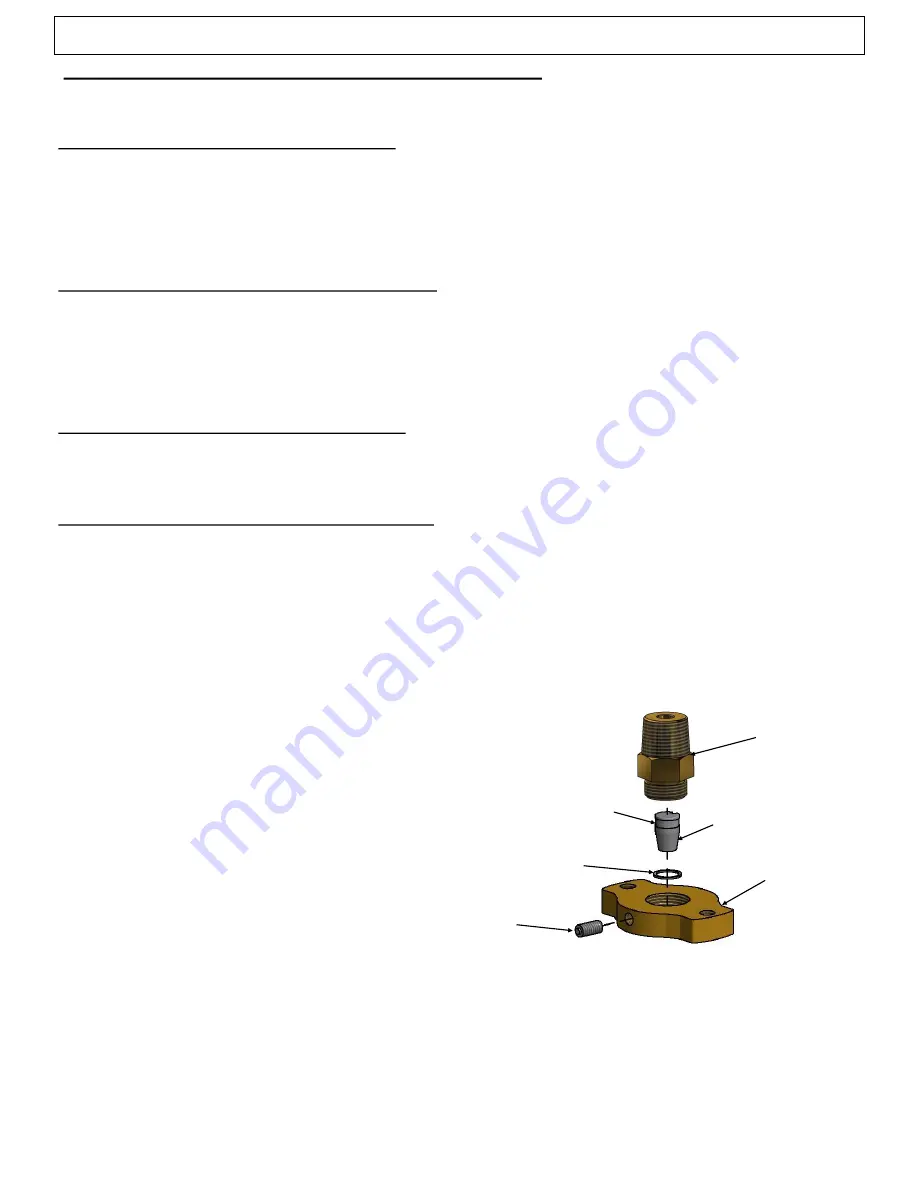
Control Head Disassembly (See Figure 6.2.1b):
4.
Remove the Set Screw (P/N 14038) from the Base (P/N 14034) using a 1/8” Allen Head
wrench.
5.
Unscrew the Body (P/N 26426) from the Base (P/N 14034).
6.
Remove the Piston (P/N 14035) and Retaining Ring (P/N 14037). Remove the Retaining Ring
from the Piston groove.
Control Head Cleaning (See Figure
6.2.1b
)
:
7.
Inspect and clean all components of the Control Head. If any scarring or damage has
occurred, replace the component. Stainless steel disc punched from spent Linear Actuator
(P/N 20500
-
R) must always be removed in the event of an automatic actuation.
Control Head Reassembly (See Figure 6.2.1b):
8.
Place Retaining Ring (P/N 14037) into Base (P/N 14034), followed by the Piston (P/N 14035)
in orientation shown.
9.
Before adding any thread lock, screw the Body (P/N 26426) into the Base and test the
assembly by using a Phillips head screwdriver inserted through the Linear Actuator port to
force the Piston through the Retaining Ring. Verify the Retaining Ring locks into the Piston
groove.
10.
After testing the control head, disassemble the
components by repeating steps 5 and 6. Repeat step 8.
11.
Apply one drop of medium grade
thread lock to threads of the Body (P/
N 26426).
Torque Body into Base to
200 in
-
lb (17 ft
-
lb) [23 Nm].
12.
Apply one drop of medium grade
thread lock to threads of the Set
Screw (P/N 14038). Thread screw
into Base until resistance is
met. Do
not over
-
tighten!
13.
Invert assembly and confirm that the
piston floats freely within the
assembly. Ensure the Retaining Ring
(P/N 14037) is not pinched between
the Body and Base.
BODY
(P/N 26426)
BASE
(P/N 14034)
SET SCREW
(P/N 14038)
PISTON
(P/N 14035)
PISTON GROOVE
RETAINING RING
(P/N 14037)
Figure 6.2.1b

