background image


HICLAVE 


HG-SERIES AUTOCLAVES 


(HG-50 and HG-80)


OPERATION MANUAL 


Before using this Autoclave, please read this manual                                                                       

and follow all Safety Rules and Operating Instructions

.


3951C Industrial Way Concord, CA 94520 

(925) 299-0743 / (888) 263-7392 ∙  Fax:(925) 299-0745 

marketing@amerexinst.com ∙ www.amerexinst.com


Summary of Contents for Hirayama HG-50

Page 1: ...PERATION MANUAL Before using this Autoclave please read this manual and follow all Safety Rules and Operating Instructions 3951C Industrial Way Concord CA 94520 925 299 0743 888 263 7392 Fax 925 299 0745 marketing amerexinst com www amerexinst com ...

Page 2: ...ting sensor Automatic water supply unit Printer if any read the attached instruction manuals for the options Please check whether or not the product conforms to your order and confirm that it was not damaged during transportation Should it be damaged or out of order please contact our authorized distributor in your region No part or all of this manual may be reproduced without our permission The c...

Page 3: ...der and metallic powders other than aluminum powder Sodium dithionite or sodium hydrosulfite Oxidizing agents Potassium chlorate sodium chlorate ammonium chlorate and other chlorates Potassium perchlorate sodium perchlorate ammonium perchlorate and other perchlorates Potassium peroxide sodium peroxide barium peroxide and other inorganic peroxides Potassium nitrate sodium nitrate ammonium nitrate a...

Page 4: ...id Do not touch the lid or lid cover when opening or closing the lid Do not put your face or hands close to the chamber when lifting the lid immediately after completion of the operation steam will gush out of the chamber The lid chamber gasket and panel are extremely hot after completion of the operation Do not touch the equipment or you may get burned Put on heat insulating gloves before removin...

Page 5: ... values and describes operations before starting the equipment and after automatic operation This section also covers the display and performance of the equipment during automatic operation Chapter 4 Maintenance and Service This section explains the methods for draining water from the drain bottle or chamber cleaning the body of the equipment and parts replacement Chapter 5 Specifications This sec...

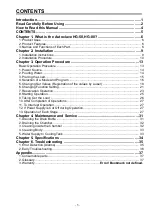
Page 6: ...lues Registration of the values by a user 18 6 Changing Function Setting 21 7 Reservation Operation 23 8 Starting Operation 25 9 Taking Out the Load 26 10 After Completion of Operations 27 11 To Interrupt Operation 27 12 If Power Supply is Cut Off during Operation 27 13 Operation of Each Stage 27 Chapter 4 Maintenance and Service 31 1 Draining the Drain Bottle 31 2 Draining the Chamber 32 3 Cleani...

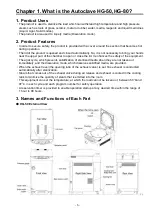
Page 7: ... enhances the safety of the equipment The agar cycle which prevents solidification of sterilized media when they are not taken out immediately and the dissolution mode which dissolves solidified media are provided When the exhaust level the opening ratio of the exhaust valve is set fine exhaust is conducted automatically after sterilization Steam that comes out of the exhaust valve during air rele...

Page 8: ... 7 HG 80 External View ...

Page 9: ...ncluded in the selected cycle light up and the current operating stage flashes Drain Bottle Display The red lamp blinks when the drain bottle is full and the green lamp illuminates when it is not full POWER Switch Used to turn on or off the power to the autoclave LID CLOSE Switch Used to close the lid LID OPEN switch Used to open the lid When the lid is in the state to be opened a green light come...

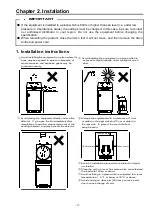
Page 10: ...under a fire detector If you open the lid immediately after completion of operation steam comes out of the working chamber and may activate the detector Arrange the equipment with a clearance of 10 cm or wider on the right side and 12 cm or wider on the rear side to prevent the vent hole from being blocked 10cm or more Avoid an installation place which is subject to impact or vibration Place the u...

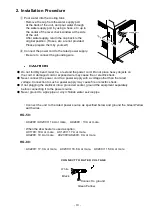
Page 11: ...Never connect the power cord to a power supply with a voltage other than the rated voltage Connection to such a power supply may cause fire or electric shock If not plugging the sterilizer into a grounded socket ground the equipment separately before connecting it to the power source Never ground to a gas pipe or vinyl chloride water service pipe Connect the unit to the rated power source as speci...

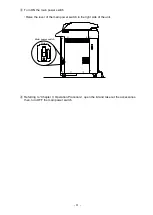
Page 12: ...er switch Raise the lever of the main power switch in the right side of the unit Raise Main power switch Referring to Chapter 3 Operation Procedure open the lid and take out the accessories then turn OFF the main power switch ...

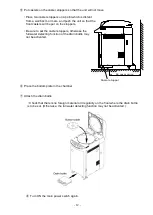
Page 13: ...rs Be sure to set the caster stoppers otherwise the full water detecting function of the drain bottle may not be activated Place the bottom plate in the chamber Attach the drain bottle Check that there is no foreign material or irregularity on the floor where the drain bottle is to be set Otherwise the full water detecting function may not be activated Turn ON the main power switch again 64 cm or ...

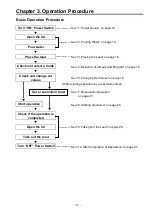
Page 14: ... Selection of a Mode and Program on page 16 Check and change set values See 5 Changing Set Values on page 18 When starting operation by a reservation timer See 7 Reservation Operation on page 23 Start operation See 8 Starting Operation on page 25 Check if the operation is completed Open the lid See 9 Taking Out the Load on page 26 Take out the load Turn OFF Power Switch See 10 After Completion of ...

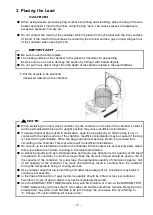
Page 15: ...the power supply is interrupted or the main power switch is turned OFF the temperature and time set for the previous operation will appear 2 Pouring Water When the sterilization time is extended or a large quantity of cloth is put in pour a larger quantity of water than specified Press the LID OPEN switch The lid will open automatically Pour water until water rises through the center hole of the b...

Page 16: ...f the bag is closed during sterilization When the bag is opened excessively steam is prevented from circulating in the chamber This may also result in insufficient sterilization Do not pile up the sterilization bucket in the chamber When buckets are excessively piled steam fails to penetrate to all points resulting in incomplete sterilization In sterilizing liquids such as medical solution and med...

Page 17: ...armed so that it will not solidify after sterilization Solid Sterilization of glass ceramics metal rubber and other solid equipment that can withstand high temperature high pressure steam and sudden decompression during exhaust Dissolution Dissolution of media Liquid mode Stage display Initial set value for all 3 programs Sterilizati on temp Sterilizati on time Exhaust level Fan cooling Warm temp ...

Page 18: ...Sterilizati on time Exhaust level Fan cooling Warm temp HEAT STERI EXHT COOL 121 20 min 3 fixed ON fixed Dissolution mode Stage display Initial set value for all 3 programs Sterilizati on temp Sterilizati on time Exhaust level Fan cooling Warm temp HEAT DISSOL COOL WARM 100 10 min OFF 50 ...

Page 19: ...hown below Switch input Liquid mode Sterilization temperature Sterilization time Agar mode Sterilization temperature Sterilization time Warming temperature Solid mode Sterilization temperature Sterilization time Dissolution mode Dissolution temperature Dissolution time Warming temperature Press the set value increase decrease switch to change the value Every time the switch is pressed the set valu...

Page 20: ...reaches the set temperature delay time If there is approx 300 500 milliliters of water in the waste disposal bag steam is generated in the bag and drives the air out This will significantly reduce the delay time at the time of temperature rise Refer to the table below and take this delay time into account when setting the sterilization time The delay time will be shortened when a perforated dressi...

Page 21: ...r exhaust level for fine exhaust or set the level 0 natural cooling Continuous operation at the exhaust level of 3 may cause steam to come out of the exhaust port of the drain bottle In that case lower the exhaust level except for the solid cycle and turn ON the fan cooling function Fan cooling ON OFF Except the solid mode fan cooling ON OFF can be changed It can be changed also during operation P...

Page 22: ...eliminate remaining air bubbles also when a large quantity of cloth is put in the chamber The time can be set for each mode and program number The set value cannot be changed during operation Press the FUNC switch two times in the standby state F2 will appear on the digital display and the air release set time display will blink entering the changeable state P R E S S T I M E FAN FU NC SET PROGM1 ...

Page 23: ...tandby state F3 will appear on the digital display and the lid lock set temperature display will blink entering the changeable state Press the set value increase decrease switch to change the value Every time the switch is pressed the temperature increases decreases in 1 increments within the following range HG 50 within the range of 60 to 97 HG 80 within the range of 60 to 95 for liquid agar and ...

Page 24: ...for 5 seconds during programmable auto start setting the reservation is cancelled returning to the standby state Press the set value increase decrease switch to change the value Every time the switch is pressed the time increases decreases in one hour increments within the range of 1hour to 99 hours While the switch is kept pressed the value will increase decrease in 10 hours increments and when t...

Page 25: ...tion will not begin even if the START switch is pressed check to see if the drain bottle is full of water If it is full refer to 1 Draining the Drain Bottle on page 31 Operation will not begin either when the lid has not been opened or closed completely Press the LID OPEN switch and press the START switch again after the lid has opened completely Press the FUNC switch to confirm the reservation ti...

Page 26: ...touch the lid or lid cover when opening closing the lid Check that there is no foreign material on the mating face of the gasket before starting the operation Such a foreign material will cause steam leakage Do not apply force to the lid that is open Such force may damage the product Liquid mode Agar mode Solid mode Dissolution mode Lid close Programmable auto start operation Air release Heating H...

Page 27: ... may get burned If the liquid surface which is placed in the chamber is covered with oil etc the liquid may gush out when taking out or carrying Be sure to check that the temperature has dropped sufficiently before unloading the liquid from the chamber or it may cause burns Put on heat insulation gloves before taking objects out of the chamber Do not put your hands into the chamber until the steam...

Page 28: ...wer supply is shut off before completing the operation due to power failure etc operation is interrupted and the power switch is in the off state when power supply comes back When the POWER switch is pressed and the equipment becomes standby state is displayed in the digital display window and an electronic alarm sounds to notify it that the operation was not completed due to the power failure Thi...

Page 29: ...ously with start up of the sterilization timer The temperature pressure is kept constant during the preset sterilization time When the temperature inside the chamber decreases by 0 1 or more from the set value because of an error the overcool mark on the digital display lights up and the sterilization timer stops operation Operation is resumed when the temperature reaches the setup temperature aga...

Page 30: ...ng is set in the ON position The fan cooling ON OFF can be changed in any stage except the solid mode The liquid mode and solid mode shift to the next stage when the temperature inside the chamber drops below the lid lock temperature The fan continues to run until the temperature drops to the level 10 lower than the lid lock temperature The agar mode and dissolution mode permit lid opening closing...

Page 31: ...p notifying that all stages have completed When the respective switches remain untouched for 10 minutes the power saving function is activated the light in the display section goes out and the dot blinks on the temperature digital display Press any switch except the LID OPEN switch and the unit returns to the completion state P R E S S T I M E PROGM1 TEMP 2 3 MPa Hr min W A R M ...

Page 32: ... the drain bottle display blinks in red making an electronic alarm sound peep Remove the drain bottle when the water inside the bottle is cool sufficiently in the standby state Slowly pull out the drain bottle from the unit Water may spill from the drain port when the bottle is pulled rapidly Set up the drain bottle slowly Set it up slowly so that the water will not spill Drain water from the bott...

Page 33: ...sounds peep Close the drain valve and drain the bottle Repeat the operation several times until the water inside the chamber disappears Close the drain valve completely 3 Cleaning inside the Chamber The heater at the bottom of the chamber is provided with a temperature sensor Exercise care so that you will not have your finger cut by the edge during cleaning Take out the bottom plate and check the...

Page 34: ... the stains with it Wipe off any moisture with a dry cloth 5 Water Supply to Cooling Tank When the water level in the cooling tank is below the water level confirmation window supply water to the cooling tank using a hose etc When the water level is low steam will come out of the drain tank during exhaust Remove the cap from the water filling port of the cooling tank at the back of the unit and su...

Page 35: ...e 5 10 min variable 8 16 min variable Lid lock temperature 60 97 variable Liquid Agar Dissolution modes 60 95 variable Solid mode 60 97 variable Programmable auto start 1 99 hr later start time setting method Max operating pressure 0 26MPa Thermometer Digital display 5 0 137 9 Pressure gauge Digital display 0 0 3 MPa Analog display 0 0 4 MPa Safety alarm unit Pressure safety valve Earth leakage an...

Page 36: ...ve the set temperature continued for 10 seconds during sterilization A temperature 10 or more above the set temperature continued for 15 minutes during warming E 4 Over cool alarm A temperature of 102 or less continued for 10 seconds during sterilization E 5 Over pressure alarm When saturated steam pressure under the set temperature exceeded 0 025MPa or above for more than 15 seconds When pressure...

Page 37: ...ed lid gasket Foreign matter under the gasket Replace the lid gasket Press on the gasket to remove any unevenness Remove the foreign matter Water leakage from the bottom of the body Deterioration of the heater seal packing due to boil dry or other problem The drain valve open Contact our authorized distributor in your region Close the valve The lid will not open The lid open display is red Power i...

Page 38: ... wire of 1 6 mm or more in diameter or any other wire equivalent to or better than the said copper wire Exhaust level The degree at which the exhaust valve opens Recorder Equipment for recording the temperature inside the chamber loaded objects See drawing below Floating sensor Detects the temperature of the objects to be sterilized and starts operation of the sterilization timer See drawing below...

Page 39: ...tact Catalog No Description ATA HGLG Lid gasket for HG 50 80 ATA 50H Heater for HG 50 specify 120V or 220V ATA 80H Heater for HG 80 ATA HVEGO Low water sensor and thermostat for HG autoclaves ATA HVESV Solenoid valve for HG 50 ATA ROM EPROM including extractor for HG 50 ATA HVSSR Solid state relay for HG autoclaves ATA HVTS Temperature sensor for HG autoclaves ...

Reviews: