background image

Entrada Series  

Commercial Ramp and Step System        

Installation Manual 

Access What Matters Most 


Tool List 

 

Impact wrench—18V or 20V 

 

Drill—18V or 20V 

 

Reciprocating or circular saw (metal 
cutting blades) - 18V or 20V 

 

Electric hammer drill 

 

Ratchet 

 

9/16—Socket   

 

3/8” Nut driver bit 

 

#2 Phillips bit 

 

3/16” masonry bit (if securing to      
concrete)  

 

Metal/wood drill bits 

 

Rubber mallet 

 

30’ Tape measure 

 

48” Level (optional 36” level for       
horizontal ramp leveling) 

 

Torpedo laser level (for finding ground 
variance) 

 

Concrete screws/anchors and asphalt 
bolts & L-brackets 

Table of Contents 

Platform and Ramp Description 

Hardware Packages    

Tongue and Groove Design 

Platform Assembly 


Ramp Assembly 

Platform Guard Rails and Closures  

Ramp Guard Rails   

Hand Rails, Brackets, Loops 

Final Platform and Ramp Hardware, ABSs 

Final Steps 

Winter Care and Maintenance 

Warranty 

10 

12 

13 

15 

16 

17 

18 

Summary of Contents for Entrada Series

Page 1: ......

Page 2: ...Metal wood drill bits Rubber mallet 30 Tape measure 48 Level optional 36 level for horizontal ramp leveling Torpedo laser level for finding ground variance Concrete screws anchors and asphalt bolts L brackets Table of Contents Platform and Ramp Description Hardware Packages Tongue and Groove Design Platform Assembly Ramp Assembly Platform Guard Rails and Closures Ramp Guard Rails Hand Rails Bracke...

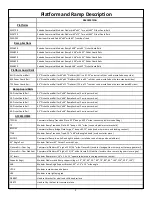
Page 3: ... Picket Guard Rail 42 Picket Guard Rail for 4 x48 Ramp Section 2 units per section 5ft Picket Guard Rail 42 Picket Guard Rail for 5 x48 Ramp Section 2 units per section 6ft Picket Guard Rail 42 Picket Guard Rail for 6 x48 Ramp Section 2 units per section ACCESSORIES TPCOM Commercial Ramp Transition Plate 9 25 deep x 45 25 wide connects platform to building TP Modular Ramp Transition Plate 9 5 deep...

Page 4: ...used to connect the top of the loop to the ramp and platform guard rails 2 3 8 SS Nut 4 3 8 SS Flat washer 2 14 x 1 Tek Screw SS 3 8 hex head 2 5 8 Black plug used to fill open bolt holes 90H 90 Degree Hardware Pack one per 90 used to create a 90 connection from hand rail to hand rail 1 Aluminum 90 elbow used to connect hand rail to hand rail 2 Aluminum insert used to connect the elbow to the hand...

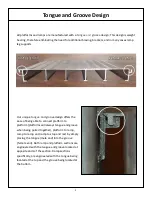
Page 5: ...ease of being able to connect platform to platform platforms will always tongue and groove when being paired together platform to ramp ramp to ramp and ramp to stop and rest by simply placing the tongue male end into the groove female end Both ramp and platform sections are engineered with the tongue and groove located at opposite ends of the section Ramp sections specifically are engineered with ...

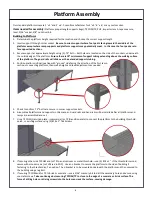
Page 6: ...e facing the direction of the first ramp section or connecting platform then make height and level adjustments as needed 5 Check to confirm 75 bolts are secure in corner support sockets 6 Assemble all platforms and supports in this manner Guard rails and hand rails will be installed after all platforms and ramps are assembled and set 7 Use a TPCOM transition plate commercial or TP transition plate...

Page 7: ...wo until the foot pads are touching the bottom of the support sockets and lightly tighten The raised supports will be lowered later 3 Place the tongue side of platform two into the groove side of platform one Platform one will support platform two The tongue side supports on platform two will be lowered in the next step Make height and level adjustments as needed Platform one and platform two need...

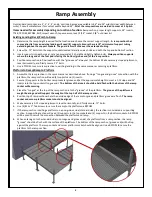
Page 8: ...Assemble the ramp section in the same manner as described above If using a tongue and groove connection with the platform the ramp section will need 2 supports and 2 inserts 2 Secure 2 supports in the bottom ramp sockets groove end at the approximate height to meet a 1 12 slope and 14 inserts into the top sockets tongue end The bottom of the insert should be held flush with the bottom of the ramp ...

Page 9: ...orts The bottom of the section will fall directly on the ground 5 The TT48 48 transition tread 12 deep x 1 high will slide from the side onto the groove part of the bottom of the last section of ramp Center the TT48 with the last section of ramp 6 Assemble the stop rest level landing after 30 of run like assembling a platform The stop and rest will be treated like a ramp section in relation to how...

Page 10: ...he end resting on the platform should be aligned with the adjacent support One side of the 63U will always slide over a 10 piece of support tubing that extends above the walking surface of the platform and the other end will always rest on the platform Never attempt to make a 63U slide over two corner supports it will not slide over them and the supports will have to be cut off in order to free up...

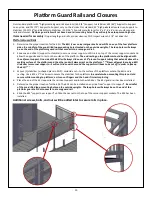
Page 11: ...3 above The larger closure support to stabilizer once installed should run from a corner support to a stabilizer aligning vertically with existing ramp guard rail 5 The 11 3 16 closure smaller closure stabilizer to stabilizer will be used on a 90 platform and potentially on custom systems where needed 6 Place the smaller stabilizer to stabilizer closure next to the existing larger closure creating...

Page 12: ...d rail over the support tubing and or insert extending 10 above the ramp section support sockets until the guard rails rest directly on top of the ramp section support socket 4 Each section of guard rail installed should align black cap to black and bolt hole to bolt hole with the previous guard rail 5 Continue this procedure throughout the system until all ramp sections have guard rails 6 When in...

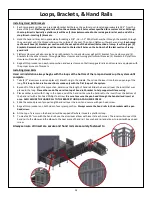
Page 13: ...locate the bolt hole The bolt hole for the loops will be at the same height as the hand rail bracket bolt holes approximately 28 5 from the base of the post 2 Place the welded spacer located at the top inside of the loop post over the bolt hole in the guard rail Place a 3 8 SS washer on a 3 8 16 5 SS bolt and insert it into the loop post through the spacer through the guard rail post until the thr...

Page 14: ...kets Installing Hand Rails Hand rail installation always begins with the loops at the bottom of the ramp and works up the system until complete 1 Take 1 5 aluminum insert and place 1 black O ring in the middle Then slide the insert into the top opening of the loop This loop to hand rail connection is made only with the first loops of the system 2 Based off of the length of ramp section determine t...

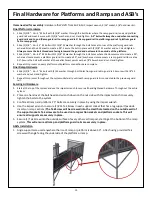
Page 15: ...form until platform connections are complete Final Ramp Hardware 1 Slide 1 3 8 16 5 SS bolt with 1 SS washer through bolt holes from guard rail to guard rail Secure with 3 8 SS washer and nut Hand tighten 2 Repeat this process throughout the system unilaterally until each ramp guard rail is connected to the previous guard rail Securing All Hardware 1 Start at the top of the system and use the impa...

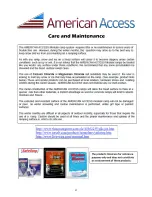
Page 16: ...se products Final Check of Installed System Ensure that all hardware is in place and secure Walk on the installed system and check for any unstableness or loose rails Remove any debris left from installation Warning Failure to install according to these instructions will void the warranty and could result in serious injury Do not exceed load rating In wet or icy conditions ramp may become slippery...

Page 17: ...17 ...

Page 18: ...18 ...

Reviews: