background image

Installation:  Safety Disable Switch

WARNING!  

If using any type of motor, such as a window motor or a door lock motor - add a Disable switch 

to prevent the door or window circuit from operating when vehicle is in motion.

 (Not provided in kit)

 A disable switch should be installed in any application to deny operation of the motor when a vehicle 

is in motion.  However, due to changes in automotive electrical design and the addition of computer controlled 
circuits, it is no longer advisable or safe to tap into or cut wires to disable automotive factory circuits.  To 
overcome this problem, you must install an electro-mechanical switch which will determine gear position, thus 
safely disabling the circuit while the vehicle is in motion.  Below are three options for installing a Safety 
Disable Switch.

Safety Disable Feature

Older models of Caprice and the Crown Victoria cars still have a Park/Neutral switch or output located near 
the steering column of the vehicle.  However, many of the newer cars do not have an available output to sense 
the gear of the vehicle.  The outputs that can sense the gear of the vehicle are logic level and directly 
connected to the computer, (ECM, Electronic Control Module).  

If any wires or switches are attached to the 

ECM harness or computer outputs, the vehicle warranty may not be honored.

Steering
Column

Option 2:  Limit Switch

(not supplied)

Limit Switch

With Lever

Steering
Column

Option 3: Inductive Proximity

(not supplied)

Inductive

Proximity

Sensor

e

G

ar 

Sh

ift

 L

ev

er

ea

r S

ev

er

G

hif

t L

Page -11-

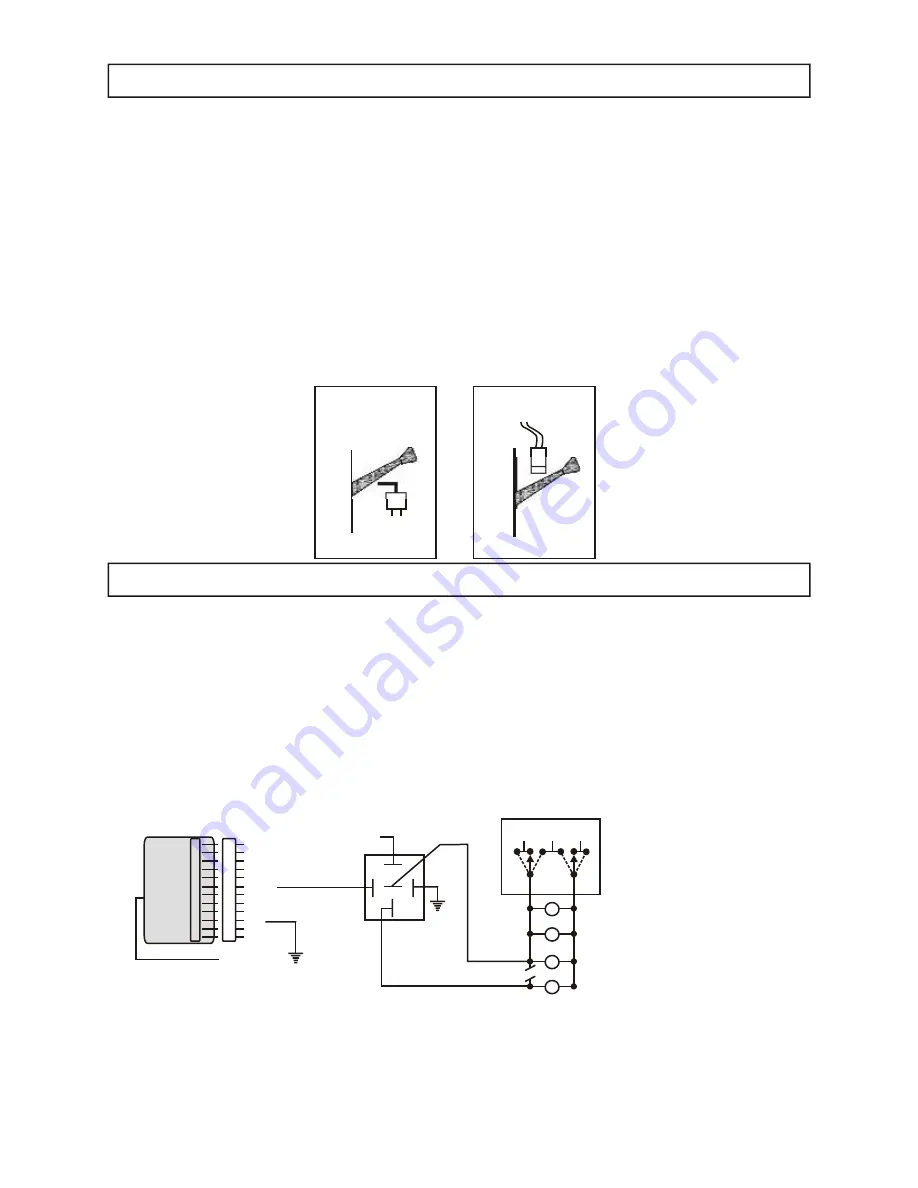
Installation:  Electrical - Door Unlock / Lock Circuit

5)   Install Door Lock Circuit

A) Determine which type of door unlock circuit operates in the vehicle.   See page 7 for a detailed 
explanation.
B)   Locate the lock and unlock wire color used in the vehicle.   It is usually easiest to remove decorative 
panel around drivers switch and pop switch out of the door.
C)   Locate the switch and unlock motor in rear door.
D)   Determine if the wire colors in the switch match the wire color on the rear door lock motor for lock 
and unlock.
E)   CUT the wires between the rear door unlock switch and the rear door unlock motors.   Choose a 
location that is easily serviced.   (See diagram 12d)

F)   Install a wire between relay terminal #87a and the cut wire going back to the switch.
G) Install a wire between relay terminal #30 and the cut wire going to the motor.
H) Reconnect power and test factory switch, then test button ‘1’ to verify proper unlocking of rear 
passenger door.

Diagram 12b

Diagram 12c

Diagram 12d

30

87a

85

86

87

GND

+12v Fused
@ 10a

Wire to cut is located in the 
passenger rear door.  It is broken out 
of the main door lock wire harness.  
*Must cut wire to passenger rear 
motor.  Check to make sure correct 
wire is cut by pressing switch.  All 
doors should unlock except Rear 

1

Lock

5

Unlock

GND

4

+12v

3

GND

2

M

M

M

M

Cut

Rear Passenger

Rear Driver

Front Passenger

Front Driver

Drive Rear
Lock Switch

R.E.S.C.U.E. Remote Control System

Manual C841.N2

1’ Co-axial Cable

12
11
10
09
08
07
06
05
04
03
02
01

12
11
10
09
08
07
06
05
04
03
02
01

White/Tan
Purple
Tan
Green/Black
Yellow/Black
Green/Red
Yellow/Red
Empty
Orange
Black
Empty
Red

P

o

w

er

T

o

u

ch

9

1

4

 R

ec

ei

v

er

Summary of Contents for R.E.S.C.U.E

Page 1: ... starting the R E S C U E Remote Control System Installation Range Typical antenna range is 100 to 300 feet Easy to Open Unlatch and open door at the touch of a button R E S C U E Remote Control Systems Manual C841 N2 Drawing C841 N2 Rev 0 05 12 03 Rev A 09 02 03 Page 1 10 Only Rev B 09 10 03 Page 1 10 13 Only R E S C U E Remote Control Systems R E S C U E Remote Control Systems AmericanAluminumAc...

Page 2: ...e Cutter Wire Stripper To Clean Grounding Pad Scraper Sand Paper Alcohol Based Cleaner Technical Support Visit the factory website to download a copy of these instructions e mail technical questions and see other TouchTronics Inc products TouchTronics Inc Phone Fax Numbers Indiana Local 1 574 294 2570 Toll Free 1 800 294 2570 Fax 1 574 293 1611 TouchTronics Inc Web Site www touchtronics com TouchT...

Page 3: ...dust resistant Physical Receiver 4 x 2 x 1 width height depth Transmitter 1 x 2 width length key chain style 2 x 4 width length oval hand held style Antenna Flex Whip 9 External Bulkhead Mount Cable 14 Shielded Coaxial Cable Relay external Type Form C SPDT Coil Current 100mA Switching Current 30 Amp Coil Voltage 12VDC Toggle Switch Type SPST On Off Latching Red Status Light On Current 30 Amp Volta...

Page 4: ...ener Switch Kit 1 pc SCW 7000 8 x 1 2 self drilling screw 5 pcs TRM 8014 16g blue butt connector 1 pc TRM 8001 18g red 3 16 ring terminal 1 pc WSH 9000 3 16 external tooth star washer 1 pc VEL H008 1 x 3 black velcro hook 1 pc VEL L008 1 x 3 black velcro loop 1 pc C814 L1 Do Not Engage Child Safety Switch Label Place over safety lock on door used by k9 1 pc SWS TG18 On Off panel mount red lighted ...

Page 5: ...vices large pieces of metal or metal buildings large bundles of wire inside a vehicle switching power supplies and motors of any kind The RF signal can pass through obstacles in the line of sight such as wood glass or plastic RF signals cannot pass through any type of metal or tinted windows which have been tinted with a metalized film All factory tinting someaftermarkettintingusethemetalizedfilmt...

Page 6: ...e receiver housing from the wire harness connector The antenna should be mounted on the roof of the vehicle The antenna should NOTtouch any metal or window tinting nor be mounted near any other RF devices any bundled wires or other antennas RF signals from base radios can overwhelm the RF signal from the transmitter to the receiver and cause a decrease in range and or a slow response time C Select...

Page 7: ...he input wire to the switch It should be a groundsignal Seediagrampg11 Reversal Rest Ground System This switch usually has 5 wires sometimes 4 wires All of the wires and terminals rest ground when the switch is not activated One terminal becomes 12v positive only when the switch is activated The switch sends a positive signal through the system and turns on the motor The ground signal from the mot...

Page 8: ... information at 1 800 294 2570 10a Maximum 1 Install Power Connect the Red wire to a constant 12v battery power source Note For best performance run a clean 12v 14 gauge wire directly from the battery or a fuse that is NOT supplying any power to motors lights or any other type of high current device 2 Install Ground Connect the Black wire to chassis ground A Scrape all paint and grease away from t...

Page 9: ...e Switch Door Unlatch Motor Note Door Motor OPERATES ONLY when Red Lighted Toggle Switch is ON SETUP 1 Door Open Only Buttons 1 and 2 Open Door To Door Lock Motor To Door Unlock Motor 12 11 10 09 08 07 06 05 04 03 02 01 PowerTouch Remote Control System Series 914 RF Receiver This device complies with FCC rules part 15 Operation is subject to the following 1 Co axial Cable w TNC Connector 12 11 10 ...

Page 10: ...Chevy Caprice Lock Unlock Lock Unlock 12V DC 12V DC Drive Door Lock Switch Vehicle Door Lock Relays To Door Lock Motors Pass Door Lock Switch Negative Pulse System Button 1 Door Unlatch Lock Unlock Lock Unlock Ground Ground Drive Door Lock Switch Diagram 10b Diagram 10a R E S C U E Remote Control System Manual C841 N2 12 11 10 09 08 07 06 05 04 03 02 01 12 11 10 09 08 07 06 05 04 03 02 01 White Ta...

Page 11: ...Inductive Proximity Sensor e G ar Shift Lever ear S ever G hift L Page 11 Installation Electrical Door Unlock Lock Circuit 5 Install DoorLock Circuit A Determine which type of door unlock circuit operates in the vehicle See page 7 for a detailed explanation B Locate the lock and unlock wire color used in the vehicle It is usually easiest to remove decorative panelarounddriversswitchandpopswitchout...

Page 12: ...problems See page 2 for contactinformation ReceiverTuning 1 Openreceiverhousing 2 Locate the tuning pot potentiometer on the printed circuit board The tuning post is a square silver metal boxwithasmallholeonthetop 3 Using a plastic Allen wrench turn the pot 1 4 turn in either direction Check range after each turn Stop when optimum range is reached The plasticAllen wrenches may be purchased at Radi...

Page 13: ... or rear door SHOULD NOT lock 5 Turn power toggle switch to ON 6 Test remote control buttons again a Press vehicle unlock lock switch All doors or rear door SHOULD unlock lock with corresponding button press b Press remote control button 1 If connected to door unlock All doors or rear door SHOULD unlock c Press remote control button 2 Door SHOULD pop open d Press remote control buttons 1 2 If conn...

Page 14: ...s present when button is pressed and float when not pressed if input to wire is 12v 1 2c If outputs read nothing when pressed or not pressed then the power supply is damaged 1 2d Send back to factory for repair or replacement 1 2e Any of the above problems can be caused by a defective unit or damage by the customer from over voltage over current or testing the inputs and outputs using a test light...

Page 15: ...t 4 4 Not all buttons send a signal when pressed 4 1 Check battery voltage Replace battery if voltage is 11 5 volts or less Signal strength is dependent upon battery voltage 4 2 Place probe from voltmeter on battery and leads Press any button voltage should change by 0 2 to 0 3 volts if a signal is transmitted Check both buttons 4 3a If transmitter is sending a signal and no signal is being receiv...

Page 16: ...r logic power input from main wire harness 5 3b Run new wire from vehicle battery to red wire 5 4a Disconnect receiver logic ground input from main wire harness 5 4b Remove black wire on receiver from wire harness and install on the vehicle frame for a new chassis ground or vehicle battery 5 4c Remove any paint or residue from metal use an external tooth star washer and tighten new chassis ground ...

Page 17: ... or the use of defective materials for a period of up to TWO YEARS 24 months from the original date of manufacture or ONE YEAR 12 months from the original retail or O E M in service date Sellers sole and exclusive liability shall by at sellers option to repair replace or credit buyer for such goods which are returned by buyer during the applicable warranty period set forth above provided that I se...

Page 18: ...This space left blank intentionally May be used for installation notes or drawings R E S C U E Remote Control System Manual C841 N2 Page 18 ...

Reviews: