background image

ELECTRICAL PRECAUTIONS

RISK OF ELECTRIC SHOCK

DO NOT OPEN

CAUTION

The exclamation point within an equilateral triangle is
intended to alert the user to the presence of important
operating and maintenance (servicing) instructions in
the literature accompanying the appliance.

The lightning flash with arrowhead symbol, within an
equilateral triangle, is intended to alert the user to the
presence of uninsulated "dangerous voltage" within the
product's enclosure that may be of sufficient magnitude
to constitute a risk of electric shock to persons.

READ INSTRUCTIONS —

 All the safety and operating

instructions should be read before the product is
operated.

RETAIN INSTRUCTIONS — 

The safety and operating

instructions should be retained for future reference.

HEED WARNINGS

— All warnings on the product and

in the operating instructions should be adhered to.

FOLLOW INSTRUCTIONS —

All operating and use

instructions should be followed.

CLEANING —

 The product should be cleaned only with

a polishing cloth or a soft dry cloth. Never clean with
furniture wax, benzine, insecticides or other volatile
liquids since they may corrode the cabinet.

ATTACHMENTS —

Do not use attachments not

recommended by the product manufacturer as they
may cause hazards.

WATER AND MOISTURE —

Do not use this product

near water — for example, near a bathtub, wash
bowl, kitchen sink, or laundry tub; in a wet basement;
or near a swimming pool; and the like.

ACCESSORIES —

Do not place this product on an

unstable cart, stand, tripod, bracket, or table. The
product may fall, causing serious injury to a child or
adult, and serious damage to the product. Use only
with a cart, stand, tripod, bracket, or table
recommended by the manufacturer, or sold with
the product. Any mounting of the product should
follow the manufacturer’s instructions, and should
use a mounting accessory recommended by the
manufacturer.

CART —

A product and cart combination should be

moved with care. Quick stops, excessive force, and
uneven surfaces may cause the product and cart
combination to overturn.

VENTILATION —

Slots and openings in the cabinet are

provided for ventilation and to ensure reliable
operation of the product and to protect it from
overheating, and these openings must not be
blocked or covered. The openings should never be
blocked by placing the product on a bed, sofa, rug,
or other similar surface. This product should not be
placed in a built-in installation such as a bookcase or
rack unless proper ventilation is provided or the
manufacturer’s instructions have been adhered to.

POWER SOURCES — 

This product should be operated

only from the type of power source indicated on the
marking label. If you are not sure of the type of
power supply to your home, consult your product
dealer or local power company.

LOCATION

– The appliance should be installed in a

stable location.

NONUSE PERIODS

– The power cord of the appliance

should be unplugged from the outlet when left un-
used for a long period of time.

GROUNDING OR POLARIZATION

If this product is equipped with a polarized alternating
current line plug (a plug having one blade wider than
the other), it will fit into the outlet only one way. This
is a safety feature. If you are unable to insert the plug
fully into the outlet, try reversing the plug. If the plug
should still fail to fit, contact your electrician to
replace your obsolete outlet. Do not defeat the
safety purpose of the polarized plug.

If  this product is equipped with a three-wire
grounding type plug, a plug having a third (grounding)
pin, it will only fit into a grounding type power outlet.
This is a safety feature. If you are unable to insert the
plug into the outlet, contact your electrician to
replace your obsolete outlet. Do not defeat the
safety purpose of the grounding type plug.

POWER-CORD PROTECTION -

Power-supply cords

should be routed so that they are not likely to be
walked on or pinched by items placed upon or
against them, paying particular attention to cords at
plugs, convenience receptacles, and the point where
they exit from the product.

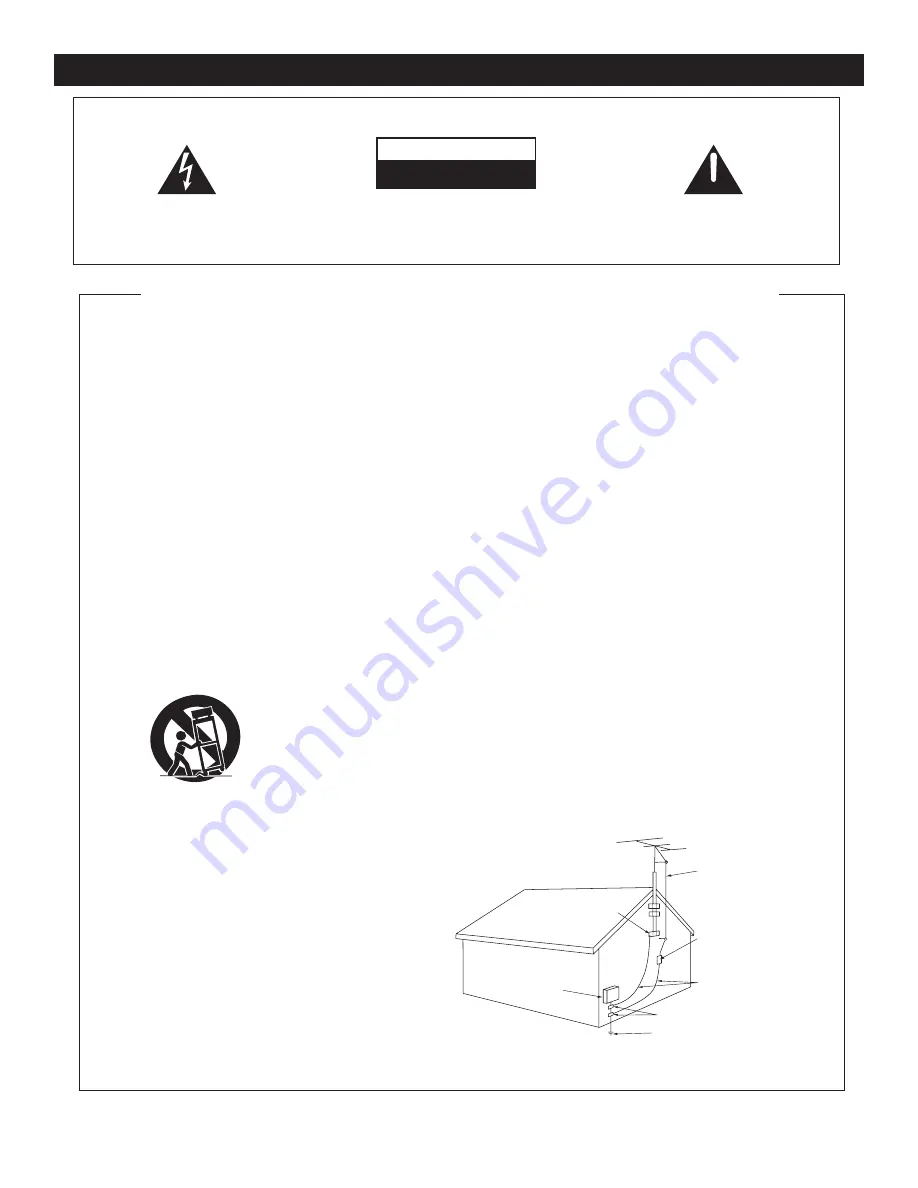
OUTDOOR ANTENNA GROUNDING —

 If an outside

antenna or cable system is connected to the product,
be sure the antenna or cable system is grounded so
as to provide some protection against voltage surges
and built-up static charges. Article 810 of the National
Electrical Code, ANSI/NFPA 70, provides information
with regard to proper grounding of the mast and
supporting structure, grounding of the lead-in wire
to an antenna discharge unit, size of grounding
conductors, location of antenna-discharge unit,
connection to grounding electrodes, and
requirements for the grounding electrode. See Figure
A.

LIGHTNING —

For added protection for this product

during a lightning storm, or when it is left unattended
and unused for long periods of time, unplug it from
the wall outlet and disconnect the antenna or cable
system. This will prevent damage to the product
due to lightning and power-line surges.

POWER LINES —

An outside antenna system should

not be located in the vicinity of overhead power lines
or other electric light or power circuits, or where it
can fall into such power lines or circuits. When
installing an outside antenna system, extreme care
should be taken to keep from touching such power
lines or circuits as contact with them might be fatal.

OVERLOADING —

Do not overload wall outlets,

extension cords, or integral convenience receptacles
as this can result in a risk of fire or electric shock.

OBJECT AND LIQUID ENTRY -

 Never push objects of

any kind into this product through openings as they
may touch dangerous voltage points or short-out
parts that could result in a fire or electric shock.
Never spill liquid of any kind on the product.

SERVICING — 

Do not attempt to service this product

yourself as opening or removing covers may expose
you to dangerous voltage or other hazards. Refer all
servicing to qualified service personnel.

DAMAGE REQUIRING SERVICE  - 

Unplug this product

from the wall outlet and refer servicing to qualified
service personnel under the following conditions:

When the power-supply cord or plug is damaged.

If liquid has been spilled, or objects have fallen into
the product.

If the product has been exposed to rain or water.

If the product does not operate normally by following
the operating instructions. Adjust only those controls
that are covered by the operating instructions as an
improper adjustment of other controls may result in
damage and will often require extensive work by a
qualified technician to restore the product to its
normal operation.

If the product has been dropped or damaged in any
way.

When the product exhibits a distinct change in
performance — this indicates a need for service.

REPLACEMENT PARTS --

 W hen  replacement  parts

are required, be sure the service technician has used
replacement parts specified by the manufacturer or
have the same characteristics as the original part.
Unauthorized substitutions may result in fire, electric
shock, or other hazards.

SAFETY CHECK -

 Upon completion of any service or

repairs to this product, ask the service technician to
perform safety checks to determine that the product
is in proper operating condition.

WALL OR CEILING MOUNTING —

 The product should

not be mounted to a wall or ceiling.

HEAT — 

The product should be situated away from heat

sources such as radiators, heat registers, stoves, or
other products (including amplifiers) that produce
heat.

IMPORTANT SAFETY INSTRUCTIONS

ANTENNA
LEAD IN
WIRE

GROUND
CLAMP

ANTENNA
DISCHARGE UNIT
(NEC SECTION 810-20)

GROUNDING CONDUCTORS
(NEC SECTION 810-21)

GROUND CLAMPS

POWER SERVICE GROUNDING
ELECTRODE SYSTEM
(NEC ART 250, PART H)

ELECTRIC
SERVICE
EQUIPMENT

Fig. A

NEC — NATIONAL ELECTRICAL CODE

CAUTION: TO  REDUCE  THE  RISK OF ELECTRIC 
SHOCK, DO NOT REMOVE THE COVER (OR BACK). 
T H E R E  A R E  N O  U S E R  S E R V I C E A B L E  P A R T S 
INSIDE REFER SERVICE TO YOUR AUTHORIZED 
AMERICAN AUDIO

®

 SERVICE TECHNICIAN.

 ELECTRICAL SAFETY PRECAUTIONS

©

American Audio

®

   -   www.americandj.com   -   DIGI-PRO™ Instruction Manual Page 4

Summary of Contents for DIGI-PRO

Page 1: ...Featuring FLIPFLOP DIGI PRO Professional Dual CD Player American Audio 4295 Charter Street Los Angeles Ca 90058 Revised 9 01 Operating Instructions ...

Page 2: ...JECTING DISC 16 SELECTING TRACKS 16 STARTING STOPPING PLAYBACK 16 FRAME SEARCH 17 ADJUSTING TIME DISPLAY 17 MAKING PITCH CHANGES 18 SETTING CUE POINTS 20 CREATING SEAMLESS LOOPS 21 EDITING LOOPS 22 PROGRAMMINGAND PROGRAM PLAY 23 ADVANCED OPERATION CREATINGABOPEFFECT 24 REVERSE PLAY 24 FLIP FLOP 25 USING THE BUILT IN EFFECTS SCRATCH 26 COAST 26 FILTER 27 SCRATCH BOX SET UP 28 SHUT DOWN PROCEDURES 2...

Page 3: ...ONNEL This equipment has been tested and found to comply with the limits for a Class B digital device pursuant to Part 15 of the FCC Rules These limits are designed to provide reason able protection against harmful interference in a residential installation This equipment gen erates uses and can radiate radio frequency energy and if not installed and used in accor dance with the instructions may c...

Page 4: ...pinched by items placed upon or against them paying particular attention to cords at plugs conveniencereceptacles andthepointwhere they exit from the product OUTDOOR ANTENNA GROUNDING If an outside antennaorcablesystemisconnectedtotheproduct be sure the antenna or cable system is grounded so astoprovidesomeprotectionagainstvoltagesurges andbuilt upstaticcharges Article810oftheNational ElectricalCo...

Page 5: ...rs American Audio www americandj com DIGI PRO Instruction Manual Page 5 This unit has been thoroughly tested and has been shipped in perfect operating condition Carefully check the shipping carton for damage that may have occurred during shipping If the carton appears to be damaged carefully inspect your unit for any damage Be sure all acces sories needed to operate the unit has arrived intact In ...

Page 6: ... that the visual angle is within this range Figure 2 Figure 1 1 Checking the Contents Be sure your DIGI PRO was shipped with the following 1 DIGI PRO Dual CD player unit 1 DIGI PRO Controller Head Unit 1 Scratch Box 1 SB 12 12 Vinyl For Scratch Effect 1 Scratch Box External 12V Power Supply 1 Scratch Box 1 8 Male to Male Stereo Mini Plug 2 Dual Male to Male RCA cable 2 Q Start 1 8 Male to Male Min...

Page 7: ...Note for mixers with a Hamster Feature For proper Q Start operation be sure your mixers Hamster setting are set to 1 2 Normal Setting b BOP EFFECT The Bop Effect button serves two features First it is a stutter effect creating a sound similar to a sampler Second it will return to the last Cue point in memory instantly This will allow you to create great effects To create the BOP Effect see BOP Eff...

Page 8: ... you to program up to 4 cue points on the CD For more information on setting a cue point see page 20 3 FILTER This button activates the FILTER effect This effect simulates the sudden platter stop of a turntable Almost like pressing the stop button on a turntable When the FILTER effect is selected a number 1 will appear in the LCD 14 this indicates the FILTER effect is active See FILTER effect on p...

Page 9: ...track by track and returns to cue mode after all tracks have played This American Audio www americandj com DIGI PRO Instruction Manual Page 9 function also operates in PROGRAM and FLIP FLOP modes In program mode the continuous function will play all tracks in a program than return to cue mode on the first track in the program When using two units in Flip Flop mode each unit may be set up to run in...

Page 10: ...L FUNCTIONS AND CONTROLS REMOTE UNIT CONT search control when the unit is in pause or cue mode allowing you to set a specific cue point or find a particular starting point B The inner wheel also works as a momentary pitch bend during playback Turning the wheel clockwise will increase the pitch percentage up to 16 and turning the wheel in the counterclockwise direction will decrease the pitch perce...

Page 11: ...AY PAUSE BUTTON Each press of the PLAY PAUSE BUTTON causes the operation to change from play to pause or from pause to play While in play mode the green play LED will glow and while in pause mode the green play LED will flash 30 RELOOP BOP BUTTON This button serve tow functions A RELOOP If a Loop has been made see setting a Seamless Loop on page 21 but the unit is not actively in Loop mode a loop ...

Page 12: ... NOTE When a disc is already loaded in the transport tray the tray will not open unless the unit is in pause or cue mode 39 DRIVE 2 TRANSPORT TRAY This tray is used to load and load compact disc in to the drive 2 mechanism The tray is opened and closed by pressing the DRIVE 2 OPEN CLOSE BUTTON 38 Never attempt to force the transport tray open or closed when the power is turned off 40 SCRATCH BOX I...

Page 13: ...se the supplied polar ized power cord Use of any other power may GENERAL FUNCTIONS AND CONTROLS PLAYER UNIT American Audio www americandj com DIGI PRO Instruction Manual Page 13 result in sever damage to the unit Be sure the local power matches the unit s required power 46 SCRATCH BOX INPUT Drive 1 This jack is used to receive the digital Scratch Box signal Use the included stereo mini plugs to co...

Page 14: ... direct reference to the TIME METER 57 58 59 When the ELAPSE indicator is displayed in the LCD 14 the time defined will refer to a single track s elapsed time The time mode is changed by the tapping on the TIME BUTTON 5 57 MINUTES METER This meter will display the elapse total or remaining time in minutes The display time will be indirect reference to the current time mode 58 SECONDS METER This me...

Page 15: ... a repeat track mode This function is indicated by the REPEAT 69 and 1 68 icons in the LCD 14 58 59 As with the TIME METER 57 58 59 this bar is also dependent on the selected time function TOTAL REMAIN 66 REMAIN 62 OR ELAPSE 56 This bar will begin to flash when 15 seconds of a track remain and will begin to rapidly flash when three seconds of a track remain The flashing bar is a great visual remin...

Page 16: ...LECTING TRACKS Select a desired track by using either of the two TRACK BUTTONS 20 21 Tapping the TRACK BUTTONS 20 21 once will select either a higher or lower track You may hold down the TRACK BUTTONS 20 21 to change tracks continuously at a higher speed If you are using the TRACK BUTTONS 20 21 to select a new track during playback a track already playing the new track you selected will immediatel...

Page 17: ...u rotate the wheel Figure 9 Figure 10 10 CHANGING THE TIME DISPLAY 42 43 44 TIME BAR 46 The time may be displayed in three different modes Elapsed Remain and Total Remain During normal playback pressing the TIME BUTTON 5 as in figure 11 will change the time display information 57 58 59 in the LCD 14 The following is a break down of the time settings and their definitions 1 ELAPSED 56 This details ...

Page 18: ...CH SLIDER 23 adjustment can be changed to range from 8 12 or 16 See changing PITCH SLIDER PERCENTAGE RANGE figure 19 page 20 The pitch adjustments will effect playback reverse playback and loops Using the Pitch Slider 21 To use the PITCH SLIDER 23 slide the slider up and down Down will increase the pitch and up will decrease the pitch When the slider is in the center position a green LED just left...

Page 19: ...ITCH BEND BUTTON 15 will provide a slow down The extent to which the speed changes is proportionate to the amount of time the button is pressed For example if the PITCH BEND BUTTON 16 is held down continuously the disc speed will increases and will continue to increase until reaches a maximum of 100 speed gain When you release the PITCH BEND BUTTON 16 the disc speed will automatically return to it...

Page 20: ...turn the disc in cue mode pressing the RELOOP BOP BUTTON 30 will return the disc to cue point without music interruption and continue playback from that point 2 The JOG WHEEL 19 may be used to set a cue point by frame While a disc is in pause or cue mode use the JOG WHEEL 19 to scroll through a track to find your desired starting point Once you have found your desired cue point press the PLAY BUTT...

Page 21: ...AL TIME CUE BUTTON 26 This will set a loops starting point The IN REAL TIME CUE BUTTON 26 LED will briefly indicating a starting point has been set 1 Press the PLAY PAUSE BUTTON 29 to activate playback mode Figure 22 Figure 23 2 At this point pressing any one of the four CUE BUTTONS 6 will store your cue point into memory Figure 21 and the yellow Cue Memory LED will shut off 3 Repeat steps one and...

Page 22: ... loop may be made shorter or longer Before you can edit your seamless loop you obviously must first have created a seamless loop to edit If you haven t created a SEAMLESS LOOP follow the instructions in step 10 If a SEAMLESS LOOP has already been created press the RELOOP BOP BUTTON 30 to activate your SEAMLESS LOOP Figure 26 if it is not already playing To edit a loop s ending point 1 Press the OU...

Page 23: ...ct a track to be programmed by using the FORWARD TRACK SKIP 21 and BACK SKIP TRACK BUTTON 20 4 Once you reach the track you wish to place in to the program memory pressing PRG HOLD FX 13 will lock the track into memory Figure 29 Figure 28 5 Repeat these steps three and four up to 29 times up to 30 tracks may be programmed 6 As you program tracks in memory the LCD 14 will indicate the tracks that h...

Page 24: ...ay in reverse when playback begins again Reverse loop play In this mode the loop will play in reverse once and turn off If the reverse function is turned off at this point the loop will continue in regular play If the OUT EXIT BUTTON 28 is pressed during reverse loop playback mode playback will continue in reverse until the reverse function Figure 34 Creating a BOP Effect The Bop Effect is a stutt...

Page 25: ...rear your DIGI PRO to the 1 8 control jack on the rear of American DJ Q series mixer That s it you ll be set for FLIP FLOP Scratch Box Compatible The American DJ Scratch Box is a devices that simulates real time scratch of a CD The Scratch Box device is used in conjunction with any turntable and any Scratch Box compatible American DJ CD player For details of the Scratch Box refer to page 28 ADVANC...

Page 26: ... may also be used to simulates a turntable slowly revving up to it s proper speed To activate the COAST effect be sure the DTA FX BUTTON 22 22 is off and press the COAST BUTTON 11 When the COAST effect is selected the 2 icon displays in the LCD 14 Figure 37 1 SCRATCH EFFECT This button activates the SCRATCH effect This effect can only be used in conjunction with an American DJ Scratch Box When the...

Page 27: ...ased once the unit is powered off Figure 39 Figure 43 Figure 42 Figure 40 7 FILTER TIME PARAMETER The filter effect has an adjustable time parameter of 10msec to 9 9 seconds This is the amount of time it takes the filter to cycle through the low and high pass filters This parameter can be adjusted at any time once the filter effect has been activated by turning the jog wheel in either direction 4 ...

Page 28: ...of the CD transport unit Be sure to only use the supplied stereo mini plugs Using mono mini plugs may damage the unit 74 POWER SUPPLY INPUT Connect the power supply included with the unit to power the Scratch Box 75 PHONO OUTPUTS These outputs are used to send the turntable analog signal to your mixer The left channel is represented by the white RCA connector the red represents the right channel 7...

Page 29: ...empt to dry the disc with a hair dryer etc 2 PRECAUTION ON STORAGE After playing a disc always unload it from the unit Always store the compact disc in the jewel case protecting from dirt or damage Do not place discs in the following areas a Areas exposed to direct sunlight for a considerable time b Areas subject to accumulation of dust or high humidity c Areas affected by heat from indoor heaters...

Page 30: ...not include maintenance cleaning or peri odic check up During the period specified above American Audio will replace defective parts at its expense and will absorb all expenses for warranty service and repair labor by reason of defects in material or workmanship The sole responsibility of American Audio under this warranty shall be limited to the repair of the product or replacement thereof includ...

Page 31: ...z Output level 2 0V 1dB Load impedance 47k ohm or more AUDIO CHARACTERISTICS TEST DISC TCD 782 LOAD 47Kohm ITEM NOMINAL LIMIT CONDITION Output level 2 0Vrms 1dB 2 0V 1dB 1KHz 0dB Channel balance 0 5dB 1 0dB 1KHz 0dB Frequency response 0 5dB 1 0dB 20Hz 20KHz 0dB De emphasis response 2 5dB 3dB 16KHz 20dB Channel separation 82dB 75dB 1KHz 0dB T H D NOISE 0 02 0 025 1KHz 0dB S N ratio IHF A 84dB 75dB ...

Page 32: ...io A Division of the American DJ Group of Companies American Audio World Headquarters 4295 Charter Street Los Angeles CA 90058 USA Tel 323 582 2650 Fax 323 582 2610 Web www americandj com E mail info americandj com ...

Reviews: