Quick Setup Guide
9
DIGIMUX SETUP
To quickly set up the DigiMux for recording and viewing video, follow these
steps:
NOTE: All of these DigiMux setups can be performed quickly and easily
through DigiClient using your PC. See
page 13 for information on DigiClient setup.
1.
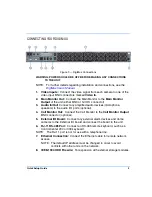
Perform all necessary connections to the unit (see
2.
Power up the unit by connecting the power cord to a power source.
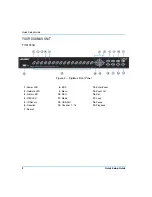
• Wait approximately 2 minutes. The function keys on the front panel light
up sequentially until the unit is completely powered up. During this time,
the DigiMux splash screen is displayed on the main monitor.
• When power up is completed, the splash screen is replaced by 4 x 4 live
video display screen.
3.
Access the On Screen Display Main Menu and enter the passcode.
• Press
Menu
to access the Main Menu.
• Enter the default Administrative passcode,
1234,
using the
Camera
keys.
4.
Define Recording Settings
• Select
Record
from the Main Menu.
• Adjust
Pre-Alarm
,
Circular
, and
Audio Recording
parameters (select
and enter).
• Select a
Preset Config
setting (Best Quality, Standard, or Extended
Record).
• Press
ESC
until the Exit menu is displayed. Select Save and Exit. The
unit is now recording and displaying video.
5.
Viewing Format
• To view video from a specific camera, press the
Camera
on the front
panel. Video is then in full view.
• Press
Mode
to switch between available viewing formats.

