Quick Setup Guide
13
DIGICLIENT REMOTE SOFTWARE
NOTE: You must have a network connection and the IP Address of your
DigiMux unit to install and operate DigiClient. See
on page 7 for LAN
setup or modem setup, respectively.
Installing DigiClient
1.
On your PC, start your web browser and enter the DigiMux unit’s IP
Address in the Address field.
NOTE: Do not enter leading 0 characters. For example, 050.244.060.002
is entered 50.244.60.2.
2.
The DigiClient/DigiAlert License Agreement is displayed. Read the
agreement carefully. Choose to accept or decline the terms of the
agreement. If you choose to accept the terms of the agreement, DigiClient
installation continues and you can proceed to Step 3 of this procedure. If
you choose to decline, then you can click Cancel to exit DigiClient
Installation. In this case, DigiClient is not installed.
The necessary DigiClient plug-ins are downloaded and installed on your
PC. If you have previously loaded DigiClient software, a confirmation box
allows you to confirm a version upgrade.
The DigiClient plugins are downloaded and installed in your web browser.
This may take up to 30 seconds.
3.
Save the IP Address of the remote DigiMux unit as a Favorite in your web
browser to allow easy access to the unit via DigiClient.
4.
When the installation is successful, a small Login screen is displayed.
Enter the
Admin
Username with a 1234 passcode, or
User
Username
with a 4321 passcode, then click
Connect
. (The passcodes are the same
as the DigiMux unit passcodes.)
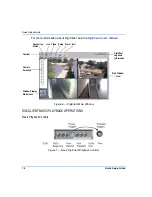
The DigiClient Main Window is displayed.
NOTE: Change your passcodes upon successful connection for security
reasons.

