background image

E-3

13. Follow all warnings and instructions marked on the appliance.
14. Do not overload wall outlets and extension cords as this can result in fire or electric shock.
15. Never push objects of any kind into this appliance through cabinet slots as they may touch

dangerous voltage points or short out parts that could result in a fire or electric shock.
Never spill liquid of any kind on the appliance.

16. Do not attempt to service this appliance yourself as opening or removing covers may

expose you to dangerous voltage or other hazards. Refer all servicing to qualified service
personnel.

17. Unplug this appliance from the wall outlet and refer servicing to qualified service person-

nel under the following conditions:
a. When the power cord or plug is damaged or frayed.
b. If liquid has been spilled into the appliance.
c. If the appliance has been exposed to rain or water.
d. If the appliance does not operate normally by following the operating instructions. Ad-

just only those controls that are covered by the operating instructions as improper
adjustment of other controls may result in damage and will often require extensive
work by a qualified technician to restore the appliance to normal operation.

e. If the appliance has been dropped or the cabinet has been damaged.
f. When the appliance exhibits a distinct change in performance - this indicates a need

for service.

18. When replacement parts are required, be sure the service technician has used replace-

ment parts specified by the manufacturer that have the same characteristics as the origi-
nal part. Unauthorized substitutions may result in fire, electric shock, or other hazards.

19. Upon completion of any service or repairs to this appliance, ask the service technician to

perform routine safety checks to determine that the appliance is in safe operating
condition.

e01_adc770(01_05)e.p65

5/10/04, 10:37 AM

3

Summary of Contents for Tyco ADC770

Page 1: ...770 INSTRUCTIONS COLOR VIDEO CAMERA LWT0188 001A H BF LOOK DIGITAL For Customer Use Enter below the Serial No which is located on the body Retain this information for future reference Model No ADC770 Serial No ...

Page 2: ... it from overheating these openings must not be blocked or covered The openings should never be blocked by placing the appliance on a bed sofa rug or other similar surface This appliance should never be placed near or over a radiator or heat register This appli ance should not be placed in a built in installation such as a bookcase unless proper ventilation is provided 9 This appliance should be o...

Page 3: ...pliance c If the appliance has been exposed to rain or water d If the appliance does not operate normally by following the operating instructions Ad just only those controls that are covered by the operating instructions as improper adjustment of other controls may result in damage and will often require extensive work by a qualified technician to restore the appliance to normal operation e If the...

Page 4: ...ns in the literature accompa nying the appliance WARNING TO REDUCETHE RISK OF FIRE OR ELECTRIC SHOCK DO NOT EXPOSETHIS APPLIANCETO RAIN OR MOISTURE RISK OF ELECTRIC SHOCK DO NOT OPEN CAUTION Information for USA This device complies with part 15 of the FCC Rules Changes or modifications not approved by JVC could void the user s authority to operate the equipment INFORMATION FOR CANADA RENSEIGNEMENT...

Page 5: ... Mounting the lens 14 Connections on the back 15 Setting the switches 17 Mounting the camera 18 Lens adjustment 20 Back focus adjustment 21 Auto white balance control adjustment 22 MENU SETTING Setting the menu 23 The flow of menu screen 24 SYNC ADJUST Screen 26 ALC SETTINGS Screen 26 VIDEO ADJUST Screen 30 MODE SELECT Screen 31 MOTION DETECT Screen 31 FACTORY SETTINGS Screen 33 BLC EDITTING Scree...

Page 6: ...not accept liability for the loss of a recording in the case of it becoming impossible to record due to a problem in the video camera VCR or video tape We do not accept liability for any damage to the camera in cases when it is dropped because of incomplete installation due to not observing the installation instructions correctly Please be careful when installing the camera The motion detector is ...

Page 7: ...ng at its periphery This is a characteristic of the CCD and is not a defect Operating Precautions Observe the following when carrying out camera maintenance Turn the power OFF before proceeding to carry out maintenance If it is contaminated seriously clean the contaminated part with a cloth or a tissue which has been soaked in a solution of water and a neutral detergent The unit is to be powered b...

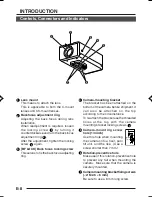
Page 8: ...t The bracket has been attached on the bottom of the camera before shipment It can also be attached on the top according to the circumstance To re attach the bracket use the threaded holes at the top with the camera mounting bracket locking screws 7 5 Camera mounting screw hole 1 4 inch Use this hole when mounting the camera onto a fixer pan tilt unit and the like Use a screw shorter than 7 mm 6 R...

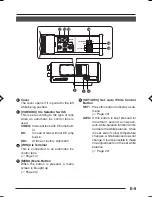
Page 9: ...control lens 墌 Page 14 11 MENU Menu Button When the button is pressed a menu screen is brought up 墌 Page 23 12 SET AWC Set Auto White Control Button SET Press this button to display a sub menu 墌 Page 23 AWC If this button is kept pressed for more than 1 second a one push auto white balance function works and sets the white balance Once it is set even if colour temperature changes white balance doe...

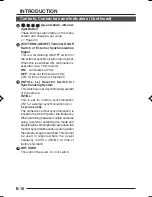
Page 10: ...ector Switch for Synchronizing System This switch can set a synchronizing system of the camera INT GL This is set for internal synchronization INT or external synchronization GL LL Line Lock The camera s vertical synchronization is locked to the AC 24V power line frequency When switching between multiple cameras using a switcher selecting this mode and adjusting the vertical phase can reduce the m...

Page 11: ... SYNC IN Sync signal input connector This BNC connector accepts the input of anexternalsyncsignalsuchasacomposite video VBS or black burst BB signal When a sync signal is input into this connector the camera operation is automatically synchronized with the external sync signal To terminate this connector at 75Ω turn ON the EXT TERM switch 14 Pin No Signal 1 GND 2 GND 3 Luminance Y 4 Chrominance C ...

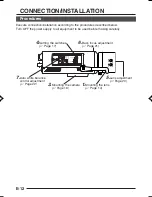
Page 12: ...e procedures described below Turn OFF the power supply to all equipment to be used before making carefully 1 Mounting the lens 墌 Page 14 4 Setting the switches 墌 Page 17 6 Back focus adjustment 墌 Page 21 5 Lens adjustment 墌 Page 20 7 Auto white balance control adjustment 墌 Page 22 3 Mounting the camera 墌 Page 18 Procedures CONNECTION INSTALLATION ...

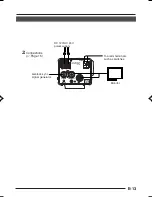
Page 13: ...X GND CLASS 2 ONLY U TYPE ISOLATED POWER ONLY E TYPE SEE INST RUCTION MANUAL Y C OUT VIDEO OUT SYNC IN POWER To alarm terminals such as switches Monitor 2 Connections Page 15 DC 12V AC 24V power supply Genlock sync signal generator ...

Page 14: ...e never use such lenses Do not attach the C mount lens when using a CS mount The F mark indicates a focal point 2 Mount the lens on the camera by turning the lens clockwise Adjust its position 3 When using an auto iris lens with an EE amplifier turn the switch to the VIDEO side When no EE amplifier is equipped turn the switch to the DC side 4 If the lens has an auto iris mechanism connect the lens...

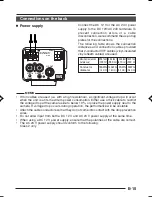
Page 15: ...amera side to below 10 or place the power supply near to the camera If voltage drop occurs during operation the performance will be unstable Attach the cable conductors so that they do not come into contact with the drop prevention wires Do not allow input from both a DC 12 V and AC 24 V power supply at the same time When using a DC 12 V power supply ensure that the polarities of the cable are cor...

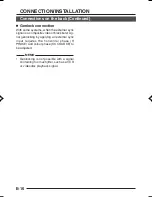
Page 16: ...nlocking by applying an external sync input requires the horizontal phase H PHASE and colour phase SC COARSE to be adjusted MEMO Genlocking is not possible with a signal containing too much jitter such as a VCR or videodisc playback signal Setting the swaitches CONNECTION INSTALLATION Connections on the back Continued ...

Page 17: ...M OFF ON LL INT GL SET CAMERA SETUP EXT NOT USED TERM OFF ON LL INT GL MENU AWC Select the synchronization method of the camera image Set the switch on all cameras to LL Line Lock and match with the V PHASE 墌 Page 26 Setting the switches ...

Page 18: ... in the installation work yourself Ask a professional to do the job since the fall of the unit can result in injuries and accidents When installing the unit on a fixer Pan Tilt unit etc make sure to install it firmly using a rotation preventing hole provided to prevent fall To prevent fall connect the unit to a section with sufficient strength ceiling slab or channel using a fall prevention wire s...

Page 19: ...Mounting from the top Remove the CAMERA MOUNTING BRACKET from the bottom of the camera by removing two fixing screws as shown w Attach the CAMERA MOUNTING BRACKET to the top then mount the camera on the Fixing Unit as shown e Make sure that two original screws are used when mounting the CAMERA MOUNTING BRACKET Be sure to use a 6 mm long locking screw for the camera mounting bracket This camera is ...

Page 20: ...on Too bright Counterclockwise Toward L Too dark Clockwise Toward H MEMO If the sensitivity adjustment LEVEL is turned excessively to L the sensitivity in creases because of the AGC function of the camera and the image looks grainy If the video iris lens is set to too low a level malfunction such as the hunting phenom enon in which the iris opens or closes unintentionally may occur In such a case ...

Page 21: ...steps 3 and 4 two or three times 5 Tighten the back focus locking screw by turning it clockwise Back focus adjustment Be sure to make back focus adjustments when changing the lens mounting method or using a different lens If required adjust it as follows MEMO When the subject is bright the use of an ND filter permits more accurate back focus ad justment The ND filter reduces the amount of incident...

Page 22: ...ayed for approx 0 5 sec When the appropriate white balance is acquired AWC OK is displayed 4 Error message display NG OBJECT Displayed when there is not enough white colour on an object or the colour temperature is not suitable By taking a shot of a white object to fill the screen adjust the white balance again ERROR LOW LIGHT Displayed when the light is low In crease the illumination then re adju...

Page 23: ... to the previous one MENU screen 7 Press the MENU button The screen returns to the normal screen quitting the menu display L A C SE T T I NGS I I R S LE VEL NORMAL A E V RA E G PEAK 8 2 A C G MODE 2 dB 0 S UT H T ER E x DR N RMAL O MODE L L U O X O F F P I O R R I T Y B C L O F F S NS E E UP O F F L A C SE T T I NGS A E V RA E G PEAK 8 2 A C G MODE 2 dB 0 S UT H T ER E x DR N RMAL O I I R S LE VEL...

Page 24: ... E NORMAL EL V L E N ANCE LE NORMAL EL V H P E EST AL LE NORMAL EL V D AU O BL AC K OF F T L C T T I MO O N DE T EC T MO E OFF D L E E L NORMAL V AR A ED I E AL RM T I E M 1 0 s A DE ONSTRA T I N O M CT F A ORY SE NGS T T I CA CE L N CL A W I HOUT T I T LE R T E C DAT A CLEARED L A R AL L E WH I T E BALANC E CONTROL AWC SE T R B M G g T MENU SETTING The flow of menu screen Page 26 Page 30 Page 31 ...

Page 25: ...E I DOUBLE AL ARM COLOUR WH I TE SHUT T R E Ex DR SHUT T ER SPEED SPEED 1 1 2 0 F AST L I M I T E D x E R E D x R L L EV M C AMER A T I T L E 0 1 2 3 4 5 6 7 8 9 ABC DE K L MNO P FG H I J QRS T U VWX Y Z a b c d e k l mn o p f g h i j q r s t u v w x y z T D i s l a y i t l e WIDE T E L E MODE L L U O X O F F P I O R R I T Y B C L O F F S NS E E UP O F F Page 26 Page 31 Page 36 Page 34 ...

Page 26: ...er adjusting H PHASE When it is not set to GL will appear disabling change the set value Set values 0 90 180 270 Fine adjustment of the SC phase in gen lock operation When it is not set to GL will appear disabling change the set value Set values 0 to 255 MENU SETTING SYNC ADJUST Screen This executes the setting regarding synchronization 0 00 0 128 ALC SETTINGS Screen Item Functions and set values ...

Page 27: ...en shooting a subject with difference in a luminous flux density in the screen under a fixed illumination condition and so on During ExDR mode the item M ExDR SPEED on the SHUTTER ExDR screen sets the composing high shutter speed It is possible to set only when the items BLC and SENSE UP are OFF What s more the ExDR LEVEL sets the signal level of the composing high speed shutter A ExDR This is use...

Page 28: ...arly This is displayed as during MANUAL AUTO or A ExDR and cannot be set Set values 1 500 1 1000 1 2000 1 4000 1 10000 1 20000 This sets a maximum gain of the AGC Automatic Gain Control OFF When the AGC function is not used 10dB When luminous energy is insufficient 20dB When luminous energy is extremely insufficient SUPER When brightness is insufficient even when it is set to 20dB If the gain is i...

Page 29: ...he backlight compensation function Set when a bright light source etc is placed in the same direction as the subject If the item SHUTTER ExDR is set to the M ExDR or the A ExDR will appear and the BLC does not function OFF The backlight compensation function does not work AREA 1 to AREA 4 When the SET button is pressed the fixed light metering areas are displayed Select one of the four types Indic...

Page 30: ...signal To make the picture quality harder Increase the value To make the picture quality softer Decrease the value Set values 5 to NORMAL to 5 To adjust the pedestal level of the video signal To brighten picture Increase the value To darken picture Decrease the value Set values 5 to NORMAL to 5 This is set when it is difficult to view a dark part of the image even if gain is boosted by the AGC aut...

Page 31: ...of the image are reversed Set the size of the characters displayed in the case of alarms This sets the colour of an alarm title Set values WHITE YELLOW CYAN GREEN OFF DOUBLE WHITE A L A R M AL ARM NORMAL DOUBLE MOTION DETECT Screen Item Functions and set values Initial value MODE Settings are executed about the motion detecting function that emits alarm signals when there exists any motion in the ...

Page 32: ... to NORMAL to 5 This sets the range in which the motion detecting function works Page 37 This sets the output time of the alarm signal output of AUX terminal as well as ALARM display on the screen when motion is detected If the item MODE is set to OFF will appear and settings cannot be changed Set values OFF 5s 6s 7s 8s 9s 10s 15s 20s 30s 1min MEMO When the MODE item is set to OFF only the alarm s...

Page 33: ...EL No return to the initial value CLEAR Returns set values except titles to the WITHOUT TITLE initial value CLEAR ALL Returns all set values including titles to the initial value Select respective set value and press the SET button Then DATA CLEARED will appear for about 3 seconds Be sure not to switch off the power while the display is still on FACTORY SETTINGS Screen ...

Page 34: ...ess the SET button The EDIT1 screen is brought up 3 Set the upper side and left side of the metering area using the button The sides having marks can be changed 4 Press the SET button The changeable sides of the metering area move to the right side and base side 5 Set the base and right side of the metering area using the button If the SET button is pressed once more the two changeable sides of th...

Page 35: ... button 3 Adjust the hue Press the or button The ı indicator moves in accordance with the setting When a setting is changed the mark appears at the original position 4 Concluding manual white balance ad justment Pushing the MENU button returns the screen to VIDEO ADJUST DE V I O ADJ UST WH TE BAL E AWC NC A I CO OUR L E NORMAL EL V L E N ANCE LE NORMAL EL V H P E EST AL LE NORMAL EL V D AU O BL AC...

Page 36: ...rs to input the title 5 Push the MENU button The screen returns to MODE SELECT Up to 24 characters can be selected as camera text for each camera The set characters are displayed at the bottom of the screen MENU SETTING CAMERA TITLE Setting MODE SELECT CAMERA T I T L E ED I T REV ERS E MODE OF F AL M T I TLE S Z E I DOUBLE AL ARM COLOUR WH I TE MODE SELECT screen CAMERA TITLE screen C AMER A T I T...

Page 37: ...FF in black and white moves 4 Press the SET button The area not subject to detection is set and it turns gray lights up To cancel the set area press the SET button again 5 Repeat items 3 and 4 above 6 Upon completion of setting press the MENU button The screen returns to the MOTION DETECT menu MEMO Indicated positions on the screen are rough guides Be sure to check and conform the positions on the...

Page 38: ...era side connectors Fasten the ferrite core with the wire clamp provided For lens connection Pass the lens cable through the ferrite core twice and connect it to the camera If the LENS cable is short please connect the cable to the camera without winding the cable around the ferrite core Wind twice Ferrite core Video iris lens or galvanometnc iris lens DIMENSIONS Unit mm Specifications 41 1 4 20UN...

Page 39: ...86V p p 75Ω Video S N ratio 50 dB AGC OFF Minimum required illumination 0 8 lx 50 F1 2 AGC 20 dB 0 4 lx 25 F1 2 AGC 20 dB 0 025 lx 50 F1 2 AGC 20 dB SENSE UP 32 Lens mount C CS mount Power supply and power consumption AC24V 60 Hz DC12V 5 5W Ambient temperature 10 C 14 F to 50 C 122 F operation 0 C 32 F to 40 C 104 F recommended Mass 600 1 32 lbs Accessory Instructions 1 Ferrite core 1 4P plug 1 De...

Page 40: ...ww americandynamics net 2004 Sensormatic Electronics Corporation Product specifications subject to change without notice Certain product names mentioned herein may be trade names and or registered trademarks of other companies 8200 0206 17 Printed in Thailand LWT0188 001A H ...

Reviews: