Installation Procedure 09
⑥
⑦
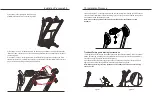
4) As shown in the right figure, lift the running
platform until it is stuck in the air spring sleeve.
5) As shown in step
⑥
of the figure below, fix two moving trundles on the main frame with two
“M6*12 Screws”. (Note: The one side of the moving trundle with nut must face the direction of
the running belt).
6) As shown in step
⑦
of the figure below, install the left and right tail housings on the main
frame with two “ST4.2*16 Bolts”. (As for how to put down the running platform, please refer to
page 10: Treadmill Folding and Moving Instructions).
10 Installation Procedure
⑧
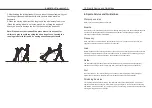
7) As shown in step
⑧
of the figure below, draw the red “Safety lock” into the yellow box on the
console and the installation is completed. Plug in, turn on the power switch below the front end
of the treadmill, and enter standby mode.
Note: Please check again whether all bolts are locked after the assembly of this
treadmill.
Treadmill Folding and Moving Instructions
1. Folding treadmill: Folding up the treadmill can save space. Before folding, turn off the power
switch, pull the plug, and lift the running platform with your hands until the running platform is
stuck by the air spring sleeve. (As shown in figure 1).
2. Putting down the treadmill: Lightly step on the air spring sleeve with your foot as shown in
figure 2 below and the running platform will descend slowly to the ground.
Note: When performing this step, please do not let children be around to avoid being
crushed or hit.
Figure 1
Figure 2


