background image


1.


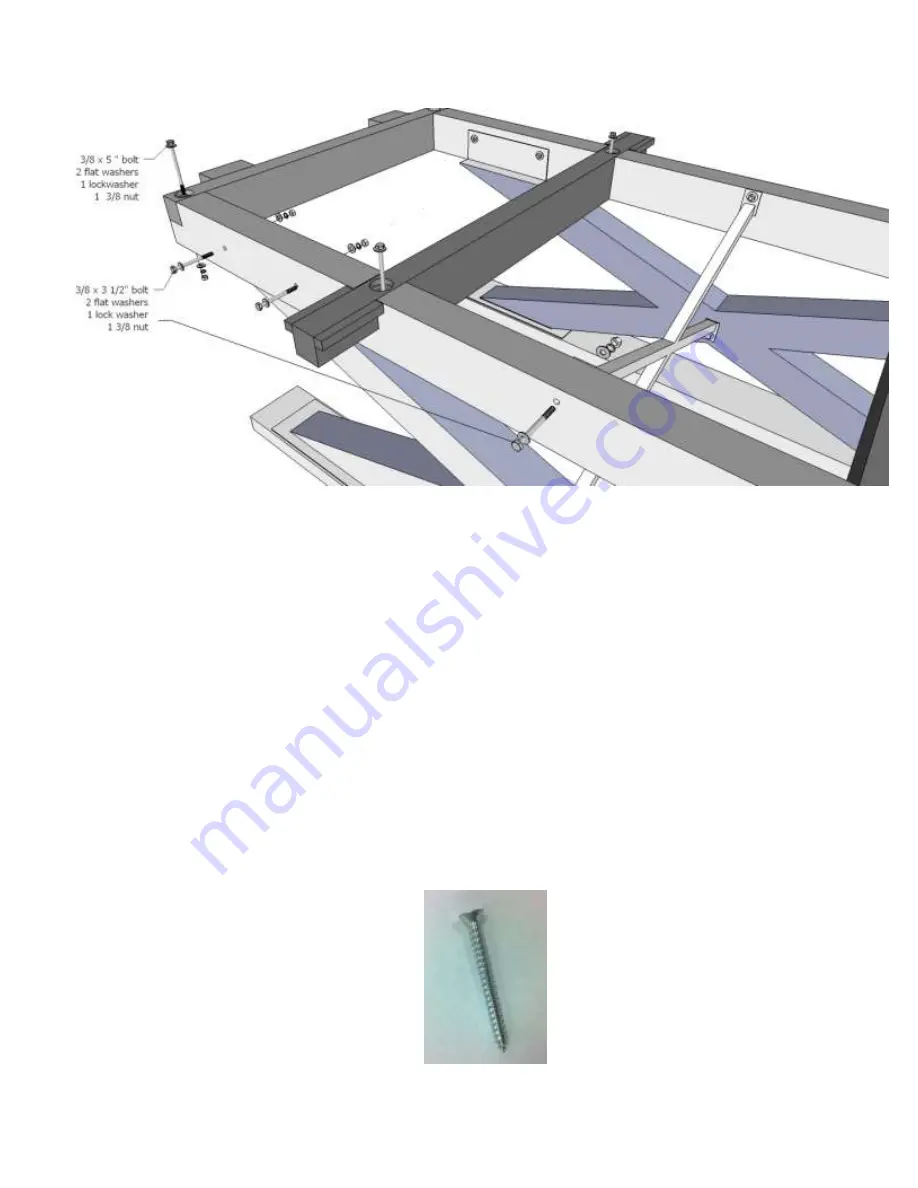
Assemble the Wood Beam Frame without tightening any nuts on top of the Metal Legs. 

2.


Attach the X Connector between the Metal Legs.  Do 

NOT

 tighten the X Connector to the 

Metal Legs. 

3.


Square the Wood Beam Frame to approximately 95”.  Tighten and secure all perimeter bolts. 

4.


Double check to be sure that the Wood Beam Frame is still square. 

5.


Securely tighten the bolts of the X Connector to the Metal Legs. 

6.


Level the Wood Beam Frame to the floor by shimming underneath the Wood Sled Leg Pads. 

7.


Locate the center piece of slate and position it on the cross beam assembly so that it is 

centered to both the length and width of the assembly (you must be very accurate with 

placement). Pre-drill hole through slate screw hole using a 3/16” drill bit.  Vacuum out debris 

and secure using slate screws pictured below (figure 1.A).  Continue with same process with 

both outside sections of slate.  

1.a 


Summary of Contents for QUEST 8' BILLIARD TABLE

Page 1: ...QUEST 8 BILLIARD TABLE ...

Page 2: ...ecurely tighten the bolts of the X Connector to the Metal Legs 6 Level the Wood Beam Frame to the floor by shimming underneath the Wood Sled Leg Pads 7 Locate the center piece of slate and position it on the cross beam assembly so that it is centered to both the length and width of the assembly you must be very accurate with placement Pre drill hole through slate screw hole using a 3 16 drill bit ...

Page 3: ...surface Starting at one end staple cloth to slate framing working from center out toward the pockets stretch cloth toward pockets Go to opposite end of table and repeat process but pull the cloth tight while stapling Repeat on long sides working from center between center pocket and end pocket stretching cloth toward the pockets as you staple Once cloth is completely stapled cut pocket openings by...

Page 4: ...on the rails measuring the overhang on each end Make sure the center pocket opening seam is tight Secure long side blind to cleats using provided screws Be absolutely sure to use only the enclosed blind screws when securing the blinds to each rail incorrect screw length will cause permanent damage to all blinds ...

Page 5: ... by lining up the rail bolt holes in the slate and the cooresponding threaded rods of the rail Hand tighten the rails using the domed washer and nut Dome of washer faces down 14 Slide the end rail blind assembly onto the table making sure both corners align with the side rail blind assemblies Repeat this step for both ends of the table 15 Once all four corners are flush attach the end blind to the...

Page 6: ... 16 Insert the Pocket through the underside of the rail and pull the pocket all the way back towards the outside of the Table Make sure the front of the pocket lines up with the felt on the rails INCORRECT WAY CORRECT WAY ...

Reviews: