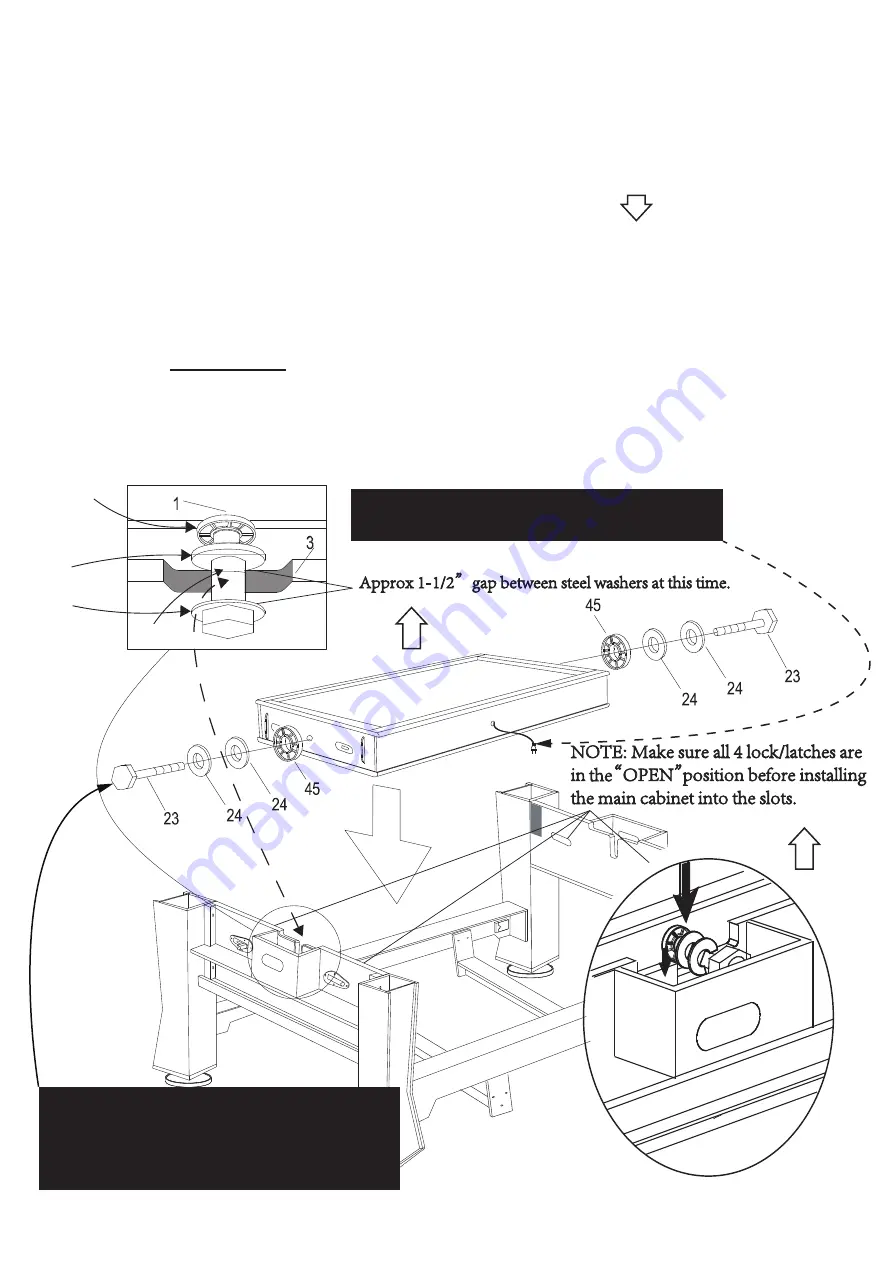
Note: Place main cabinet into frame, Air
Hockey up and cord close to a wall outlet.
Note: Bolt #23 will start into the wood
of the End Panel. Be sure to keep turning
the bolt until it is well started into the
metal insert.
Preparing the pool / air hockey main cabinet for placement into the frame.
The factory installed threaded inserts in the main cabinet inside of each end (#1) cannot be removed,
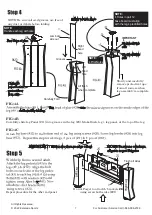
Second, install pivot bolts (#23) into the metal threaded inserts in the ends of the main cabinet.
First, slide 2 pcs 20mm washers (#24) and plastic washer (#45) onto the 20mm hex bolt (#23) as seen below.
Screw the bolt into the steel insert leaving approx 1-1/2 of the hex bolt exposed when the bolt is secured into the
steel threaded insert.
Placing the pool / air hockey cabinet to the base frame: NOTE: USE CAUTION NOT TO PINCH FINGERS.
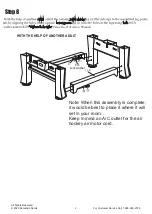
You are now ready to place the main cabinet (#1) onto the base frame. With the help of 4 to 5 other adults, have two adults
on each side of the table top, and the others on the ends to help guide the hex bolts (#23) into the slots on the leg pedestals .
Once in place, make sure the head of the hex bolts (#23) and the 20mm washer (#24) are sticking out past the leg panel.
Make sure the plastic washer (#45) is against the main cabinet (#1) as it will act as the spacer for the table to rotate freely.
To secure the table top to the leg panel use the wrench (#28) provided. Tighten each of the 20mm hex bolts (#23) on each
end of the leg panel, snug tighten only. This will lock the table top to the base frame, and still allow the table top to rotate
freely. When rotation is complete, engage all 4 latch/locks.
Main Cabinet
CAREFULLY LIFT THE MAIN CABINET FROM EACH SIDE (NOT ENDS) TO PLACE THE INTO THE END PEDISTAL LEGS
4 TO 5 CAPABLE ADULTS REQUIRED!
Plastic
washer #45
#24
Pilot bolt
#23
Cabinet
Steel flat washer
each side
Cradle
End apron
©
202 2 Escalad e Sports
Fo r Custome r Servic e Cal l 1-888-996-2729
11
All Rights Reserved.
Step 11
(Heavy)


